
The last few weeks, I’ve covered how to use Gatsby with WordPress, and with JSON files. Today, I’m going to show you how you can use Gatsby with Craft CMS.
Craft CMS is a flexible, feature-rich content management system. One of the major differences between WordPress and Craft CMS is that the latter relies on matrix fields in stead of a regular WYSIWYG editor. This allows you to add multiple types of content to a single post.
In addition, it doesn’t rely on certain templates like WordPress does, and thus, gives designers and developers more of a clean slate when it comes to customization.
Another nice thing is that it comes with GraphQL support out of the box. That means we can easily integrate it with Gatsby.

Configuring the GraphQL schema
By default, Craft CMS already exposes a public GraphQL schema to the public. This schema only exposes a “ping” endpoint, and wouldn’t be useful for our purpose.
To configure what’s exposed, you first have to go to the Craft CMS dashboard. Within the dashboard, you have to select GraphQL and then Schemas. In here, you can either select the Public Schema, or create a new one and apply authentication.

After selecting or creating a schema, you can change the exact scope of what’s being exposed. In my case, I’ve exposed all blog entry types, and the assets.
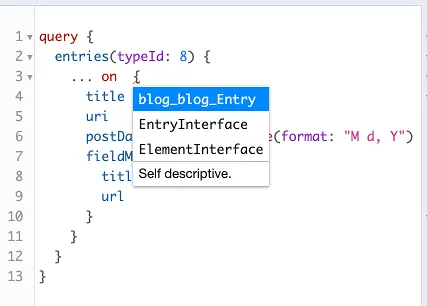
Once changed, you can try writing a query by going to GraphQL and then selecting Explore.
The queries you can execute, depend mostly on what you enabled, and what type of entities you use on Craft CMS. In my case, I can fetch all blogposts with their featured image by using the following query:
query {
  entries(typeId: 8) {
    ... on blog_blog_Entry {
      title
      uri
      postDate @formatDateTime(format: "M d, Y")
      fieldMedia {
        title
        url
      }
    }
  }
}
Important to know is that the type blog_blog_Entry depends on what entry types you declared. Normally, Craft CMS will provide an autocomplete containing which types are available.
Now that you know how to change the schema and execute queries, it’s time to get started with Gatsby.
Setting up a Gatsby project
As usual, a new Gatsby project can be created with the Gatsby CLI:
gatsby new my-craft-cms-blog
After the CLI created your project, we first have to install the gatsby-source-graphql dependency. This dependency allows us to use third-party GraphQL schemas with Gatsby.
cd my-craft-cms-blog
npm install --save gatsby-source-graphql
After that, you’re ready to start developing.
Configuring Gatsby
The first step when setting up Gatsby, is to configure the plugins you’re using. Since we just installed the gatsby-source-graphql plugin, we’ll have to configure it first.
To do this, open gatsby-config.js. In here, add a new entry to the plugins section. For example:
{
  resolve: `gatsby-source-graphql`,
  options: {
    typeName: 'CraftAPI',
    fieldName: 'craftAPI',
    url: 'https://example.org/actions/graphql/api'
  }
}
In case you’re using a private schema, you’ll have to copy over the access token, and use it like this:
{
  resolve: `gatsby-source-graphql`,
  options: {
    typeName: 'CraftAPI',
    fieldName: 'craftApi',
    url: 'https://example.org/actions/graphql/api',
    headers: {
      Authorization: `Bearer ${process.env.AUTHENTICATION_TOKEN}`
    }
  }
}
Now you’ll be able to run the application using npm start. If you’re using an authentication token, you can use:
AUTHENTICATION_TOKEN=my-token npm start
Creating an index page
Once you’ve set up your Gatsby project, and it’s up and running, it’s time to explore the page components. By default, you’ll get an index.js and a page-2.js file within the src/pages folder.
We don’t really need the “page-2.js” file, so let’s look at the “index.js” page in stead. By default, it has some dummy content, but in our case, we would prefer to show a list of all of our Craft CMS entries.
To do this, we can write a query like this:
const allEntriesQuery = graphql`
  {
    craftApi {
      entries {
        ... on CraftAPI_blog_blog_Entry {
          id
          title
          uri
          postDate
          fieldMedia {
            url
          }
        }
      }
    }
  }
`;
This query looks almost identical to the one we used before. One important difference is that you’ll have to use the name configured within fieldName as the operation you want to use. In my case, I configured it as craftApi, and thus, I have to call it that way.
Additionally, Gatsby prefixes all types using the typeName configuration. In my case, I called it CraftAPI and thus, blog_blog_Entry now became CraftAPI_blog_blog_Entry.
To actually use the query within the index page, we can use the useStaticQuery() React hook. This hook is provided by Gatsby, and will return the response of the call.
In my case, I’m interested in looping over all entries, and thus I wrote the following within the IndexPage component:
const {craftApi: {entries}} = useStaticQuery(allEntriesQuery);
Once done, you can use the entries in a normal React component. For example, I defined a <Post/> component, and called it like this:
{entries.map(({id, title, uri, postDate, fieldMedia: [{url: mediaUrl} = {}] = []}) => <Post
  key={id}
  title={title}
  uri={uri}
  postDate={postDate}
  mediaUrl={mediaUrl}
/>)}
Sadly, directives from the original schema aren’t stitched together with the schema provided by Gatsby, and thus, the @formatDateTime directive can’t be used. Neither does Gatsby recognize this field as a date type, and thus Gatsby’s date filtering doesn’t work here either.
In my case, I ended up using Intl.DateTimeFormat() to format the given date. Libraries like Moment.js could also solve this problem for you, but are a bit more heavy-weight.
const dateFormat = new Intl.DateTimeFormat('en-US', {
  year: 'numeric',
  month: 'long',
  day: 'numeric'
});

export const Post = ({title, uri, postDate, mediaUrl}) => (
  <Link to={uri}>
    <img src={mediaUrl} alt="Featured media"/>
    <h2>{title}</h2>
    <time>{dateFormat.format(new Date(postDate))}</time>
  </Link>
);
If you’re done with the component, and you add some CSS, you could end up with a result like this:
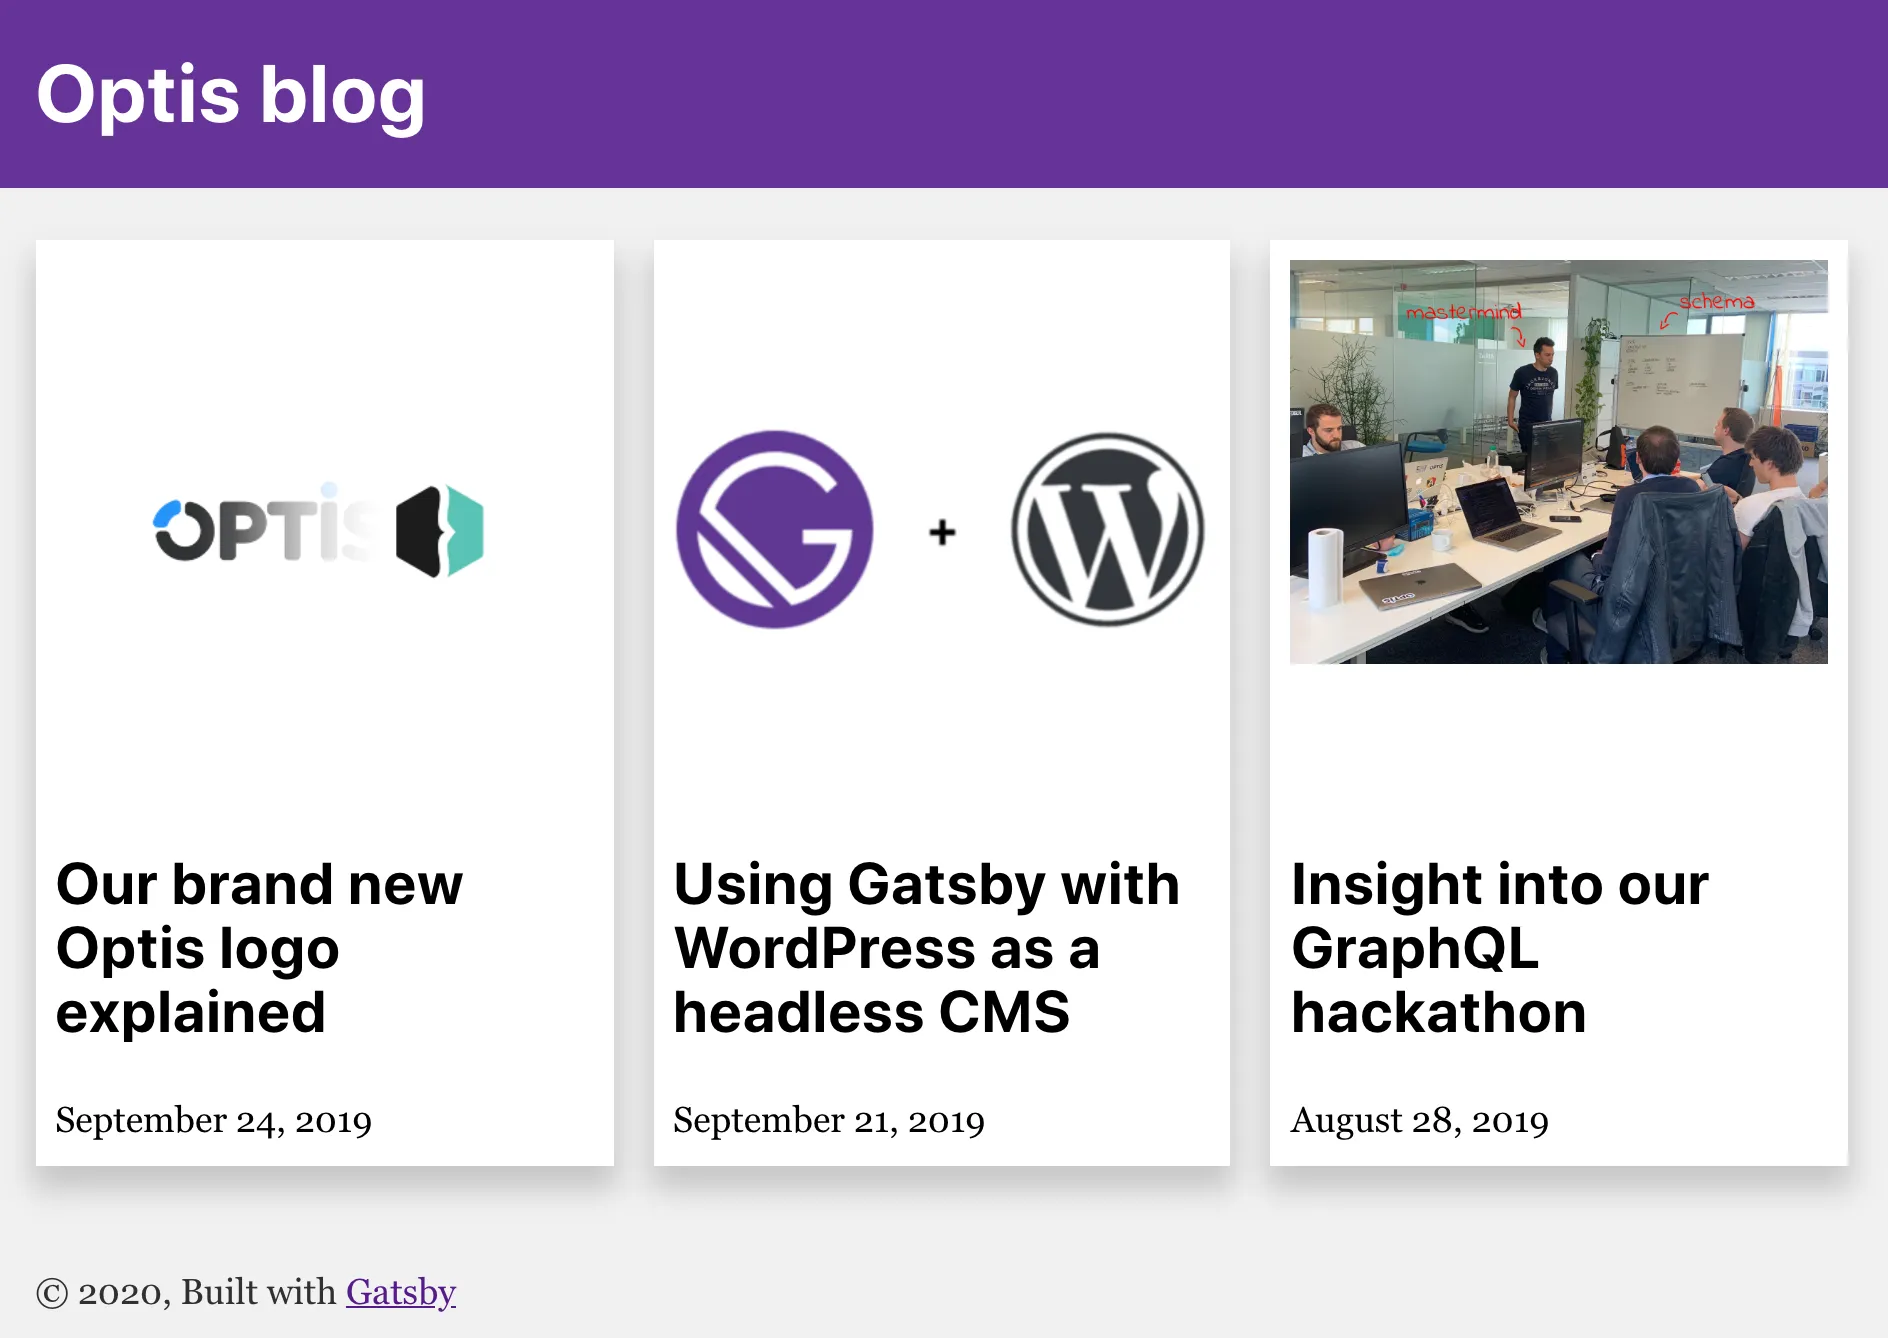
This is a copy of the blogposts from the website of the comany I work for, optis.be.
If you’re experiencing any diffulties when fetching the fieldMedia field, make sure that you enabled retrieving assets within the GraphQL schema.
Adding new pages
While the index page works fine now, clicking any article results in a 404 page. This happens because Gatsby isn’t aware yet about the pages we want to declare.
To do this, we can use the createPages API within the gatsby-node.js file. I’ve explained this more in detail in my tutorial about dynamically creating new pages.
In my case, I want to create a page for every blogpost, so I’ll be using a similar query as I wrote before:
const allEntriesQuery = `
  {
    craftApiApi {
      entries {
        ... on CraftAPI_blog_blog_Entry {
          id
          uri
        }
      }
    }
  }
`;

exports.createPages = ({graphql, actions: {createPage}}) => {
  return graphql(allEntriesQuery).then(({errors, data: {craftApi: {entries}}}) => {
    if (errors) throw new errors;
    return entries.map(({id, uri}) => createPage({
      path: uri,
      component: path.resolve('./src/templates/post.js'),
      context: {id: parseInt(id)}
    }));
  });
};
This setup will generate a new page for every post, based on the src/templates/post.js template.
Creating the detail page
Since we don’t have a detail page yet, I’m going to copy the contents of the index.js page to a new file called src/templates/post.js.
Now, the next step is to fetch the data. Within the index page, we used the useStaticQuery() React hook to get our data. This way of fetching data, will no longer work, as we’re not dealing with a static query.
In this example, we’ll have to fetch the entry with a given ID. With Gatsby, we can do that by exporting a field called query:
export const query = graphql`
  query ($id: [Int]) {
    craftApi {
      entries(id: $id) {
        ... on CraftAPI_blog_blog_Entry {
          title
          postDate
        }
      }
    }
  }
`;
The nice part about Gatsby is that it automatically injects parameters passed to the context (see gatsby-node.js) as a variable to the given query. In my case, I declared the id field onto the context, and thus, the above query will be all we need to fetch the data.
Getting the detail blocks
As I’ve mentioned at the beginning of this article, the way entries are created with Craft CMS, isn’t through a normal WYSIWYG editor. In stead of that, you’ll have to declare various types of blocks within each entry.
To be able to create a complete remake of a detail page within Gatsby, we’ll have to fetch all these blocks. We can do this by querying the fieldContent field within each entry. For example:
export const query = graphql`
  query ($id: [Int]) {
    craftApi {
      entries(id: $id) {
        ... on CraftAPI_blog_blog_Entry {
          title
          postDate
          fieldContent {
            ... on CraftAPI_fieldContent_itemTitle_BlockType {
              id
              itemTitle
            }
            ... on CraftAPI_fieldContent_itemText_BlockType {
              id
              itemText
            }
            ... on CraftAPI_fieldContent_codeBlock_BlockType {
              id
              code
            }
            ... on CraftAPI_fieldContent_itemLink_BlockType {
              id
              itemLink
            }
            ... on CraftAPI_fieldContent_itemMedia_BlockType {
              id
              itemMedia {
                title
                url
              }
            }
          }
        }
      }
    }
  }
`;
In this example, I’m using five different content block types, being titles, text, code, media and links.
To properly render all these different blocks, I created a new component called <PostContent/>, which will do the heavy lifting:
export const PostContent = ({fieldContent}) => (
  <>
    {fieldContent.map(({id, itemTitle, itemText, code, itemLink, title, itemMedia}) => {
      if (itemTitle != null) return <h2 key={id}>{itemTitle}</h2>;
      else if (itemText != null) return <div key={id} dangerouslySetInnerHTML={{__html: itemText}}/>;
      else if (code != null) return <pre key={id}>{code}</pre>;
      else if (itemLink != null) return <a key={id} href={itemLink}>{title}</a>;
      else if (itemMedia != null) return <img key={id} src={itemMedia[0].url} alt={itemMedia[0].title}/>;
      else return null;
    })}
  </>
);
Depending on which field isn’t null (or undefined), we can determine the block type, and determine which tags we’ll use. For example, for a title block we’ll use a <h2/> element, for a code block a <pre/> element and so on.
Since the itemText field can contain HTML code, it’s recommended to use the dangerouslySetInnerHtml={{__html: itemText}} attribue.
Using the data within the post template
Earlier on, we exported a query within the post.js template. The data that is being fetched in such cases will be available as a parameter within your component.
This allows you to utilize the <PostContent/> component I wrote earlier on:
const PostPage = ({data: {craftApi: {entries: [{title, postDate, fieldContent}]}}}) => {
  return (
    <Layout>
      <SEO title={title} />
      <div className="content">
        <h1>{title}</h1>
        <time>{dateFormat.format(new Date(postDate))}</time>
        <PostContent fieldContent={fieldContent}/>
      </div>
    </Layout>
  );
};
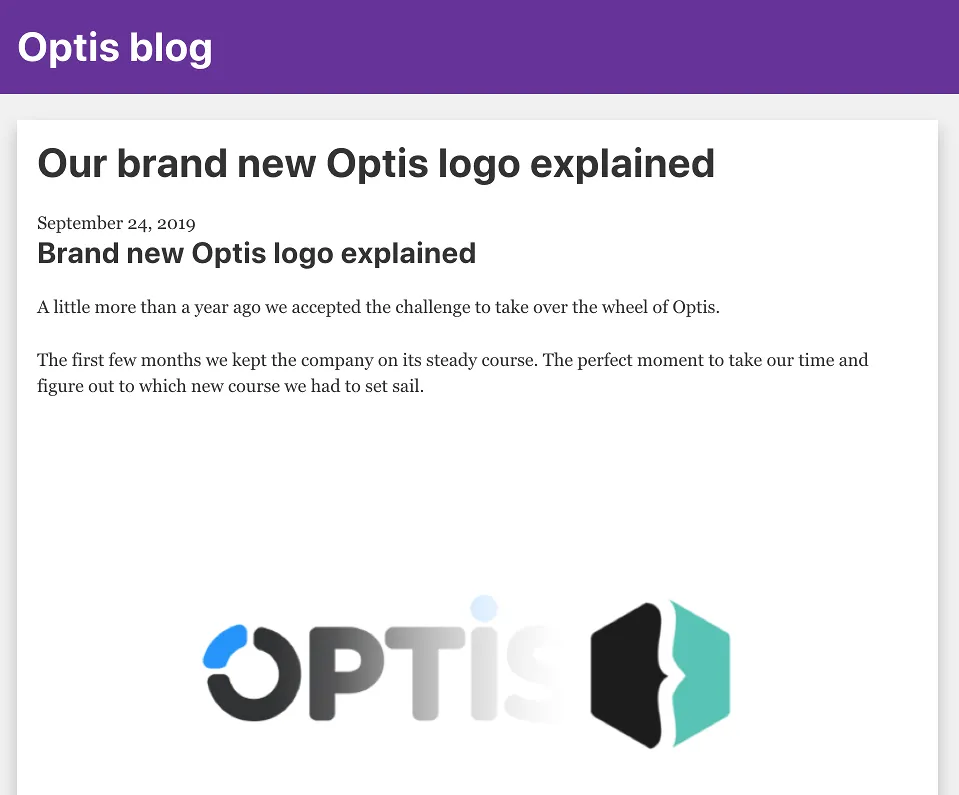
If you run the application now, you’ll see that clicking on a detail page results in the page properly being rendered:
And there you have it, you’re now able to build a blazing fast static website on top of Craft CMS.