
In this simple project I will demonstrate you how you can create your own widget. In this tutorial we will handle several principles/patterns that are commonly used in Dojo. The following topics will be handled:
- Modularity
- Dojo inheritance
- Templating, attach points and events
- Internationalization
- Scoping using hitch
Project structure
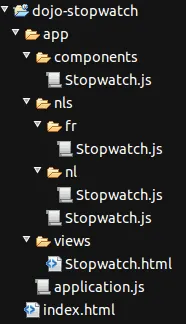
To start our project you need a HTML file (index.html) and a folder called app that will contain all our JavaScript. In this folder you can create a folder called components, views and nls. These folders will contain a different aspect about our application:
- Components: Widget business logic or module
- Views: Widget template (as an HTML template)
- nls: This folder will contain localized information (like labels, messages, …)
Heads up! Dojo uses an entire different project structure in their code. Dojo uses a folder called resources that will contain both the localized content as the views.
If you created all these folders, you can now create the files that are necessary to make our widget work. In this tutorial I will create a simple stopwatch widget, so you can create a file called Stopwatch.js in your components directory. You can also create a file called Stopwatch.html in the views directory.
The localized folder is a bit different. First you need to create subfolders in your nls folder for each locale you want to handle. In my example I will be writing localized messages in Dutch (nl) and French (fr). The default locale will be English, so we don’t need a folder for that (unless you want to use a different default locale). If you don’t know the locale-code of a certain language, you can try looking it up at Wikipedia. You will need to look at the ISO 639-1 column. Now you can create a file called Stopwatch.js in the nls directory and each subdirectory you created.
The last step is to creat our main JavaScript file called application.js which should be added to the app directory. If you created all these folders and files, your project should look similar to the screenshot below.
Template
The easiest part to start with is usually the template (because you know how you want to make your widget look like). In this example I will be creating a stopwatch, so I need a field to display the hours, minutes, seconds and milliseconds. I also want to add a Start/Stop/Resume button and a Reset button. Our entire template will look like this:
<div class="${baseClass} dijitInline" data-dojo-attach-point="containerNode">
    <p class="dijitInline">
        <span data-dojo-attach-point="hoursNode">00</span> :
        <span data-dojo-attach-point="minutesNode">00</span> :
        <span data-dojo-attach-point="secondsNode">00</span> ::
        <span data-dojo-attach-point="milliNode">000</span>
    </p>

    <button data-dojo-type="dijit/form/ToggleButton" data-dojo-attach-point="startBtn"
        data-dojo-attach-event="onChange: onStart">${__nls.start}</button>
    <button data-dojo-type="dijit/form/Button" data-dojo-attach-point="resetBtn"
        data-dojo-attach-event="onClick: onReset" data-dojo-props="disabled: true">${__nls.reset}</button>
</div>
Don’t worry if you don’t get all this stuff, I will explain all of these now. The first thing we need to know is that a widget can only have a single root DOM node. In this example I will wrap all my HTML code in a single <div>, which will be our root node. As you can see we gave this <div> a class called dijitInline. This classname is used to style our widget properly. When you use this classname, the widget will be inline, which means that if you put something after our widget, it will be placed on the same line (otherwise it would start on a new line). Another classname we used is ${baseClass}. This is actually not a real classname, but it’s a placeholder. When rendering the template (to the actual HTML), it will replace all placeholders with properties of the business logic of the module. In this case, it will be replaced by a property called baseClass.
We also used the data-dojo-attach-point attribute. This is a attribute commonly used in templates in Dojo. When you want to modify a DOM node, you usually give it an ID and use that ID to modify it. However, because our widget should be reusable (and IDs should be unique), we will use attach points to manipulate our DOM nodes. These attach points will give us the opportunity to retrieve the DOM node from our widget business logic, I will talk about this later as well.
The next thing you see are several <span> DOM nodes. Each of these nodes will represent a part of our time (the hours, minutes, seconds and milliseconds). As you can see we gave these nodes an attach point as well, because we will change them later on.
The final part are our two buttons, the first button is a dijit/form/ToggleButton. This is a button that can be toggled like a checkbox (on/offf). We want to “do something” when the button is toggle, so that’s why we use the data-dojo-attach-event attribute. The onChange event will be executed when the button is toggled and returns a boolean parameter (on/off state). As you can see we connect this event to an event handler called onStart.
Next to the data-dojo-attach-event and the data-dojo-attach-point attributes which I explained already, we also use an attribute called data-dojo-type. This will contain the widget type that we will be using. When the template is rendered, it will be converted to a ToggleButton widget (in stead of a normal <button>).
We do a similar thing with the reset button. The only difference is that this is a normal dijit/form/Button which has no on/off state. This means we don’t need the onChange event but the onClick event that is called when the button is clicked. Another difference is that we also have an attribute called data-dojo-props. This attribute will allow us to set properties of the widget, in this case we disable the button by default by using the disabled property.
For both buttons we will use a placeholder as the name of the button, ${__nls.start} and ${__nls.reset}. If you only want to provide your widget in English, you can also just enter the English labels right there and don’t use placeholders.
Localization
The next part of this tutorial is providing our widget with some localized messages. Our widget will contain a start, stop, reset and resume label for our buttons. The first file we need to change is the JavaScript file in the nls directory. It will have the following structure:
define({
    root: {
        start: "Start",
        stop: "Stop",
        reset: "Reset",
        resume: "Resume"
    },
    nl: true,
    fr: true
});
As you can see it has several properties, the first one being root which contains the default localized labels, in this case in English. Below this property we list all locales we want to implement, in this case nl (Dutch) and fr (French).
The next file we will edit is the JavaScript file in the fr directory. This one will look a bit different to the previous resource file.
define({
    start: "Commence",
    stop: "Arrêt",
    reset: "Remet",
    resume: "Recommence"
});
This file contains translations of each property we listed before. Be sure that the names of the properties (start, stop, reset and resume) are the same. Now we need to do a similar thing in the nl directory, but containing our Dutch translations.
define({
    start: "Start",
    stop: "Stop",
    reset: "Reset",
    resume: "Hervatten"
});
You can repeat this for each locale you want to implement, just make sure that you translate all properties and that you add the locale to the JavaScript file in the nls directy, for example de: true.
This ends the first part of this tutorial. In the next tutorial we will start with our module.