
In the previous tutorials we wrote our entire module using Dojo. In this tutorial I will finish the entire application by providing a HTML page and giving a demonstration of the application.
Finishing our code
We finally finished to stopwatch module, if you missed anything or you want to make sure your code is correct, you can copy or verify it with the code below.
define([
    "dojo/_base/declare", "dojo/_base/lang", "dojo/number",
    "dojo/text!../views/Stopwatch.html", "dojo/i18n!app/nls/Stopwatch",
    "dijit/_WidgetBase", "dijit/_TemplatedMixin", "dijit/_WidgetsInTemplateMixin",
    "dijit/form/ToggleButton", "dijit/form/Button"
], function(declare, lang, NumberUtils, template, nls, _WidgetBase, _TemplatedMixin, _WidgetsInTemplateMixin) {
    return declare("app.components.Stopwatch", [_WidgetBase, _TemplatedMixin, _WidgetsInTemplateMixin], {
        templateString: template,
        baseClass: "dijitStopwatch",
        declaredClass: "app.componnents.Stopwatch",
        updateRate: 30,

        __SECMS: 1000,
        __MINMS: 1000 * 60,
        __HRSMS: 1000 * 60 * 60,

        __nls: nls,

        __currentTime: 0,
        __pauseTime: 0,
        __timer: null,
        __started: false,

        onStart: function(newValue) {
            if (newValue && !this.__started) {
                this.__start();
            } else if (!newValue && this.__started) {
                this.__stop();
            } else {
                this.__resume();
            }
        },

        onReset: function() {
            this.__pauseTime = 0;
            this.__started = false;
            this.__render(0);
        },

        __getTime: function() {
            return new Date().getTime();
        },
        __start: function() {
            this.__started = true;
            this.__currentTime = this.__getTime();
            this.__startTimer();
        },
        __startTimer: function() {
            this.__pauseTime = 0;
            this.startBtn.set("label", nls.stop);
            this.resetBtn.set("disabled", true);
            this.__timer = setInterval(lang.hitch(this, "__render"), this.__SECMS / this.updateRate);
        },
        __stop: function() {
            clearInterval(this.__timer);
            this.startBtn.set("label", nls.resume);
            this.resetBtn.set("disabled", false);
            this.__pauseTime = this.__getTime();
        },
        __resume: function() {
            if (this.__pauseTime !== 0) {
                this.__currentTime += (this.__getTime() - this.__pauseTime);
            }
            this.__startTimer();
        },
        __render: function(milli) {
            if (milli === undefined) {
                milli = this.__getTime() - this.__currentTime;
            }
            var hrs = milli / this.__HRSMS;
            milli = milli % this.__HRSMS;
            var mins = milli / this.__MINMS;
            milli = milli % this.__MINMS;
            var secs = milli / this.__SECMS;
            milli = milli % this.__SECMS;

            this.hoursNode.innerHTML = this.__format(hrs, "00");
            this.minutesNode.innerHTML = this.__format(mins, "00");
            this.secondsNode.innerHTML = this.__format(secs, "00");
            this.milliNode.innerHTML = this.__format(milli, "000");
        },
        __format: function(value, pattern) {
            return NumberUtils.format(value, {
                pattern: pattern
            });
        },

        postCreate: function() {
            this.inherited(arguments);
            this.__render(0);
        }
    });
});
The next step is that we’re going to use the widget. First open up your index.html file and put the following content in it:
<!DOCTYPE HTML PUBLIC "-//W3C//DTD HTML 4.01 Transitional//EN" "http://www.w3.org/TR/html4/loose.dtd">
<html xmlns="http://www.w3.org/1999/xhtml">
    <head>
        <meta name="viewport" content="width=device-width,initial-scale=1,maximum-scale=1,minimum-scale=1,user-scalable=no" />
        <meta http-equiv="Content-Type" content="text/html; charset=UTF-8" />
        <title>Dojo Stopwatch</title>
        <link rel="stylesheet" href="http://ajax.googleapis.com/ajax/libs/dojo/1.9.1/dijit/themes/claro/claro.css" />

        <script type="text/javascript">
            dojoConfig = {
                parseOnLoad : true,
                async: true,
                packages: [{
                        name: 'app',
                        location: location.pathname.replace((/\/[^/]+$/, '') + 'app'
                }]
            }
        </script>

        <script src="http://ajax.googleapis.com/ajax/libs/dojo/1.9.2/dojo/dojo.js"></script>
    </head>
    <body class="claro">
        <input data-dojo-type="app/components/Stopwatch" />
        <input data-dojo-type="app/components/Stopwatch" data-dojo-props="updateRate: 1" />

        <script type="text/javascript" src="app/application.js"></script>
    </body>
</html>
If we look at the <head>, we notice several things, the first thing is that we load a CSS file called claro.css. This is one of the default themes for Dojo that can be used.
The next thing to notice is that we have a script that initializes a global variable called dojoConfig, this actually configures the Dojo loader. We use it to make sure that declarative widgets are automatically loaded when the page is loaded (using parseOnLoad), to make sure that modules and other files are called asynchronously (async) and we also define our app package here. This one is probably the most difficult one. By default, Dojo will look for packages in folder relative to the Dojo loader. However, because we’re using a CDN, our package is not relatively positioned to the Dojo loader, so we have to make an absolute URL (containing the hostname as well). To retrieve the hostname, we use a regex: location.pathname.replace((/\/[^/]+$/, '') which makes sure that the app package can be found.
Then the next part is the <body>. The first thing to notice is that we added a class called claro. To use a Dojo theme, you have to mark a parent with this class name, usually this classname is placed on the <body> tag. We then declaratively write our widget by using the data-dojo-type attribute (as we did for the buttons). We have two stopwatches here, the first one being the normal one, and the second one is using data-dojo-props to override the updateRate property of our module so that it will actually only update once every second.
Main JavaScript
We now implemented most files except our main JavaScript file that could be found in the app directory. Don’t worry, this is actually the smallest file of all:
require(["app/components/Stopwatch", "dojo/parser"]);
Just like when we did with the dijit/form/ToggleButton and dijit/form/Button modules, we have to import the modules we use in our declarative markup, this time being our stopwatch. As you can see here, we use require() in stead of define(). define() is actually only used when defining modules. It allows you to return an object (the module itself) while require() doesn’t. You always need a main JavaScript file with a require(). It’s this function that will start loading all depending modules and widgets for the entire application.
The next thing we need is the dojo/parser module. This module is actually responsible of parsing the HTML, looking for declarative markup of widgets and create them. Because we use parseOnLoad, we need to provide this module as well.
Demo
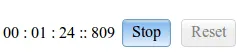
We finally finished our application and we can go and test it out. Just open your browser and open your index.html file and you should see something similar as in the screenshot below.

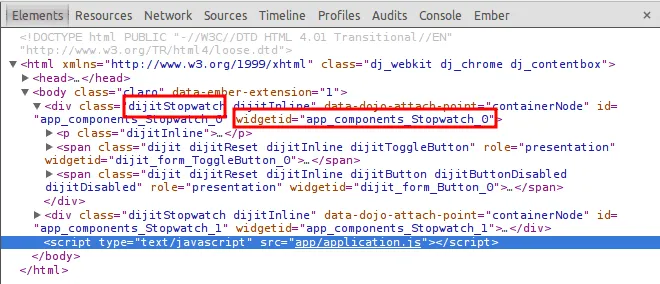
As you can see, they’re both on the same line thanks to the dijitInline class. If you open up your inspector or develoer tools (usually F12), you will see that it replaced ${baseClass} and gave your widget an id and widgetid attribute similar to your declaredClass.
Finally we can start playing around with our widgets. You will notice that the second one only updates every second as we defined. But be aware, because our operations take time as well, you will see that it takes a bit longer than 1 second. it will actually try to run the code as soon as the interval is over. If you clicked the start button, you will see that the label of our button changed to Stop and that it looks pressed now (it’s toggled on). If we click on the Stop button, you will notice that it enables the Reset button, giving you the option to resume or to reset and start over.
If you change the locale/language of your browser, you can see that in other languages the widget will show other labels thanks to the dojo/i18n plugin.

Achievement: Tutorial finished
This ends our small series about writing a widget using Dojo. If you’re interested in the full code example, you can find it on GitHub as well as the demo. If you want to try out the code yourself, you can download an archive from Github.