
Last time, we implemented our pokémon detail view by using routing to switch between the overview and the detail. However, currently we still have the same title across our entire application. Usually when you have an application with multiple pages, you want to change the page title depending on the page the user visits.
The problem
When you’re not using single page webapps, it’s pretty easy to do this by just changing the <title> for that page. However, now that we’re using Angular 2 and components, we have to look for a different solution. Our component is responsible only for a small part of the page, and it isn’t responsible for the <head>. The proper way to implement this would be to use a service. Luckily, Angular already has such a service, called Title.
Using Title
Let’s open PokemonInfoComponent by opening pokemon-info.component.ts. The first step when we’re using a service is to add it to the constructor. Currently I’m already using the PokemonService and ActivatedRoute services, so I just have to add another one:
constructor(private _route: ActivatedRoute, private _service: PokemonService, private _titleService: Title) {
}
Obviously, we also have to import Title:
import {Title} from '@angular/platform-browser';
Refactoring our ngOnInit()
If we want to show the ID and the name of the pokémon in the title, we’ll have to subscribe to the following:
ngOnInit() {
  this._route.params
    .map(params => params['id'])
    .flatMap(id => this._service.findOne(id))
    .subscribe(pokemon => this.pokemon = pokemon);
}
However, currently we already have a subscriber. Either we put another line of code into the subscribe(), or we refactor it so that the observable itself is stored in a variable and then we subscribe to it twice:
ngOnInit() {
  let observable = this._route.params
    .map(params => params['id'])
    .flatMap(id => this._service.findOne(id));
  observable.subscribe(pokemon => this.pokemon = pokemon);
  observable.subscribe(pokemon => this._titleService.setTitle(`#${pokemon.baseInfo.id} - ${pokemon.baseInfo.name}`));
}
However, if we use this code, it will actually call our service twice. To share the same observable, we have to use the Observable.share() operator. For example:
ngOnInit() {
  let observable = this._route.params
    .map(params => params['id'])
    .flatMap(id => this._service.findOne(id))
    .share();
  observable.subscribe(pokemon => this.pokemon = pokemon);
  observable.subscribe(pokemon => this._titleService.setTitle(`#${pokemon.baseInfo.id} - ${pokemon.baseInfo.name}`));
}
Resetting the title
We have one issue now though, when we view a pokémon and go back to our overview, the page title remains the same. We have to find a way to reset this somehow. We can either add the Title service to all components, but this time I want to wait until a route changes to change the title to “Pokédex”.
To do that, I’m going to open app.component.ts and I’m going to import both Title and Router:
constructor(private _titleService: Title, private _router: Router) {

}
With the Router we can listen to events, and one of these events is the NavigationStart event which will be fired when we start navigating to a specific route:
ngOnInit() {
  this._router.events
    .filter(event => event instanceof NavigationStart)
    .subscribe(event => this._titleService.setTitle('Pokédex'));
}
As usual, make sure you don’t forget to import both Title, Router and NavigationStart:
import {Router, NavigationStart} from '@angular/router';
import {Title} from '@angular/platform-browser';
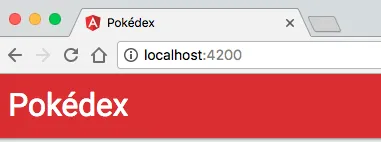
If we open the application now, you can see that the title is “Pokédex”.
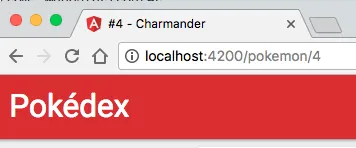
However, when we click the “View” link next to a Pokémon, we can see that the title changes for that specific Pokémon:
If you’re wondering why it takes so long to show that title, well, that’s because we first have to call the PokéAPI to retrieve the name of the pokémon before we can actually show it. If you don’t want this delay, you should probably send that data with your route, or use a service to store that info temporarily.
Anyways, that wraps up this article. Next time we’ll talk about defining your own pipes.
Achievement: Master of titles
If you’re seeing this, then it means you successfully managed to make it through this tutorial. If you’re interested in the code, you can check it out at Github.