In this second part of the tutorials series about introducing AngularJS I’m going to talk about filters and factories. In the first part we made our first AngularJS application and wrote a small controller. What we learned in that tutorial is that AngularJS biggest trump is that it has two way data binding, which means that the data is bound in two ways:
- When changing a value in your model, the view (for example a textbox) updates with that value
- When changing your view (for example typing inside a textbox), the value in your model changes as well
Because of this, we can decouple our HTML code from our logic, something that was way harder to achieve by just using plain JavaScript or jQuery.
Enough summarizing, in this second tutorial I’m going to talk about filters and services. Filters can be used to convert or filter a specific input to another output, for example you can order an array, convert all letters to uppercase, convert to JSON, … . All of these “convert”-things should be written as a filter. When writing applications, you usually have more than just a simple view + model and something that controls them. You also have functionality to persist and retrieve data, you have utilities to change certain things, … . Everything you don’t write in your controller, should be written in a service, factory, … .
FiLTEring
Sorry for the weird title, but this actually explains what we’re going to do today. If we enter an artist or song title, we can use uppercase letters, lowercase letters all together and make a really weird looking application.
So what I’m going to do now is convert the artist/title to a more appropriate form where every letter is in lower case except the first letter of each word which we will capitalize. So, if you didn’t see it, I marked the word “convert” which may already ring a bell (and if it didn’t, just read the title again). Yes! We’re going to write a filter. But before we start writing a filter, we have to open up app.js again and just like the myApp.controllers package, we’re also going to add the myApp.filters package, just like this:
angular.module("myApp", [
  'myApp.filters',
  'myApp.controllers'
]);
if you did that, you can open filters.js and start by defining the myApp.filters package just like we did with the controllers:
angular.module("myApp.filters", [])
Now we’re going to start by writing a filter, just like a controller we append it to the previous statement like this:
angular.module("myApp.filters", []).filter("titleize", function() {
  // Write code here
});
So in this case we made a filter called titleize. Now we only have to implement it. A filter is nothing more than a function which accepts the input as the parameter and returns the (converted) output. In this case we will get:
return function(input) {
  return _.titleize(input);
};
And yes, we now wrote our first filter! What happens here is that we return the “convert” function, which converts the input String (parameter input) to something else, in this case _.titleize(input);. The titleize function is part of the underscore.string library and converts strings like “this IS a sTRIng” to “This Is A String” which looks way better. It might not be appropriate for all artists/bands, but hey, it’s just a tutorial!
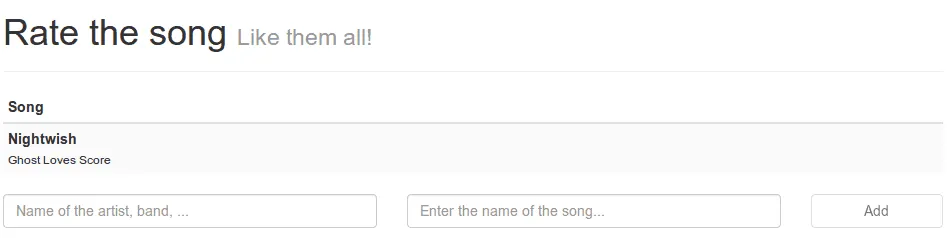
So now we can open up our index.html page and use the filter where we want. Just locate the {{song.artist}} and {{song.title}} placeholders and replace them by {{song.artist | titleize}} and {{song.title | titleize}}. When we use the pipe character (”|”), then we say that we want to filter the stuff on the left, by the filter on the right, so in this case we say “titleize the title of the song”.
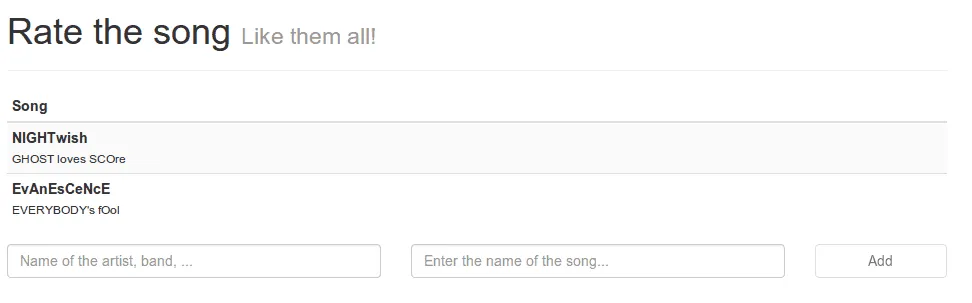
So let’s test it out! If we enter a weird name again:
And we submit it, then we see that the filter is correctly applied, there are no longer random uppercase letters and only the first letter is being capitalized.
Built-in filters
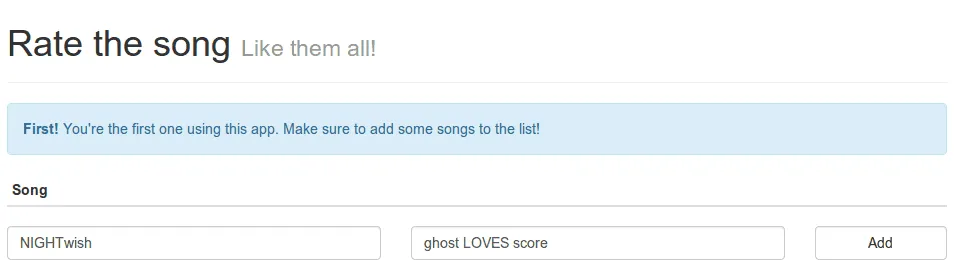
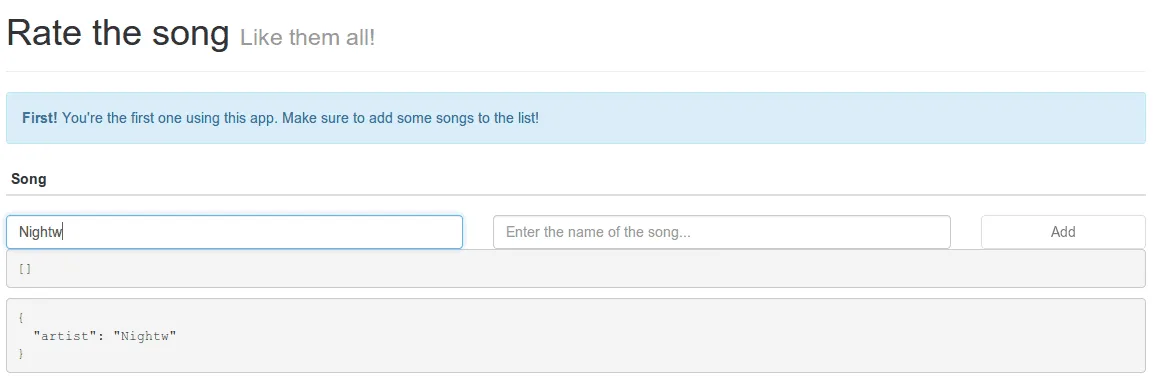
AngularJS also comes with a some extra filters that are already available to you. There are filters for sorting arrays, date formatting, converting all characters to uppercase or lowercase, … . Let’s test one of them out! A great way to find out about the data binding is by using the JSON filter which allows you to print an object as a JSON response. So if we add the following HTML code just below our form:
<pre>{{songs | json}}</pre>
<pre>{{newSong  | json}}</pre>
Then it will show us how the songs array and newSong object are constructed. If we run our app, we will see the following:

Which makes sense, since we intialized our songs array with an empty array [ ] and our newSong object with an empty object { }. However, the moment we start typing in our textbox we will see that the model also changes.
Finally, if we submit the form we will see that the newSong is empty again, but the song is being added to the songs array, just like we expected it to be.
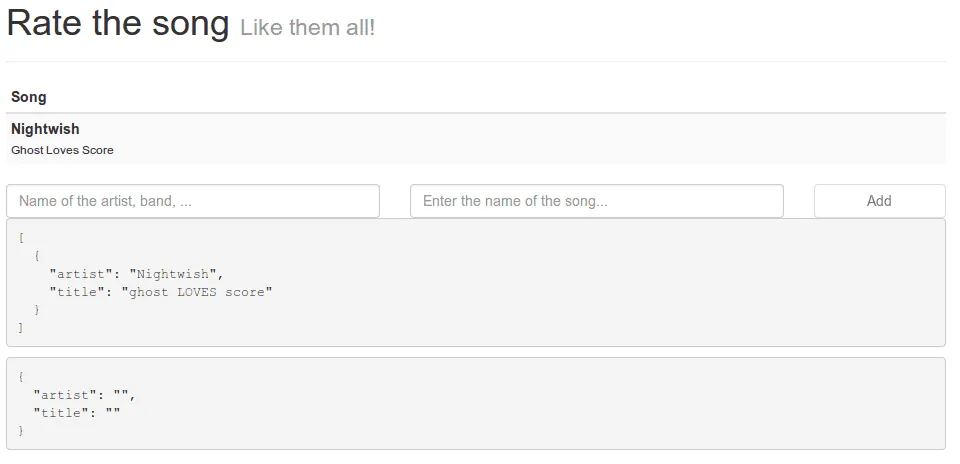
Also notice that the titleize filter we just wrote is only applied to the output, the input does not contain the filtered value. If you want to filter the input, then you will have to do that before adding it to the songs array.
Factories
It’s quite annoying that each time we refresh our application, we lose all changes we made. We’re not persisting our songs anywhere, so it makes sense that every time we refresh the page, our changes are gone. It’s time to change that. In stead of writing an entire back-end to persist our songs inside a database I’m going to use the HTML5 LocalStorage feature. The biggest drawback of old web applications compared to native applications is that you always need a back-end service to persist your data. The web itself is stateless, and for that reason it was impossible to make a web-only application. With HTML5 a feature was added called local storage, it allows you to store some data inside an object which you could retrieve later on. In this example I’m going to use it to persist our songs so we never have to enter them again! If you’re worrying about compatibility with older browsers, well, local storage is there a while already, as you can see here.
As I mentioned earlier, persisting our data is not a part of the controller, it’s something entirely different. So in this case, we’re going to write a factory to handle the persisting part. Like all other parts of the application, we’re going to start by modifying app.js and adding myApp.services to it.
angular.module("myApp", [
  'myApp.filters',
  'myApp.services',
  'myApp.controllers'
]);
And then we open services.js and start creating our factory:
angular.module("myApp.services", []).factory("songService", function() {
  // Write code here
});
This part is still quite similar to what we have done before. Now, the factory itself will have two methods, one to retrieve the data and another one to persist the data. However, HTML5 local storage only allows us to store simple Strings, not an entire array of songs. To fix that, we will have to serialize our array to a String and later deserialize it back to the original array. The best way of doing such things is by serializing/deserializing it to a JSON string. JavaScript already has a built-in API to do that, called JSON.parse() and JSON.stringify().
So let’s start by writing the factory:
var STORAGE_ID = 'myApp.songs', factory = { };

factory.get = function() {
  return JSON.parse(localStorage.getItem(STORAGE_ID) || '[]');
};

factory.put = function(songs) {
  localStorage.setItem(STORAGE_ID, JSON.stringify(songs));
};

return factory;
A factory is nothing more than an object with methods. So you could simply do something like:
return {
  get: function() { },
  put: function() { }
}
However, I don’t really like this approach due to all the indents, so I usually write it like:
var factory = { };
factory.get = function() { };
factory.put = function() { };
return factory;
This is exactly the same, but it is more similar to a controller, where you get an object ($scope in this case) and add your methods and fields to it.
The implementation of the factory is not that hard either. We just store/retrieve the data from the local storage (localStorage) and serialize/deserialize it (JSON). The only thing that might seem a bit difficult is the JSON.parse(localStorage.getItem(STORAGE_ID) || '[]') statement, but this just means that if there is nothing in the local storage yet, we just provide an empty array.
Using the factory
So the next step is to connect our factory to the controller. Open controllers.js again and on the first line we add an extra parameter next to $scope, called songService. AngularJS then knows (based on the name) that it has to inject the songService factory we just created.
angular.module("myApp.controllers", []).controller("songCtrl", function($scope, songService) {
  // The rest of the code
});
The next step is that we replace the empty array in $scope.songs by our factory’s get() method, like this:
$scope.songs = songService.get();
Then the final part is that we have to update our local storage each time the array changed. AngularJS comes with a nice event driven feature that allows us to react everytime the array changes by “watching” it. Watching the songs array can be done by adding the following to our controller:
$scope.$watch('songs', function (newValue, oldValue) {
  // Write your code here
});
So, now we just check if newValue is different from oldValue and then we use the put() method to store it all.
if (newValue !== oldValue) {
  songService.put($scope.songs);
}
That’s all, with just 5 lines of extra code in our controller and a factory with two simple methods we made it possible to persist the songs. If we now open our app again and add a song, we will still see that song when we refresh it.
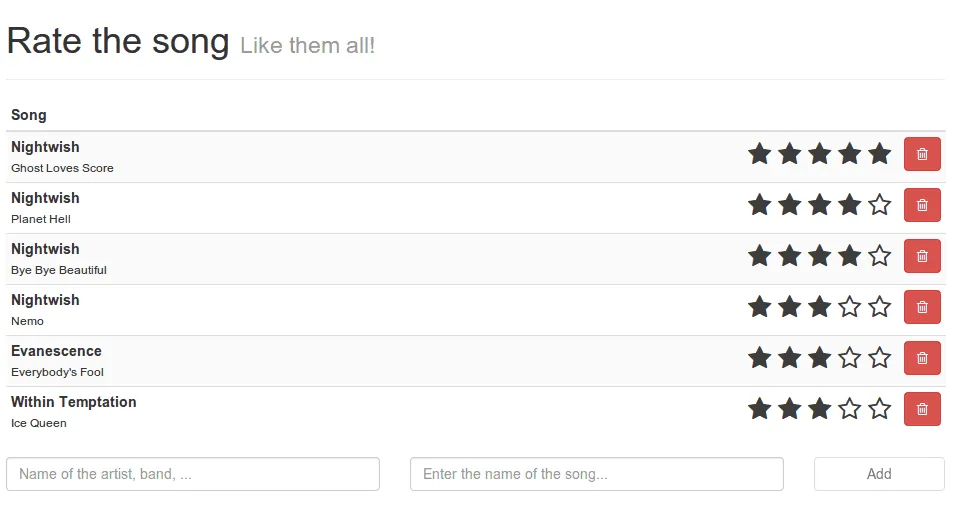
Deleting songs
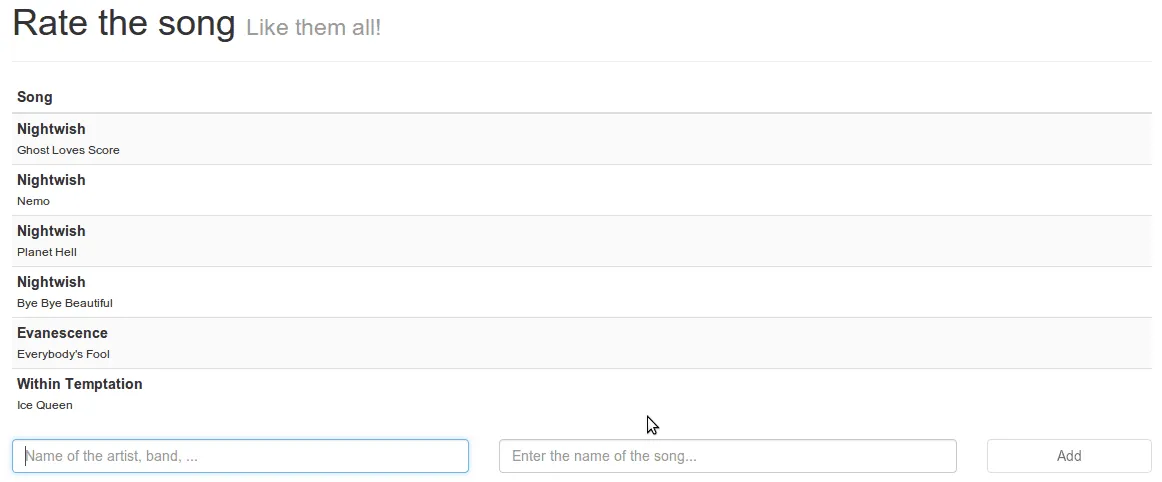
As you can see in the screenshot I already added several songs. Now that we’re able to persist our songs I think it’s time to add a delete button to the app so that we can delete songs as well.
Let’s start by opening index.html again and locate the <div class="pull-left"> inside the <table>. Just below it we’re going to put the following HTML content:
<div class="pull-right">
  <button type="button" class="btn btn-danger pull-right" ng-click="deleteSong($index)">
    <i class="fa fa-trash-o"></i>
  </button>
</div>
This should not be too hard to understand if you read my first tutorial in this series. We’re just adding a button to each song. The only difference here is that we use the ng-click property to indicate that something should happen if we click on the button. In this case we’re going to call the deleteSong() method which we will implement later. Also notice the use of a parameter called $index. AngularJS comes with many of these variables starting with a dollar sign. In this case it means that we pass the index of the song (in the song array) to the deleteSong() function. So for the first song it’s 0, the second one has $index 1 and so on.
So now we have to modify our controller and add the deleteSong function to it. JavaScript has a function called splice(index, amount) to remove elements from an array. I’m going to use it to remove the song with the matching index from the songs array, like this:
$scope.deleteSong = function(/** Integer */ idx) {
  $scope.songs.splice(idx, 1);
};
That’s all we really have to do. If we go and test out our application we will notice that each song now has a delete button.
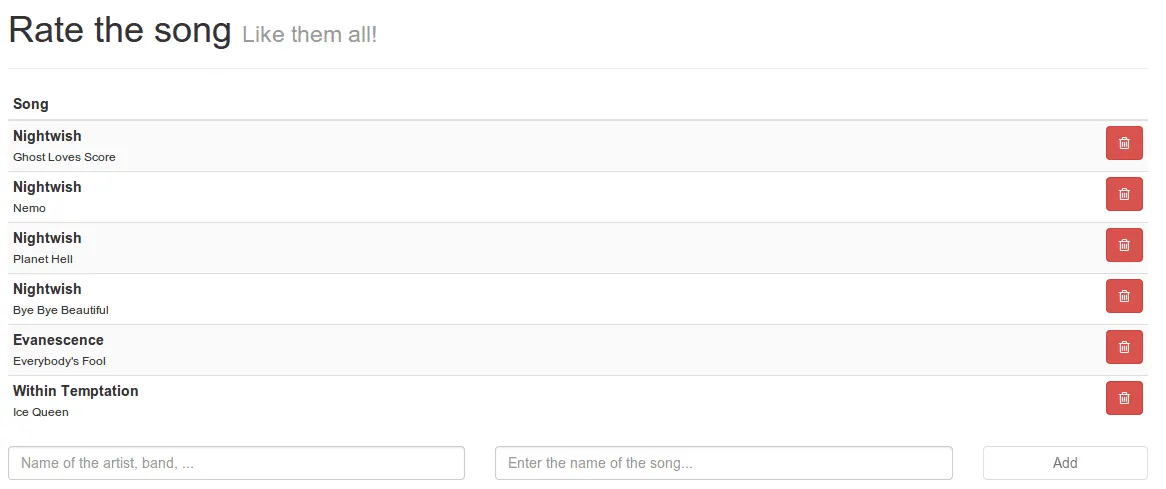
If we click on it, that song is being deleted, like it’s supposed to do. Also, if we refresh our page the song is still deleted, so that means our local storage is also up to date without having to write extra code to do it. Just because we’re watching the songs array we update the local storage on each change, so when we delete a song, the local storage is updated as well.
With the delete feature I’m going to end this tutorial about filters and factories, what you should remember from this tutorial is:
- Filters are good for converting input to another output
- Put all logic that has nothing to do with “controlling” your front-end inside services or factories
- HTML5 Local storage makes developing front-end apps a lot easier
As you can see in the screnshot below, we’re coming close to the final app. In the next and final part of this tutorial series I’m going to write a directive to rate the songs. Directives are a great way to create custom components (like a rating widget). This is a bit more complex in usage, but if you’re able to finish that tutorial as well, then you’re ready to go and develop your own AngularJS apps without a problem.