
A few weeks ago, we created a beautiful API using GraphQL. We only had one problem… the application was completely read-only and no updates were allowed. This time, we’re about to change this, and implement our own mutations with GraphQL.

Writing your mutation type
Just like last time, when we created our own Query type, it’s now time to create a type called Mutation:
type Mutation {
    createArticle(input: CreateArticleInput!): Article!
    updateArticle(input: UpdateArticleInput!): Article!
    deleteArticle(id: Int!): Int!
    createProfile(input: CreateProfileInput!): Profile!
    updateProfile(input: UpdateProfileInput!): Profile!
    deleteProfile(id: Int!): Int!
    createComment(input: CreateCommentInput!): Comment!
    deleteComment(id: Int!): Int!
}
In this case, I’m going to allow both creating, updating and deleting on articles and profiles, but only allowing to create and delete comments. People who wish to change their comment will have to remove it to post a new one.
As you can see in the example above, we’re using the Article, Profile and Comment types from before, but we’re also returning an Int for every delete action (deleteArticle(), deleteProfile() and deleteComment()). The reasoning behind this is that GraphQL doesn’t support void types as far as I know, so let’s return the amount of records that are being deleted at that time (usually either zero or one, depending on if the ID exists or not).
Defining custom inputs
We’ve seen how to use predefined inputs like Int before, but for our mutations, we’d like to use custom inputs, like CreateArticleInput. This allows us to pass multiple parameters, such as the title and the text of the article.
Creating a custom input is similar to creating a type:
input CreateArticleInput {
    title: String!
    text: String!
    authorId: Int!
}
The most important difference is that we start by writing input rather than type.
Just like that, we can create the other custom inputs:
input UpdateArticleInput {
    id: Int!
    title: String!
    text: String!
}

input CreateProfileInput {
    username: String!
    bio: String
}

input UpdateProfileInput {
    id: Int!
    bio: String
}

input CreateCommentInput {
    text: String!
    authorId: Int!
    articleId: Int!
}
In my example, I won’t allow the user to update the author ID of an article, nor the username of a profile, so I left those away in UpdateArticleInput and UpdateProfileInput respectively. Another difference between the create and update inputs is that we need to provide the ID of the article, comment or profile we wish to update, so be aware of that as well.
Mapping the types to Java classes
The next step is to create proper Java implementations of our custom types. In this case, we need to create classes for the CreateArticleInput, UpdateArticleInput, CreateProfileInput, UpdateProfileInput and CreateCommentInput types:
@Data
@NoArgsConstructor
@AllArgsConstructor
public class CreateArticleInput {
    private String title;
    private String text;
    private Long authorId;
}

@Data
@NoArgsConstructor
@AllArgsConstructor
public class UpdateArticleInput {
    private Long id;
    private String title;
    private String text;
}

@Data
@NoArgsConstructor
@AllArgsConstructor
public class CreateProfileInput {
    private String username;
    private String bio;
}

@Data
@NoArgsConstructor
@AllArgsConstructor
public class UpdateProfileInput {
    private Long id;
    private String bio;
}

@Data
@NoArgsConstructor
@AllArgsConstructor
public class CreateCommentInput {
    private String text;
    private Long authorId;
    private Long articleId;
}
Writing your resolver
As explained in my previous article, GraphQL consists out of two main components, one being types and another one being resolvers. Last time, we wrote our main resolver by implementing the GraphQLQueryResolver interface. This time, we need to do a similar thing, but rather than implementing GraphQLQueryResolver, we need to implement the GraphQLMutationResolver interface.
@Component
@AllArgsConstructor
public class MutationResolver implements GraphQLMutationResolver {

}
Now, all we have to do is to implement our resolvers by creating methods using the same name as the properties in the Mutation type. For example:
@Component
@AllArgsConstructor
public class MutationResolver implements GraphQLMutationResolver {
    private ArticleRepository articleRepository;
    private CommentRepository commentRepository;
    private ProfileRepository profileRepository;

    @Transactional
    public Article createArticle(CreateArticleInput input) {
        return articleRepository.saveAndFlush(new Article(null, input.getTitle(), input.getText(), input.getAuthorId()));
    }
}
Now we can repeat this for all other methods as well:
@Transactional
public Article updateArticle(UpdateArticleInput input) {
    Article article = articleRepository.findById(input.getId()).orElseThrow(ArticleNotFoundException::new);
    article.setText(input.getText());
    article.setTitle(input.getTitle());
    return article;
}

@Transactional
public int deleteArticle(Long id) {
   return articleRepository.deleteById(id);
}

@Transactional
public Profile createProfile(CreateProfileInput input) {
    return profileRepository.saveAndFlush(new Profile(null, input.getUsername(), input.getBio()));
}

@Transactional
public Profile updateProfile(UpdateProfileInput input) {
    Profile profile = profileRepository.findById(input.getId()).orElseThrow(ProfileNotFoundException::new);
    profile.setBio(input.getBio());
    return profile;
}

@Transactional
public int deleteProfile(Long id) {
    return profileRepository.deleteById(id);
}

@Transactional
public Comment createComment(CreateCommentInput input) {
    return commentRepository.saveAndFlush(new Comment(null, input.getText(), input.getArticleId(), input.getAuthorId()));
}

@Transactional
public int deleteComment(Long id) {
    return commentRepository.deleteById(id);
}
To be able to do this, I also created a custom ArticleNotFoundException and ProfileNotFoundException:
public class ArticleNotFoundException extends RuntimeException {
}

public class ProfileNotFoundException extends RuntimeException {
}
Additionally, I also added a few methods to my repositories:
public interface ArticleRepository extends JpaRepository<Article, Long> {
    Optional<Article> findById(Long id);
    int deleteById(Long id);
}

public interface ProfileRepository extends JpaRepository<Profile, Long> {
    Optional<Profile> findById(Long id);
    int deleteById(Long id);
}

public interface CommentRepository extends JpaRepository<Comment, Long> {
    List<Comment> findByArticleId(Long articleId);
    int deleteById(Long id);
}
Testing it out
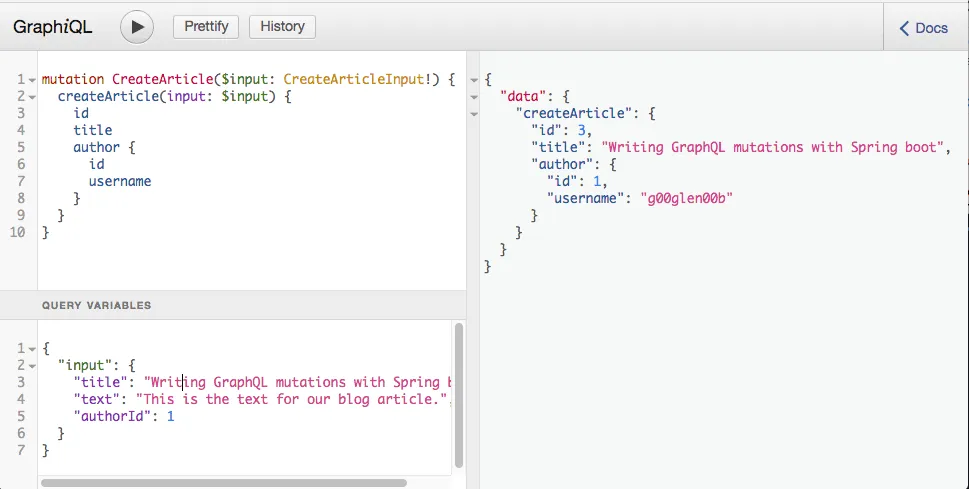
Now that we’ve written our mutation resolvers, it’s time to test things out. Just like last time, run the application and go to http://localhost:8080/graphql to open Graph_i_QL. Now, let’s create a new article by creating the following mutation query:
mutation CreateArticle($input: CreateArticleInput!) {
  createArticle(input: $input) {
    id
    title
    author {
      id
      username
    }
  }
}
This looks quite similar to querying for data, with the only exception that we use the mutation keyword in stead of the query keyword. Additionally to this, we also have to create a query variable called input at the bottom of the GraphiQL interface. GraphiQL will automatically autocomplete certain stuff, so don’t be surprised!
{
  "input": {
    "title": "Writing GraphQL mutations with Spring boot",
    "text": "This is the text for our blog article.",
    "authorId": 1
  }
}
When executing this mutation query, you’ll see that the output becomes:
{
  "data": {
    "createArticle": {
      "id": 3,
      "title": "Writing GraphQL mutations with Spring boot",
      "author": {
        "id": 1,
        "username": "g00glen00b"
      }
    }
  }
}
To verify that this actually worked, we can use the query from last time to retrieve all queries.
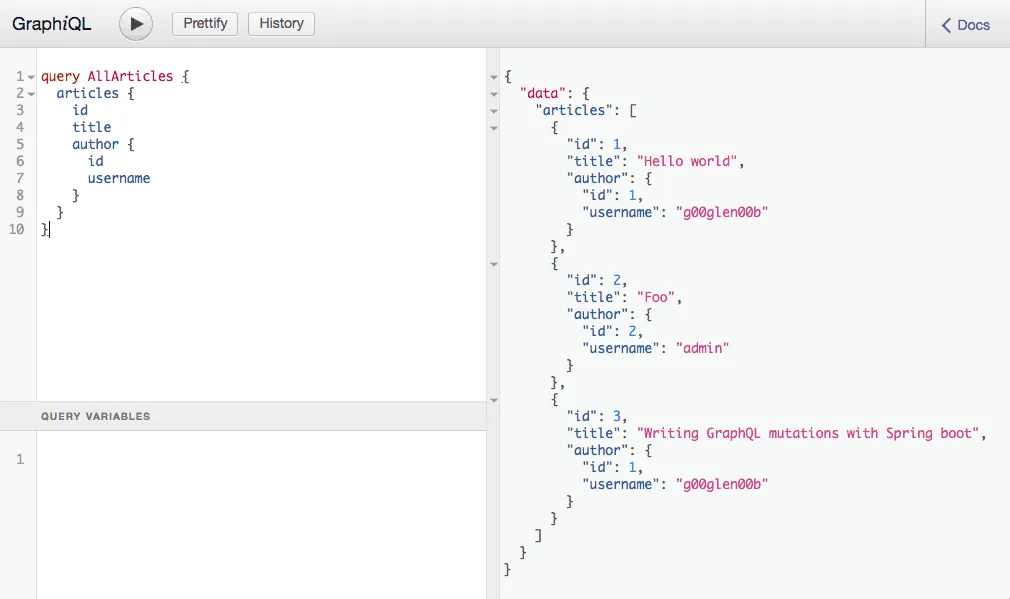
As you can see in the screenshot above, things are working quite nicely!
So, let’s clean things up now by deleting the article again by executing the following query:
mutation DeleteArticle($id: Int!) {
  deleteArticle(id: $id)
}
Just like before, we have to pass the ID of the article as a query parameter. In this case, the ID of the new article is 3:
{"id": 3}
When you execute this, you’ll see that you get a “1” as a result, because there was exactly one record deleted:
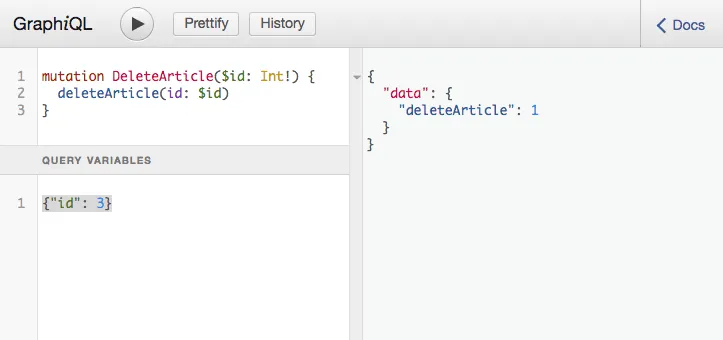
However, when you execute it again, you’ll see that the result changes to zero, because there was no longer any record with ID 3. This indicates that our delete query was properly executed.
Error handling
As you can see in our code, when we try to update an article or profile that doesn’t exist, we throw either an ArticleNotFoundException or a ProfileNotFoundException. However, if we try this right now, we see we an internal server error:
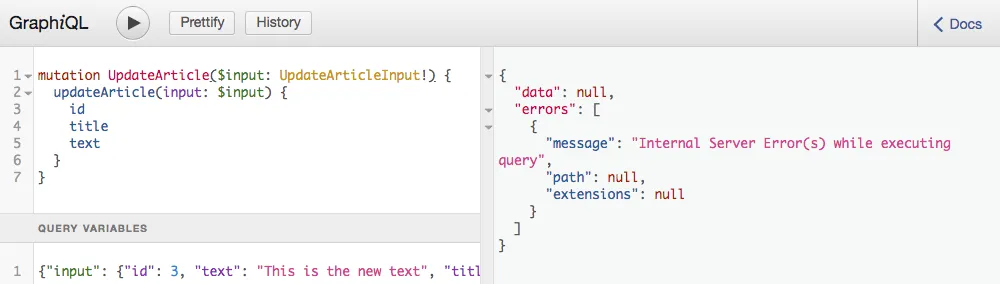
This is not really what we want, considering that the exception is really on the users end, and not on the server. First of all, let’s alter the ArticleNotFoundException to implement the GraphQLError interface:
public class ArticleNotFoundException extends RuntimeException implements GraphQLError {
    private Long articleId;

    public ArticleNotFoundException(Long articleId) {
        this.articleId = articleId;
    }

    @Override
    public String getMessage() {
        return "Article with ID " + articleId + " could not be found";
    }

    @Override
    public List<SourceLocation> getLocations() {
        return null;
    }

    @Override
    public ErrorType getErrorType() {
        return ErrorType.ValidationError;
    }

    @Override
    public Map<String, Object> getExtensions() {
        return Collections.singletonMap("articleId", articleId);
    }
}
GraphQLError indicates that this is a GraphQL related error. However, this is not enough. When you throw an exception, the default GraphQL resolver will automatically wrap that exception in a new GraphQLError called ExceptionWhileDataFetching. To solve this, we could create our own GraphQLErrorHandler implementation that unwraps the exception again, for example:
@Component
public class GraphQLErrorHandler implements graphql.servlet.GraphQLErrorHandler {

    @Override
    public List<GraphQLError> processErrors(List<GraphQLError> list) {
       return list.stream().map(this::getNested).collect(Collectors.toList());
    }

    private GraphQLError getNested(GraphQLError error) {
        if (error instanceof ExceptionWhileDataFetching) {
            ExceptionWhileDataFetching exceptionError = (ExceptionWhileDataFetching) error;
            if (exceptionError.getException() instanceof GraphQLError) {
                return (GraphQLError) exceptionError.getException();
            }
        }
        return error;
    }

}
This GraphQL error handler will check if the error is of type ExceptionWhileDataFetching and then if the exception itself is of type GraphQLError. If that’s the case, it will return the exception itself, otherwise it will return the error.
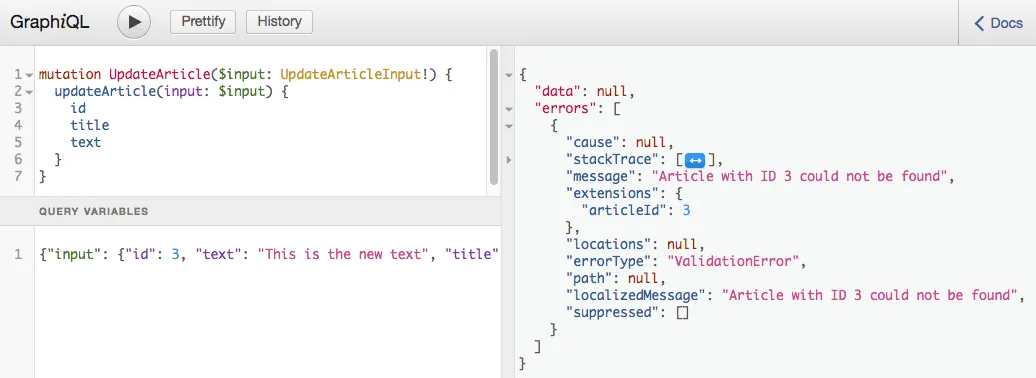
If we do the same thing for ProfileNotFoundException and run the application again. We can see that the result looks a lot better now:
The only thing you may want to change now is to exclude the stacktrace itself, because that’s not interesting to expose to others. To do this, we can use the @JsonIgnore annotation:
@Override
@JsonIgnore
public StackTraceElement[] getStackTrace() {
    return super.getStackTrace();
}
With this, we now have a proper API for querying and mutating data using GraphQL! As usual, the code can be found on GitHub.