
When creating applications, REST is an often used technology to transfer data through APIs. While REST is commonly adopted, there are some issues with it. In this tutorial, I’ll show you how GraphQL compares to REST and how to use GraphQL with Spring boot.
Issues with REST
When using REST, each resource usually has an endpoint. For example, when writing a blog application, you may have an /article endpoint to fetch the information of the article, a /profile endpoint to fetch the information of the user profile and perhaps even a /comments endpoint to retrieve the comments for a given article.
The issue is that, when you’re retrieving the articles to show a list of articles, you need different data compared to when you’re retrieving the full blown article with all of its details. This leads to a lot of overfetching, considering that you’ll fetch too much data to build the article overview page if you use the same endpoints to handle both the article overview and the article detail page.
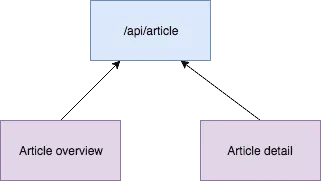
A possible solution is to provide less information when someone calls /api/article compared to when someone is calling /api/article/123. This might solve the issue, but what if you want to write your application for both mobile devices and web browsers? Your mobile application might need even less data, so you could still be overfetching. A possible solution to this problem is to have multiple endpoints, for example /api/article/mobile and /api/article/desktop. This however, leads to a much higher coupling between the view and the REST APIs.
GraphQL
But what if, you have something like REST, but you could pick the data you need? This is, simplified, what GraphQL provides. This means, that GraphQL is not just something that lives on the frontend or something that lives on the backend, it’s both. GraphQL basically has two major concepts, which are:
- Types: Types are definitions or interfaces of you API. It contains the various types of your API and how they’re linked and what operations are possible.
- Resolvers: Resolvers contain the mappings from the types to their actual implementation.
There are a few GraphQL libraries to start with though. Since Facebook came up with the concept, they also have their own library called Relay. The group behind Meteor also created their own library, called Apollo. Additionally to those two, there are various implementations in most programming languages, and Java is no different with graphql-java.
In this tutorial I’ll talk about how to use GraphQL with Spring boot.

Setting up project
To set up your Spring boot project, you can use the Spring Initializr. In my case, I want to add JPA and HSQLDB for my persistence layer, Lombok to be able to write classes in fewer lines of code and the Web dependency to be able to use my application as a web application.
Additionally to that, I’m also going to add the graphql-spring-boot-starter and graphiql-spring-boot-starter dependencies to my project. The first one provides the GraphQL endpoint, while the second one provides a graphical interface to debug your GraphQL queries.
<dependency>
    <groupId>com.graphql-java</groupId>
    <artifactId>graphql-spring-boot-starter</artifactId>
    <version>${graphql-java.version}</version>
</dependency>
<dependency>
    <groupId>com.graphql-java</groupId>
    <artifactId>graphiql-spring-boot-starter</artifactId>
    <version>${graphql-java.version}</version>
</dependency>
I configured ${graphql-java.version} to be 3.10.0.
Writing your types
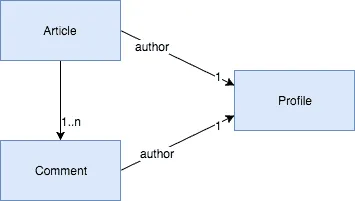
In this article, I’ll be using a “blog application” as an example. There will be three types, articles, comments and profiles. The link between them is shown below:
To start off, create a file called types.graphqls in src/main/resources. The first type we have to define is the root/global type called Query:
type Query {

}
In this type, we can define the various “operations” that will be possible. In this example, I’ll add four possible operations:
- An operation to retrieve a list of all articles.
- Another operation to retrieve a list of all profiles.
- An operation to retrieve a list of all comments.
- And finally, an operation to retrieve an article by its ID.
To do this, we modify the Query type to be like this:
type Query {
    articles: [Article]
    profiles: [Profile]
    comments: [Comment]
    article(id: Int!): Article
}
As you can see, we use the [Article] syntax to define an array, and the (id: Int!) syntax to explain that this operation requires a parameter called id. The exclamination mark (Int!) means that the parameter is required.
The next step is to define the other types, being Article, Profile and Comment:
type Article {
    id: Int!
    title: String!
    text: String!
    author: Profile!
    comments: [Comment]
}

type Profile {
    id: Int!
    username: String!
    bio: String
}

type Comment {
    id: Int!
    text: String!
    author: Profile!
}
The way this works is similar to the Query type. Fields that are required have an exclamination mark behind them, while arrays are surrounded by square brackets.
Writing the actual models
The types we just wrote, are a representation of our entities. This means that we also need an actual implementation of these types. In this case I’ll be using JPA to be able to persist my entities. For example, the Article class will look like this:
@Data
@Entity
@AllArgsConstructor
@NoArgsConstructor
public class Article {
    @Id
    @GeneratedValue(strategy = GenerationType.IDENTITY)
    private Long id;
    private String title;
    private String text;
    private Long authorId;
}
The Profile entity will contain the following data:
@Data
@Entity
@AllArgsConstructor
@NoArgsConstructor
public class Profile {
    @Id
    @GeneratedValue(strategy = GenerationType.IDENTITY)
    private Long id;
    private String username;
    private String bio;
}
And finally, the Comment will look like this:
@Data
@Entity
@NoArgsConstructor
@AllArgsConstructor
public class Comment {
    @Id
    @GeneratedValue(strategy = GenerationType.IDENTITY)
    private Long id;
    private String text;
    private Long articleId;
    private Long authorId;
}
Writing the persistence layer
Before we start with the next part of GraphQL (the resolvers), we have to write the repositories that will be used to fetch data from the database. I’ll be using Spring Data JPA here to write my repository interfaces like this:
public interface ArticleRepository extends JpaRepository<Article, Long> {
}

public interface ProfileRepository extends JpaRepository<Profile, Long> {
}

public interface CommentRepository extends JpaRepository<Comment, Long> {
    List findByArticleId(Long articleId);
}
Most repositories here are quite simple, and since we’ll probably only use the default methods (findOne(), findAll()), you don’t have to write any methods. The only exception is the CommentRepository, since we want to be able to fetch all comments for a given Article.
Getting started with a resolver
Resolvers allow you to map certain field in your types to specific actions. When using graphql-java, there are two types of resolvers:
GraphQLQueryResolveris the main resolver, used to resolve any properties or operations within theQuerytypeGraphQLResolveris the resolver for any other types. It uses generics to be able to detect which type it’s about. An example would beGraphQLResolver<Article>.
To resolve a specific property, the library will look for any methods matching the property name. For example, the articles property within Query will be matched to a method called articles(), getArticles() or isArticles().
To get started, you need to implement GraphQLQueryResolver, for example:
@Component
@AllArgsConstructor
public class QueryResolver implements GraphQLQueryResolver {
    private ArticleRepository articleRepository;
    private CommentRepository commentRepository;
    private ProfileRepository profileRepository;

    public List<Article> getArticles() {
        return articleRepository.findAll();
    }

    public List<Comment> getComments() {
        return commentRepository.findAll();
    }

    public List<Profile> getProfiles() {
        return profileRepository.findAll();
    }

    public Article getArticle(Long id) {
        return articleRepository.findOne(id);
    }
}
As you can see, these method names match the property names of the Query type.
The next step is to write resolvers for every other type. This is necessary, because we want to link the comments and the author to the article, but also the author to the comment itself. The profile doesn’t need any custom resolvers, since all fields of Profile are basic fields.
First let’s create an implementation of GraphQLResolver<Article>:
@Component
@AllArgsConstructor
public class ArticleResolver implements GraphQLResolver<Article> {
    private CommentRepository commentRepository;
    private ProfileRepository profileRepository;

    public Profile getAuthor(Article article) {
        return profileRepository.findOne(article.getAuthorId());
    }

    public List<Comment> getComments(Article article) {
        return commentRepository.findByArticleId(article.getId());
    }
}
As you can see, the setup is quite similar to the resolver we wrote before. The only exception is that we now have access to the parent object, which is the Article that is being resolved.
Similar to this, we can create our CommentResolver:
@Component
@AllArgsConstructor
public class CommentResolver implements GraphQLResolver<Comment> {
    private ProfileRepository profileRepository;

    public Profile getAuthor(Comment comment) {
        return profileRepository.findOne(comment.getAuthorId());
    }
}
Testing it out
Now that we’ve implemented our resolvers, it’s time to test it out. I made a simple CommandLineRunner to insert some mock data:
@Component
@AllArgsConstructor
public class DataProvider implements CommandLineRunner {
    private CommentRepository commentRepository;
    private ArticleRepository articleRepository;
    private ProfileRepository profileRepository;


    @Override
    @Transactional
    public void run(String... strings) {
        Profile author = profileRepository.save(new Profile(null, "g00glen00b", "The author of this blog"));
        Profile admin = profileRepository.save(new Profile(null, "admin", "The administrator of this blog"));
        Article article1 = articleRepository.save(new Article(null, "Hello wold", "This is a hello world", author.getId()));
        Article article2 = articleRepository.save(new Article(null, "Foo", "Bar", admin.getId()));
        commentRepository.save(new Comment(null, "Do you like this article?", article1.getId(), author.getId()));
        commentRepository.save(new Comment(null, "This is a great article", article1.getId(), admin.getId()));
        commentRepository.save(new Comment(null, "This is a comment", article2.getId(), admin.getId()));
    }
}
And now, if we run the application and go to http://localhost:8080/graphiql, we should be able to see our GraphQL tester.

Now, let’s say that we want to write a GraphQL query to show a list of articles, but we don’t need the comments, nor the bio of the author. If we would like to do so, we could write the following query:
query AllArticles {
  articles {
    id
    title
    author {
      id
      username
    }
  }
}
As you can see, we’re only retrieving the id and the title of the article, and the username of the author. If you would debug you code, you would see that it will never retrieve the comments in this case.

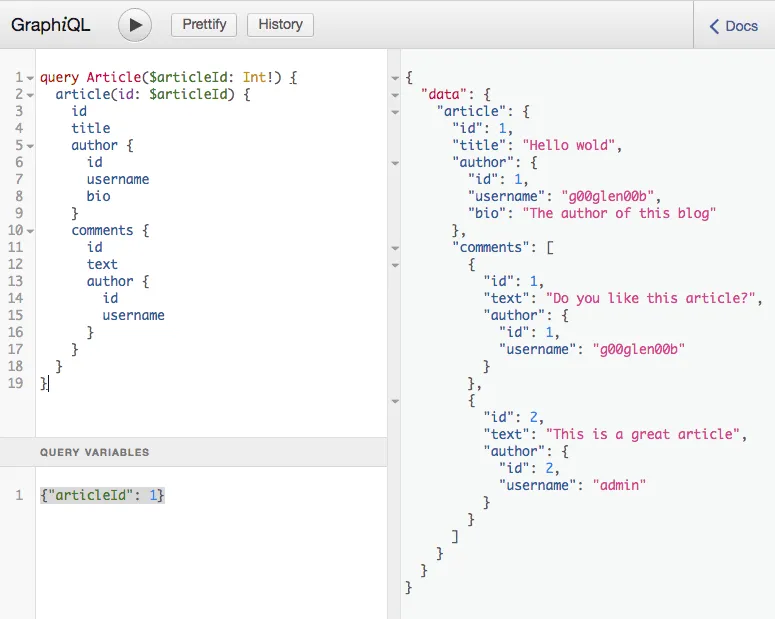
The next interesting query would be to retrieve all information of the current article, including the bio of the author and the comments from the other users. This query would use the article property of Query, but that means we need to pass the article ID somehow. To do this, we need to write the following query:
query Article($articleId: Int!) {
  article(id: $articleId) {
    id
    title
    author {
      id
      username
      bio
    }
    comments {
      id
      text
      author {
        id
        username
      }
    }
  }
}
As you can see, we’re defining a parameter called $articleId and we pas this ID to the article endpoint as the parameter id. The resolver will then pick this up and invoke the correct method.
To be able to test this in GraphiQL, you need to select Query variables at the bottom, and enter your parameters as a JSON:
{"articleId": 1}
Normally, GraphiQL will already initialize an empty object containing the "articleId" key as soon as you start to enter the ID.
Next time, I’ll show how you can use GraphQL with Angular, and how to modify data using GraphQL. If you’re interested in the code of this tutorial, you can find it on GitHub.