
A while back, I decided to use Gatsby for my WordPress blog, and continue with WordPress as a headless CMS. So far, I’ve also written two tutorials about setting up Gatsby with WordPress, and how to create detail pages for your content. In this tutorial, we’ll explore how we can use pagination with Gatsby.

Refactoring our original code
The concept behind pagination with Gatsby is similar to creating detail pages. Rather than creating a separate page for each blog post, we’ll have to create a page for every 10 blog posts (or any other amount).
For example, let’s say we have 183 blog posts, and we want 10 blogposts per page. In that case, we’ll end up with 19 pages.
The nice part is that we already wrote a query to retrieve all blog posts before. If you don’t remember, this is what we ended up with:
const allPostsQuery = `{
  allWordpressPost {
    edges {
      node {
        id
        slug
      }
    }
  }
}`;

exports.createPages = ({graphql, actions}) => {
  const {createPage} = actions;
  return graphql(allPostsQuery).then(({errors, data}) => {
    if (errors) return Promise.reject(errors);
    return data.allWordpressPost.edges.map(({node}) => createPage({
      path: node.slug,
      component: path.resolve('./src/templates/post.js'),
      context: {id: node.id}
    });
  });
};
To expand this, I’m going to put the original code in a separate function, like this:
const createDetailPages = ({allWordpressPost}, createPage) => {
  return allWordpressPost.edges.map(({node}) => createPage({
    path: node.slug,
    component: path.resolve('./src/templates/post.js'),
    context: {id: node.id}
  });
};

exports.createPages = ({graphql, actions}) => {
  const {createPage} = actions;
  return graphql(allPostsQuery).then(({errors, data}) => {
    if (errors) return Promise.reject(errors);
    return [
      ...createDetailPages(data, createPage),
    ];
  });
};
Creating new pages
Now that we can plug in more functions to create pages, it’s time to do so. As I’ve said before, the only thing we need to know is the total amount of published blog posts. We can retrieve this with allWordpressPost.edges.length, so let’s get started:
const pageSize = 10;
const createPaginationPages = ({allWordpressPost}, createPage) => {
  const pageCount = Math.ceil(allWordpressPost.edges.length / pageSize);
  return Array.from({length: pageCount}).map((_, index) => createPage({
    path: `/page/${index + 1}`,
    component: path.resolve(`./src/templates/posts.js`),
    context: {
      skip: index * pageSize,
      limit: pageSize,
      pageCount,
      currentPage: index + 1
    }
  });
};
Now we can use the createPages API to call our function:
exports.createPages = ({graphql, actions}) => {
  const {createPage} = actions;
  return graphql(allPostsQuery).then(({errors, data}) => {
    if (errors) return Promise.reject(errors);
    return [
      ...createDetailPages(data, createPage),
      ...createPaginationPages(data, createPage),
    ];
  });
};
And there you have it, you’re now ready to create a proper component to render the pages.
Creating a pagination component
Before creating the page template component, I’m going to create a simple pagination component. This component will allow users to navigate to the previous and next page.
export const Pagination = ({currentPage, pageCount, base}) => (
<nav className="pagination">
{currentPage > 1 ? (
<Link
title="Go to previous page"
to={`/page/${currentPage - 1}`}>
← Newer posts
</Link>) :
<span />}
Page {currentPage} of {pageCount}
{currentPage < pageCount ? (
<Link
title="Go to next page"
to={`/page/${currentPage + 1}`}>
Older posts →
</Link>) :
<span />}
</nav>
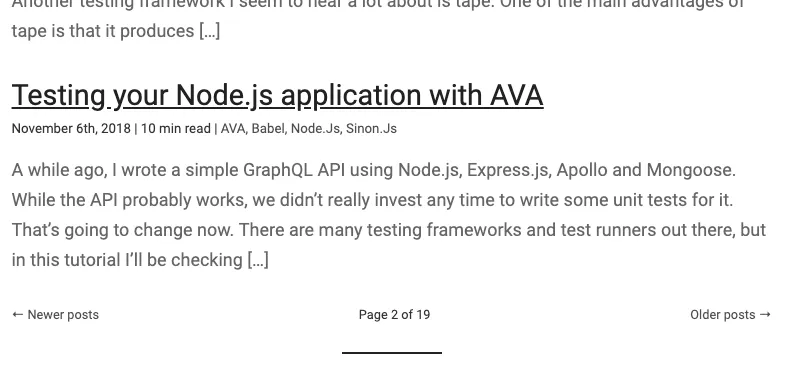
);In this component, we’re showing a link to the previous page if our currentPage is greater than 1. Similar to that, we’re showing a link to the next page if the currentPage is smaller than the total pageCount.
If either of these links isn’t visible, we’re showing an empty <span/> tag. This allows us to use flexbox with justify-content being space-between for alignment:
nav.pagination {
  display: flex;
  justify-content: space-between;
}
Setting up a component query
Now that we have a proper pagination component, we can create a file called src/templates/posts.js and add the initial structure:
const Posts = () => (
  <Layout>
    <SEO title="Posts"/>
  </Layout>
);

export default Posts;
The next step is to write the query we need. If we open http://localhost:8080/__graphql, we can see that the allWordpressPost endpoint has both a skip and a limit parameter.
If we need to retrieve the blogposts for page 3, we can use a skip of 20 if our page size is 10. For example:
{
  allWordpressPost(skip: 20, limit: 10, sort: {fields: date, order: DESC}) {
    edges {
      node {
        excerpt
        date(formatString: "MMMM Do, YYYY")
        slug
        tags {
          name
        }
        title
      }
    }
  }
}
We can include this query in our component by exporting it and adding variables called $skip and $limit:
export const query = graphql`
  query($skip: Int!, $limit: Int!) {
    allWordpressPost(sort: {fields: [date], order:DESC}, limit: $limit, skip: $skip) {
      edges {
        node {
          id
          date(formatString: "MMMM Do, YYYY")
          title
          excerpt
          slug
          tags {
            name
          }
        }
      }
    }
  }
`;
Gatsby will inject all page context parameters into the query, so we don’t have to worry about those $skip and $limit variables.
Now that we have a query, we can inject data into our component and use it. For example:
const Posts = ({data}) => (
  <Layout>
    <SEO title="Posts"/>
    {data.allWordpressPost.edges.map(({node}) => (
      <PostItem
        key={node.id}
        date={node.date}
        tags={node.tags}
        title={node.title}
        excerpt={node.excerpt}
        slug={node.slug} />
    ))}
  </Layout>
);
In this example, we’re using the <PostItem/> component from my last tutorial to show some information about each blogpost.
Using the page context within a component
The final step is to add the <Pagination/> component to our template. To be able to integrate this, we need to know the pageCount and currentPage though. To get these, we need to access the page context itself.
With Gatsby, we can inject these into our component as well:
const Posts = ({data, pageContext}) => (
  <Layout>
    <SEO title="Posts"/>
    {data.allWordpressPost.edges.map(({node}) => (
      <PostItem
        key={node.id}
        date={node.date}
        tags={node.tags}
        title={node.title}
        excerpt={node.excerpt}
        slug={node.slug} />
    ))}
    <Pagination
      pageCount={pageContext.pageCount}
      currentPage={pageContext.currentPage}/>
  </Layout>
);
With that, we’ve implemented pagination with Gatsby.
Repeating the process for categories and tags
We can also do the same thing for our categories and tags. First of all, we need to extend the query we used in gatsby-node.js to also include a list of all categories and tags. We can do this by using allWordpressCategory and allWordpressTag:
const allPostsQuery = `{
  allWordpressPost {
    edges {
      node {
        id
        slug
      }
    }
  }

  allWordpressCategory {
    edges {
      node {
        id
        count
        slug
      }
    }
  }

  allWordpressTag {
    edges {
      node {
        id
        count
        slug
      }
    }
  }
}`;
Using the count of both, we know how many pages we have to generate. Like before, we’ll implement this by creating a few new functions:
const createCategoryPages = ({allWordpressCategory}, createPage) => {
  return allWorpressCategory.edges.map(({node}) => {
    const pageCount = Math.ceil(node.count / pageSize);
    return Array.from({length: pageCount}).map((_, index) => createPage({
      path: `/category/${node.slug}/${index + 1}`,
      component: path.resolve(`./src/templates/categoryPosts.js`),
      context: {
        skip: index * pageSize,
        limit: pageSize,
        pageCount,
        currentPage: index + 1,
        categoryId: node.id
      }
    });
  });
};

const createTagPages = ({allWordpressTag}, createPage) => {
  return allWorpressTag.edges.map(({node}) => {
    const pageCount = Math.ceil(node.count / pageSize);
    return Array.from({length: pageCount}).map((_, index) => createPage({
      path: `/tag/${node.slug}/${index + 1}`,
      component: path.resolve(`./src/templates/tagPosts.js`),
      context: {
        skip: index * pageSize,
        limit: pageSize,
        pageCount,
        currentPage: index + 1,
        tagId: node.id
      }
    });
  });
};
To call these functions, we add them to the createPages function:
exports.createPages = ({graphql, actions}) => {
  const {createPage} = actions;
  return graphql(allPostsQuery).then(({errors, data}) => {
    if (errors) return Promise.reject(errors);
    return [
      ...createDetailPages(data, createPage),
      ...createPaginationPages(data, createPage),
      ...createCategoryPages(data, createPage),
      ...createTagPages(data, createPage)
    ];
  });
};
The implementation of the templates is similar to what we’ve done before, since allWordpressPost contains a filter parameter. This allows us to filter posts by category (or by tag), as you can see in the query below:
export const query = graphql`
  query($skip: Int!, $limit: Int!, $categoryId: String!) {
    allWordpressPost(sort: {fields: [date], order:DESC}, limit: $limit, skip: $skip, filter: {categories: {elemMatch: {id: {eq: $categoryId}}}}) {
      edges {
        node {
          id
          date(formatString: "MMMM Do, YYYY")
          title
          excerpt
          slug
          tags {
            name
          }
        }
      }
    }
  }
`;
Other than that, the template looks exactly the same. I only extended the <Pagination/> component by including a base parameter:
export const Pagination = ({currentPage, pageCount, base}) => (
  <nav className="pagination">
    {currentPage > 1 ? (
      <Link
        title="Go to previous page"
        to={`${base}/page/${currentPage - 1}`}>
        ← Newer posts
      </Link>) :
      <span />}
    Page {currentPage} of {pageCount}
    {currentPage < pageCount ? (
      <Link
        title="Go to next page"
        to={`${base}/page/${currentPage + 1}`}>
        Older posts →
      </Link>) :
      <span />}
  </nav>
);
This allows me to use the pagination component for the category posts like this:
<Pagination
  pageCount={pageContext.pageCount}
  currentPage={pageContext.currentPage}
  base="/category"/>
And with that, we’ve implemented pagination with Gatsby, by using our WordPress data as the source. If you want to check a working example, you can check the source code of this blog on GitHub.