
In our last two tutorials we made a simple song list app where you could add/delete songs from a list. To make the app really good we’re going to add a rating component to the app, allowing us to rate the songs and eventually sort them based on their rating. So let’s start!
Changing the model
You may remember the models.js file from the first tutorial that contained the description of what a song really is. Today we’re going to extend the model a bit and add a score field, like this:
App.Song = DS.Model.extend({
  title: DS.attr('string'),
  artist: DS.attr('string'),
  score: DS.attr('number')
});
The next step is that we’re going to sort the list of songs based on their score. To do that, we have to open controllers.js and add the following properties to it:
sortProperties: [ 'score' ],
sortAscending: false,
We’re also going to initialize the score of each song with 0, so replace the createRecord() function in the addSong action by:
this.store.createRecord('song', {
  artist: this.get('newArtist'),
  title: this.get('newTitle'),
  score: 0
}).save();
Writing a component
So right now, we made the changes to the data. The next step is to implement a view that shows us that score. Let’s start by editing index.html. Locate the delete button of each song and put the following content before the <button> tag:
{{rating-stars score=score max=5 class="pull-left" action="updateScore" param=this}}
This piece of code is similar to the {{input}} components we used in the first tutorial, the only difference now is that the rating-stars component is a custom component we’re going to create.
As you can see we’re passing several things to it, we pass the score (score), the maximum score (max), the action that should be executed when the score is changed (updateScore) and the parameter that we’re going to pass to that function (param). All of these are custom parameters which we are going to use later on in our implementation.
Let’s start by adding our component Handlebars template. Right below the closing </script> tag of the main template, put a new template:
<script type="text/x-handlebars" id="components/rating-stars">
  {{score}}/{{max}}
</script>
The only thing we need now is to create the JavaScript code for our component. So let’s open components.js and add the following piece of code:
App.RatingStarsComponent = Ember.Component.extend({
});
As you can see we’re extending an Ember.Component here. The naming of the component is really important again, we used {{rating-stars}} so the ID of the template has to be id="components/rating-stars" and the name of the component has to be App.RatingStarsComponent.
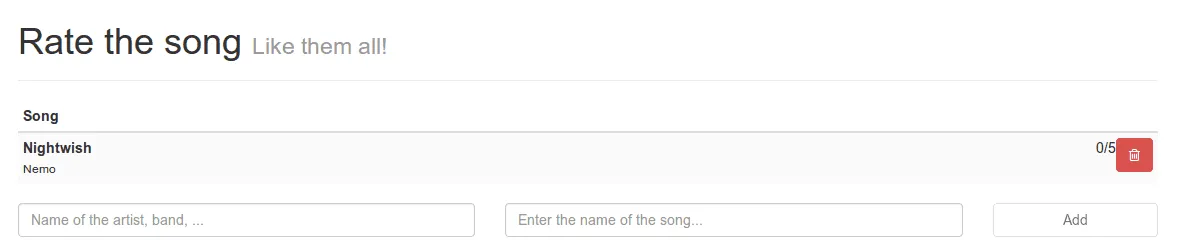
If we now run our app and delete the old songs and add some new ones in stead, you will notice that they all get a score 0/5 (because we initialized it that way).
Looking at the stars
Of course, this is just a simple component, we have to improve that! Somehow we have to replace the score to stars. If we have a score of 3, then it means that we have to show 3 full stars and 2 empty stars. To do that, we’re going to add a property function to our component just like we earlier did in our controller (for example isEmpty). This one will be a bit more complex though:
setStars: function() {
  var idx = 0, stars = [];
  for (idx = 0; idx < this.get("max"); idx += 1) {
     stars.push({
       index: idx,
       full: this.get("score") > idx
    });
  }
  this.set('stars', stars);
}.observes("score", "max").on("didInsertElement")
This piece of code will create the stars field. It will add a star object for each number below the maximum score and depending on the current score it will set the full property to true or false. We end the function by saying that it should observe changes at the score and max field. We’re also using on("didInsertElement") to execute the code on the initial load.
The next step is that we’re going to change the template a bit, so open index.html and replace the component template by:
<div class="rating">
  {{#each star in stars}}
    <i {{bind-attr class=":fa star.full:fa-star:fa-star-o"}}></i>
  {{/each}}
</div>
We already used the {{#each}} helper before, but because we don’t have a single model here, we also have to define what we’re going to loop through, in this case stars. Something else that should be familiar is the {{bind-attr}}. We used it before to disable a specific form element and in this case we’re using it to use a specific classname depending on the full property of a star. The class names will make sure the correct icon is being loaded from the Font Awesome set. In this case it will load fa-star if the full property returns true and fa-star-o if it’s false. The fa classname will always be there.
Before we actually test the app, let’s add some CSS as well. Edit style.css and add the following:
.rating {
  font-size: 175%;
  padding: 0 0.5em;
}

.rating > a {
  text-decoration: none;
}

.rating .rating-highlight, .rating.rating-highlight:hover {
  color: #F4914E;
}

.rating .rating-normal, .rating.rating-normal:hover {
  color: #3C3C3C;
}
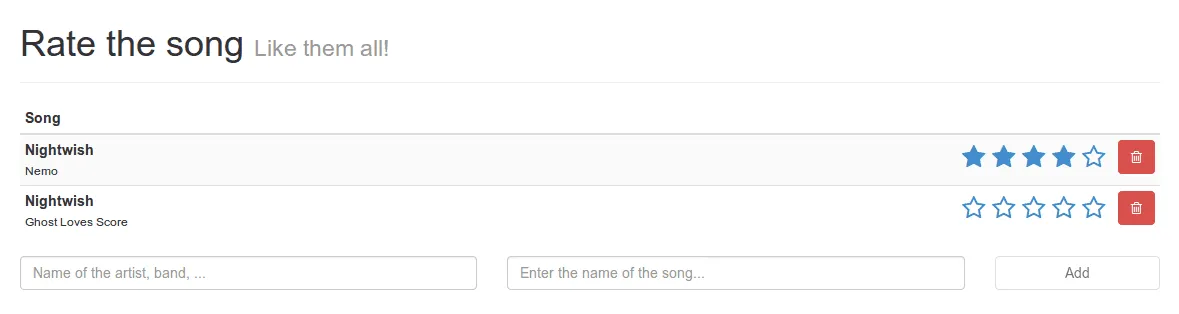
So now it’s time to test out the application. If we open the app we will see that the songs now have some stars next to them.
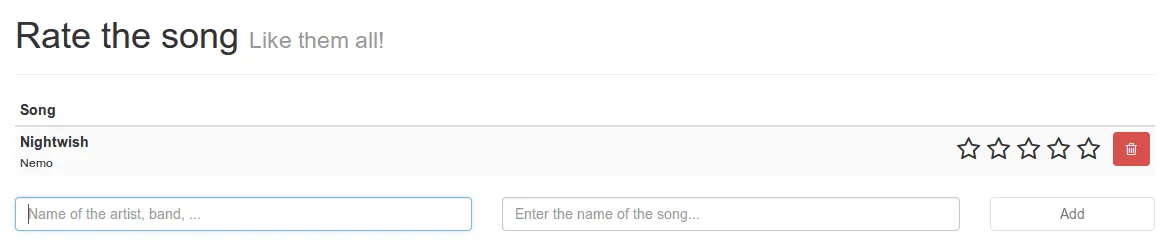
Obviously, it’s still not possible to edit the score and so all stars will be empty, but we can test it a bit by replacing the score=score attribute in the {{rating-stars}} component in our main template and replace it (for example) by score=3. If we then run our app again, we will notice that it already works pretty good:
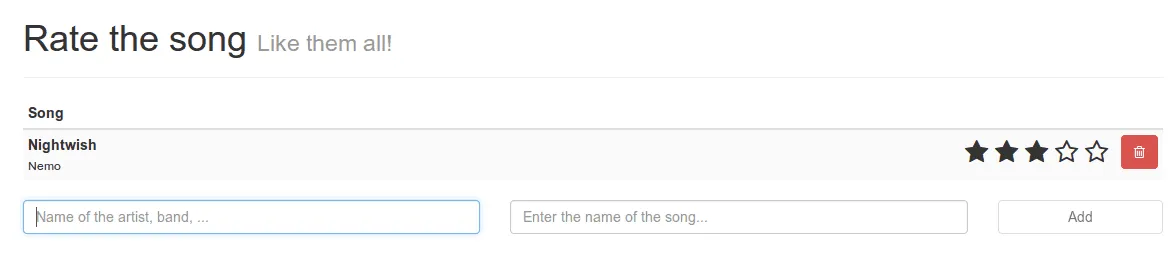
Don’t forget to restore the value afterwards.
Adjusting the score
The next step is that we’re going to make it possible to click a star and update the score depending on the star that is being clicked. We could simply use the {{action}} Handlebars helper here which we already used before (for adding and deleting songs), but in this case we’re going to do something different. The reason behind this is that we can only specify one event handler when we use the {{action}} helper, but in the next part I also want to add additional event handlers which you can only make if you use a view.
So let’s start by adjusting the component template a bit again and adding an element to it so the code becomes:
<div class="rating">
  {{#each star in stars}}
    {{#view App.StarView star=star}}
      <i {{bind-attr class=":fa star.full:fa-star:fa-star-o"}}></i>
    {{/view}}
  {{/each}}
</div>
So right now we wrapped the star inside a view, called the App.StarView. Just like our component we’re passing something to it as well, in this case it will be our current star (star=star). So let’s start by defining our view by opening views.js.
The view itself should not really do a lot by itself, it will just propagate the events to the parent “controller”, in this case it’s not a controller, but a component though. The code for the view is:
App.StarView = Ember.View.extend({

  tagName: "a",

  click: function(evt) {
    this.get('controller').send('click', this.get('star'));
  }
});
As you can see here we added a simple click event handler that propagates it to our controller (in this case the component). We’re also adding a parameter to it, namely the current star (this.get('star'). Another thing to notice here is that the view is based upon the <a> element, as you can see in the tagName property. Being propagated to the component, means that we still have to write some code that will be executed inside the component to handle this event. Just like in our controller we will add an actions object containing our different event handlers. In our view we’re sending the current star to the component using the 'click' action (first parameter), so we have to define an action with the same name here:
actions: {
  click: function(star) {
    var score = star.index + 1;
    this.set('score', score);
    this.sendAction('action', this.get('param'), score);
  }
},
The new score is based upon the index property. However, we’re working with a zero based index here, so the first star actually has index 0. This means that score itself is the index + 1. We’re then setting the score inside the component and then propagate this to our controller as well by using the this.sendAction() function. This will send it to the updateScore action in the controller, passing the parameter (the star) and the score to it.
So the next step is that we have to update and save the record in our store. Open controllers.js and add the following action:
updateScore: function(song, score) {
  song.set('score', score);
  song.save();
}
Nothing spectacular here, we’re just setting the score property and saving the song afterwards.
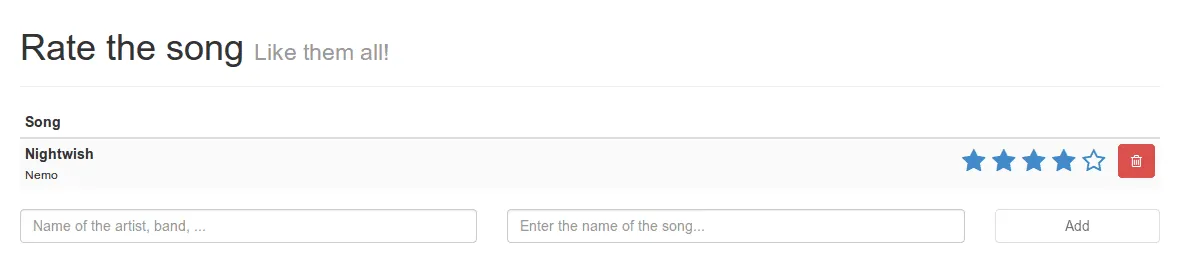
So now it’s time again to test our application. If we open our app and click on the score, you will see that the score is being updated. Even when reloading the page, the score is still there.
If we have multiple songs, we will also notice that they’re being sorted based upon the score as we defined earlier in our controller. For example:
And after changing the score of the second song we get:
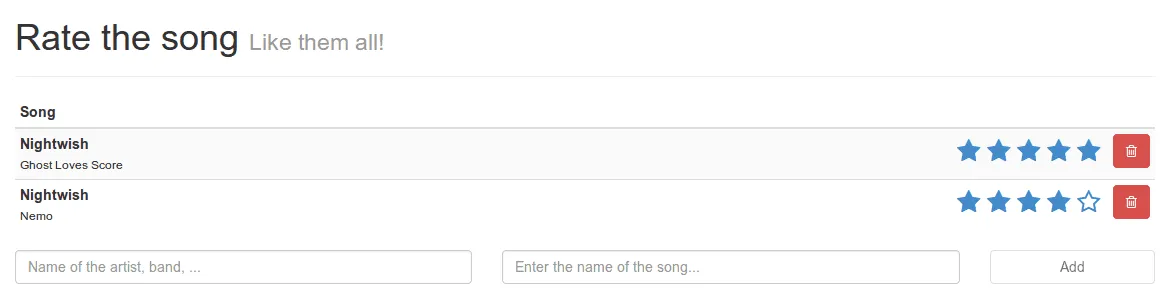
The songs are being sorted based upon their score, without having to refresh your page.
Making it look good
So right now everything is working pretty good, but I don’t really like how the rating widget looks. It would be way better that if you hover a specific star, all stars up to that star are being highlighted. So if you hover over the fourth star, the first four stars will be highlighted. This is where we’re going to need our view for, to propagate the mouseEnter and mouseLeave events to the component as well.
So let’s open views.js and do that:
mouseLeave: function(evt) {
  this.get('controller').send('mouseLeave', this.get('star'));
},

mouseEnter: function(evt) {
  this.get('controller').send('mouseEnter', this.get('star'));
}
Nothing spectacular here, this is just the same we did earlier when defining our click event handler. The next step is that we have to change components.js as well (obviously). But before that, let’s explain first what we’re going to do. I’m going to keep track of the currently highlighted star by introducing a property on our component called hoverIdx. This property will always contain the currently hovered index of the star and if no star is being hovered, it will return -1.
In the second phase I’m going to add a property highlight to each star which will be true if the index of the star is lower or equal to the hoverIdx. If we do that, we can simply use {{bind-attr}} to use a specific classname for a highlighted star.
The first step is that we’re going to keep track of the index of the currently hovered star by defining our actions at our component:
mouseEnter: function(star) {
  this.set('hoverIdx', star.index);
},

mouseLeave: function(star) {
  this.set('hoverIdx', -1);
},
The next step is that we’re going to add the highlight property to each star by modifying the setStars function. In stead of using:
stars.push({
  index : idx,
  full : this.get("score") > idx
});
We will be using:
stars.push({
  index: idx,
  highlight: idx <= this.get("hoverIdx"),
  full: this.get("score") > idx || idx <= this.get("hoverIdx")
});
As you can see we introduced the highlight property, but I’m also modifying the full
Finally we also have to change the observes() part after the setStars() function a bit to also observe the hoverIdx:
.observes("score", "max", "hoverIdx")
Then the only thing that rests us is to modify the {{bind-attr}}star.highlight:rating-highlight:rating-normal so it becomes:
<i {{bind-attr class=":fa star.full:fa-star:fa-star-o star.highlight:rating-highlight:rating-normal"}}></i>
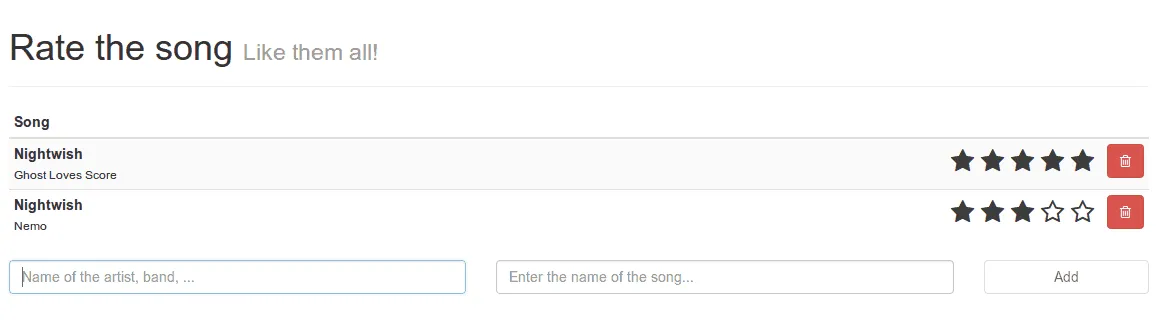
That’s all! If we run our app now, we will notice that the stars got a different color. THat’s because the rating-normal class is now applied, which is a custom class I defined earlier in style.css which will make the stars look a bit black/greyish.
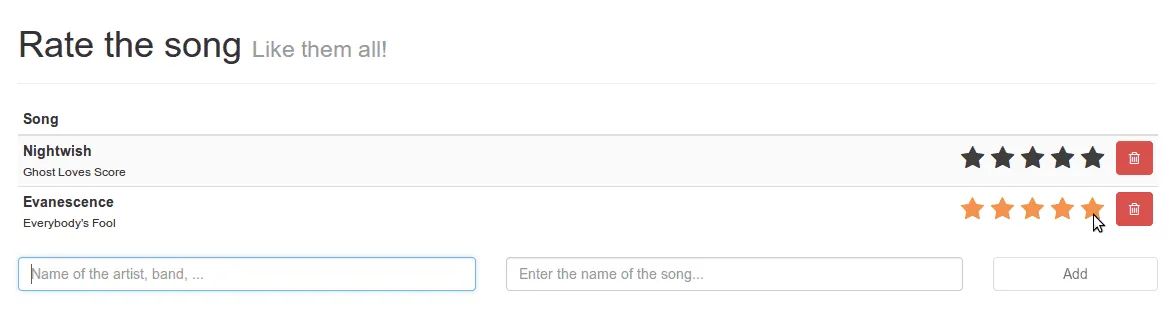
The moment we hover over a specific star, the highlighting class will take over:
Summarizing
This also means our tutorial series about Ember.js has come to an end. Before actually ending this tutorial I’m going to wrap everything up.
- In Ember.js we work with Handlebars.js templates, using helpers and expressions.
- When creating an application we define a route and then the controller.
- Custom Handlebars helper functions can be written to format certain fields
- Ember.js has a side project called ember-data which allows us to create more complex models and allowing us to persist them using adapters (REST, LocalStorage, …)
- The ember-data project is currently still in beta.
- Components and views are similar (in fact, a component is an extension to a view), but in a view you’re restricted to an actual HTML tag BUT you can add multiple event handlers to it
- Complex properties add the
.property()to the end of the function to indicate on what fields they’re based on. - Functions that should be execute when a field changes will add the
.observes()to the end of the function. - **Naming **is very important in Ember.js, there are naming conventions for routes, components, … and the JavaScript business logic is connected to the template through these naming conventions.
Achievement: Introduced to AngularJS
This means it’s the end of the Ember.js in action tutorial series. If you’re interested in the full code example, you can find it on GitHub. If you want to try out the code yourself, you can download an archive from Github.
You can also find the demo on Github.