E2E testing AngularJS applications with Protractor
- October 19th, 2015
- 10 minute read
- AngularJS E2E Jasmine JavaScript Protractor Testing
A few weeks ago I wrote a simple AngularJS application and some tests using Jasmine + Sinon.js. Today we will go into detail about another aspect of testing AngularJS applications, namely end to end testing (E2E).
What is E2E testing
With unit testing, we try to test/cover small, testable units in our code, like what happens when we call this function with these parameters. Within a unit test, you try to isolate the code that you’re going to test as much as possible. This means that any layers behind the tested code (for example, services, factories, …) will be mocked/stubbed, so that their implementation does not interfere with the current piece of code we’re testing. That’s why I used Sinon.js in my previous tutorial.
With E2E testing on the other hand, we’re going to test the entire application and all of its layers at once. In these tests, we’re going to test as if we’re an end user of your application. You’re gonna check what happens when certain elements are clicked, text is entered, … .

A popular framework to do this for AngularJS applications is Protractor. Protractor, based upon Selenium/WebDriverJS, will make it very easily to write tests that interact with user interface elements. WebDriverJS already allows us to do that, but Protractor adds some useful features for AngularJS applications, like specifying elements based on the bindings, model, repeater, … .
Getting started
Obviously, to get started with Protractor you need an application. So, in this case I’m going to use the application I wrote in my previous tutorial. You can find the code on GitHub.
After checking out the source code, it’s time to install Protractor. To do that you simply execute the following command:
npm install -g protractor
Like I said before, Protractor is a framework that utilizes Selenium. To setup a Selenium server, you first execute this command to make sure it’s up to date:
webdriver-manager update
And after that you can start the Selenium server with the following command:
webdriver-manager start
Protractor configuration
Just like Karma, Protractor requires a configuration file. Inside the test/ folder, create a file called protractor.conf.js and add the following configuration:
exports.config = {
  seleniumAddress: 'http://localhost:4444/wd/hub',
  specs: ['**/*.e2e.spec.js'],
  framework: 'jasmine2';
};
This configuration file tells Protractor where to find the Selenium server (by default it’s on port 4444. To differentiate unit tests from E2E tests, I’m going to use a different suffix, called .e2e.spec.js. And finally, the testing framework I’m going to be using is Jasmine.
Writing a test case
Inside the tests/spec/feature-browse/ folder I’m going to create a new file called browse.e2e.spec.js. This file will contain all E2E tests covering the browse feature (which is the only feature so far in our application).
To start of a test, we do a similar thing like all Jasmine tests, describing our test suite:
(function() {
  'use strict';

  describe('Browsing a dictionary', function() {
    // This will contain our tests
  });
}());
Now, before we execute a test, we have to run a web browser and tell the web browser where to go. To do that we write the following code inside the describe() scope:
beforeEach(function() {
  browser.get('http://localhost:9000');
});
Normally you would run this test against your application running in a separate environment, but since we don’t have that right now, I’m running these tests locally. To tell the browser where to go, you use the browser.get() API.
Now that we have told our test to run a web browser instance, it’s time to write an actual test. For the first test case I’m going to check if searching for the word ‘Filibuster’ results in 6 definitions:
it('should show the results for the given word', function() {
  element(by.model('vm.word')).sendKeys('filibuster');
  element(by.className('btn-primary')).click();
  expect(element.all(by.repeater('definition in vm.definitions.definitions')).count()).toEqual(6);
});
With plain WebDriverJS code you would have to find elements by using CSS selectors, but with Protractor you can even specify elements by their model binding, simply by using the by.model() locator. Our input textfield is bound with ng-model to vm.word, so that should work properly.
To do something with the element, for example typing a text in it, we use the element() API and with it we can use sendKeys() to actually type a text inside the field.
After typing the word filibuster inside the textbox, it’s time to press the search button. This button has the classnames .btn and .btn-primary, so if we tell Protractor to look for an element with the class btn-primary it should work fine. To do this, we can use the by.className() locator.
Again, to do something with an element, like in this case clicking, we use the element() API, and then we can use the click() function to click the button.
After clicking the button it’s time to check if there are 6 elements. In AngularJS we loop over our array by using ng-repeat. Luckily for us, with Protractor we have a by.repeater() locator to find all elements that use the given repeat expression.
In case of the by.repeater() we won’t have a single element that matches it, but we will have several elements that match. So now we won’t be using element(), but element.all().
To verify that there are 6 matches, we can use the count() function and that concludes our first test.
Running our E2E tests
Now, if we have our Selenium server running with the webdriver-manager start command, it’s time to run the application itself to run the tests against. To do that open a command prompt and enter the following command:
grunt serve
With both the Selenium server and the application running, it’s time to start Protractor. Open a command prompt and enter the following command:
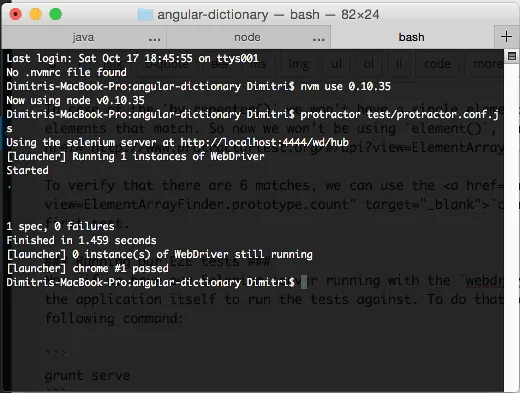
protractor test/protractor.conf.js
If you run this command, you will quickly see a browser window popping up, this is the browser window we opened in our test (with browser.get()). Then, faster than the eye can perceive, it will enter the text in the textbox, press the button and verify if there are 6 results.
The result can be seen in the command prompt, normally your test should pass:

Finishing our test suite
This one test is already quite a good indication if something goes wrong, however, it does not test all aspects of the application. For example we cannot guarantee with our one test that the explanations of the word ‘filibuster’ are displayed correctly, nor that the source is visible.
Within our second test we’re going to verify that the text of the elements that match the by.repeater() locator contains one of the provided definitions.
The set up of the test will be quite similar, we need to enter a word again and press the search button. But in stead of using the count() function, I’m going to use the first() function to retrieve the first element that matches. This should be our first result. Then I’m going to check if the text contains the given definition, by using the getText() function:
it('should show the meaning of the given word', function() {
  element(by.model('vm.word')).sendKeys('filibuster');
  element(by.className('btn-primary')).click();
  expect(element.all(by.repeater('definition in vm.definitions.definitions')).first().getText())
    .toContain('The use of obstructionist tactics, especially prolonged speechmaking, for the purpose of delaying legislative action.');
});
Also, with each definition we’re showing the source of that definition. To verify that the source is displayed, we can write another test.
In this case I’m no longer going to loop over the elements matching the by.repeater() locator, but I’m going to search for all <footer> elements. To do that, we can use the by.tagName() locator:
it('should show the source of the definition of the given word', function() {
  element(by.model('vm.word')).sendKeys('filibuster');
  element(by.className('btn-primary')).click();
  expect(element.all(by.tagName('footer')).first().getText())
    .toContain('from The American Heritage® Dictionary of the English Language, 4th Edition');
});
Other than switching the locator this test is very similar to our previous test.
Next to the results we’re also showing a title with how many results there are for the given word. We could also write a test to verify if that works correctly:
it('should show the amount of results in the title', function() {
  element(by.model('vm.word')).sendKeys('filibuster');
  element(by.className('btn-primary')).click();
  expect(element(by.tagName('h2')).getText()).toEqual('6 results found for "filibuster"');
});
Nothing special here, the setup is still the same since we still have to look for a given word. Then we can use the by.tagName() locator to get the <h2> element and verify that the title matches the given text.
This test will make sure that the title actually contains the text we want, however, if we haven’t entered a word yet, the title should not be visible. To verify that we can write another test:
it('should initially not show the title with the amount of results', function() {
  element(by.model('vm.word')).sendKeys('filibuster');
  expect(element(by.tagName('h2')).isDisplayed()).toBeFalsy();
});
As long as we don’t press that search button, the title should not be visible. So, in this case we have a similar setup as before, but we simply remove the line that actually clicks the button. If we look for the title again, and use the isDisplayed() function, we can check if it is visible or not, which should not be in this case.
For our final tests we’re going to verify that, as soon as we enter a new word in the textbox, all previous results are hidden. So, our test starts of with a similar setup again. We have to search for a word and then enter a new word to verify if the results are displayed or not.
With our current knowledge of Protractor we should already be capable of setting up something like this:
it('should hide the results if a new word is entered', function() {
  element(by.model('vm.word')).sendKeys('filibuster');
  element(by.className('btn-primary')).click();
  expect(element(by.css('form + div')).isDisplayed()).toBeTruthy();
  element(by.model('vm.word')).sendKeys('something');
  expect(element(by.css('form + div')).isDisplayed()).toBeFalsy();
});
So, what happens here is that we verify after searching if the results are displayed. The hardest part here is to find a locator which we can use to specify the <div> that holds the results.
With the by.css() locator we can do this easily, since the result container is right below the form that we use to search for the given word.
Similar to the previous test we can use the isDisplayed() function to verify if the element was visible or not. After searching it should be visible, but when you enter another word without searching, the previous results will be hidden.
Wrapping up
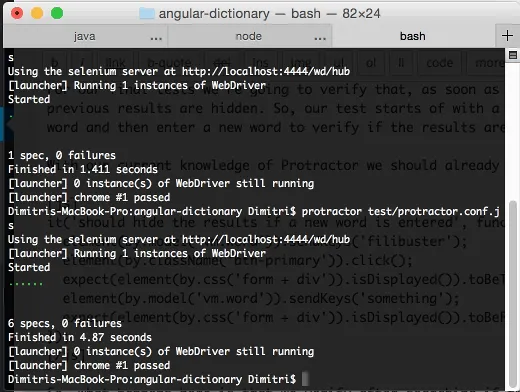
With these 6 tests we tested about everything this small application has to offer. If we run our tests again, they should all run fine.

Now you may ask yourself, was this really useful to test all these things? Well, in large projects you often find yourself doing a lot of repeated testing while development to ensure that a feature works as expected.
You may also have to solve bugs, introduce new features, … . However, sometimes fixing one thing might break something else, and it would be crazy to manually go through the entire application again, in stead of that, you can use E2E testing to verify that the application is working as expected.
However, E2E testing involves a lot of time, because the smallest change might break your tests and writing these tests usually goes a lot slower than writing integration or unit tests. They also tend to run quite slow and they do not provide a lot more feedback than “this feature is broken”, it doesn’t tell where or why it’s broken. For example, at a customer I was working for our E2E tests failed more due to other systems going down, compared to our own features no long working correctly.
You always have to try to find the right balance in writing E2E tests. A good article to read is this one, by one of the software engineers of Google.
Achievement: Used Protractor to write E2E tests for AngularJS applications
If you’re seeing this, then it means you successfully managed to make it through this article. If you’re interested in the full code example, you can find it on GitHub. If you want to try out the code yourself, you can download an archive from GitHub.