
In my previous tutorial, I’ve set up a Spring boot application that allows WebSocket communication rather than serving a traditional REST API. Today, we’re going to find out how to communicate to that backend using Angular.
Getting started
To get started, I’ll be using Angular CLI to bootstrap my project, so I generated a new project like this:
ng new angular-websockets-client
Next to the dependencies that are already added for me, I also need to add a few more dependencies:
- SockJS is a layer on top of WebSockets that allows you to fall back on polling if a web browser doesn’t support WebSockets. It also comes with a client library that we’re about to use. This is similar to what Socket.io does, but Spring is compliant with SockJS, so we’ll use that one.
- STOMP.js on the other hand is a protocol on top of WebSockets that enables features such as topics, headers and more. More about this can be found in the STOMP over WebSocket article.
npm install --save @stomp/stompjs sockjs-client
Since we’re using TypeScript, we also need to install the proper typings/interfaces:
npm install --save @types/stompjs @types/sockjs-client
Hot or cold observables
To connect to our API through both SockJS and STOMP.js isn’t actually all that difficult, all we need is the following code:
const conn = over(new SockJS('http://localhost:8080/live'));
conn.connect({}, () => {
  // We are connected
});
Additionally to this code, we have to make sure that we import both the SockJS prototype from the SockJS library, and the over() function from the Stomp.js client:
import { over } from '@stomp/stompjs';
import * as SockJS from 'sockjs-client';
However, we want to write proper service wrappers, and use observables for our communication. When we create our own observables, we have two choices. Either we go with cold observables or we go for hot observables. The difference can be best demonstrated using an example. If we would use cold observables, our code would look like this:
return new Observable<Client>(observer => {
  const conn = over(new SockJS('http://localhost:8080/live'));
  conn.connect({}, () => {
    observer.next(conn);
  });
  return () => conn.disconnect(null);
});
This means that the connection logic would happen on subscribing and unsubscribing from the observable. In many cases, this is a good solution. However, in this case, it would mean that each time we subscribe, we create a new connection.
In order to solve this, we can “share” the same connection by using hot observables. To do that, we have to move the connection logic out of the observable itself, for example:
const conn = over(new SockJS('http://localhost:8080/live'));
return new Observable(observer => observer.next(conn));
However, this leads to two issues:
- How are we going to make sure that you can’t obtain a client before the client is connected?
- How are we going to disconnect?
Let’s find out!
Working with behavior subjects
The first one is a bit difficult, because the connect() callback only fires once, even if multiple callbacks are added before the WebSocket connection is made. To solve this problem, we can use a BehaviorSubject. A BehaviorSubject represents a value over time, in this case I would use it to represent the WebSocket connection state. This state could be either “attempting to connect” or “connected”. So, let’s make an enumeration to represent this state:
export enum SocketClientState {
  ATTEMPTING, CONNECTED
}
The good thing about a BehaviorSubject is that, even if someone subscribes after next() has been called, it still obtains that value. That means that even if someone retrieves the WebSocket client if it’s already connected, it will still obtain that client.
So, my first step was to generate a new service, with Angular CLI you can do that using the following command:
ng g service socketClient
After that, I added the following code:
@Injectable({
  providedIn: 'root'
})
export class SocketClientService {
  private client: Client;
  private state: BehaviorSubject<SocketClientState>;

  constructor() {
    this.client = over(new SockJS(environment.api));
    this.state = new BehaviorSubject<SocketClientState>(SocketClientState.ATTEMPTING);
    this.client.connect({}, () => {
      this.state.next(SocketClientState.CONNECTED);
    });
  }

  private connect(): Observable<Client> {
    return new Observable<Client>(observer => {
      this.state.pipe(filter(state => state === SocketClientState.CONNECTED)).subscribe(() => {
        observer.next(this.client);
      });
    });
  }
}
So basically, within the constructor we define the client, the BehaviorSubject and we call the connect() function which will change the BehaviorSubject from ATTEMPTING to CONNECTED.
I then created a new function, that will return the client itself if the state is CONNECTED. Be aware that this function won’t create a new WebSocket connection, and that unsubscribing from this observable won’t disconnect.
The URL to connect to is stored within the environment properties, which can be found in environment.ts. I changed it to look like this:
export const environment = {
  production: false,
  api: 'http://localhost:8080/live'
};
Disconnecting
That does bring us to the next point though, when do we disconnect? Well, basically, I want to keep the connection open the entire time. Only when the application is being closed, the client can be disconnected. Since the service is provided in the root module, we can easily disconnect by making the service implement the OnDestroy lifecycle hook:
// ...
export class SocketClientService implements OnDestroy {
  // ...

  ngOnDestroy() {
    this.connect().pipe(first()).subscribe(client => client.disconnect(null));
  }
}
The first() operator is used to clean up the observable as well. The reason why I’m creating a new observable rather than directly using the client field is because you should only disconnect when you’re actually connected. The observable does guarantee that, while the field doesn’t.
Retrieving messages
The next part of this service is to retrieve messages. Messages can be retrieved using the following code:
const conn = over(new SockJS('http://localhost:8080/live'));
conn.connect({}, () => {
  conn.subscribe('/topic/posts/get', message => {
    const payload = JSON.parse(message.body);
    // Do something with 'payload'
  });
});
Now, once again, since we’re working with observables, we need to tweak it a bit. In this case, we can use cold observables, so that when you unsubscribe from the observable, you simply unsubscribe from the topic as well:
onMessage(topic: string): Observable<any> {
  return this.connect().pipe(first(), switchMap(client => {
    return new Observable<any>(observer => {
      const subscription: StompSubscription = client.subscribe(topic, message => {
        observer.next(JSON.parse(message.body));
      });
      return () => client.unsubscribe(subscription.id);
    });
  }));
}
By using the switchMap() operator, we can switch from the original observable containing the client, to an observable containing the messages that are being sent. One issue though is that some messages are plain text, so we need to be able to define whether or not we need to use JSON.parse() or not.
To do that, I basically created two handler functions:
static jsonHandler(message: Message): any {
  return JSON.parse(message.body);
}

static textHandler(message: Message): string {
  return message.body;
}
And then I added a parameter to the onMessage() function that defaults to the jsonHandler:
onMessage(topic: string, handler = SocketClientService.jsonHandler): Observable<any> {
  return this.connect().pipe(first(), switchMap(client => {
    return new Observable<any>(observer => {
      const subscription: StompSubscription = client.subscribe(topic, message => {
        observer.next(handler(message));
      });
      return () => client.unsubscribe(subscription .id);
    });
  }));
}
And finally, I added an additional method called onPlainMessage:
onPlainMessage(topic: string): Observable<string> {
  return this.onMessage(topic, SocketClientService.textHandler);
}
Sending messages
Sending messages can be done using the client.send() function. So, let’s write a wrapper using observables as well:
send(topic: string, payload: any): void {
  this.connect()
    .pipe(first())
    .subscribe(client => client.send(topic, {}, JSON.stringify(payload)));
}
Once again I’m using the first() function to immediately complete/clean up the observable as soon as a client is obtained. After that we simply call the send() function and we’re done.
Testing it out
As you may have noticed in my last tutorial, I’m going to write a simplified Reddit-clone. My first job is to fetch a list of all posts, so let’s create a service called PostService and use the service we just wrote:
@Injectable({
  providedIn: 'root'
})
export class PostService {

  constructor(private socketClient: SocketClientService) {
  }

  findAll(): Observable<PostListing[]> {
    return this.socketClient
      .onMessage('/topic/posts/get')
      .pipe(first(), map(posts => posts.map(PostService.getPostListing)));
  }

  static getPostListing(post: any): PostListing {
    const postedAt = new Date(post['postedAt']);
    return {...post, postedAt};
  }
}
If you didn’t follow the Spring tutorial, I basically wrote the code so that as soon as you subscribe to the /topic/posts/get topic, a message is sent back containing all posts. That means that if you subscribe to it, as soon as you get your first response, you can unsubscribe again, so that’s why I used the first() operator here. I also added a mapping to convert the dates to proper date objects.
The next step is to create a component called PostListingPageComponent that will call this service for us:
@Component({
  selector: 'app-post-listing-page',
  templateUrl: './post-listing-page.component.html'
})
export class PostListingPageComponent implements OnInit {
  posts: PostListing[];

  constructor(private service: PostService) { }

  ngOnInit(): void {
    this.service
      .findAll()
      .pipe(map(posts => posts.sort(PostListingPageComponent.descendingByPostedAt)))
      .subscribe(posts => this.posts = posts);
  }

  static descendingByPostedAt(post1: PostListing, post2: PostListing): number {
    return post2.postedAt.getTime() - post1.postedAt.getTime();
  }
}
That’s all you really need to make this work. All that’s left is to properly render them within the template, and to apply some routing and CSS. The result could eventually look like the one in the screenshot below.

Creating new posts
The next part to test out is sending messages through WebSockets. We already prepared the SocketClientService to do that, so all we have to do is to actually use it. So let’s get started by adding a new function to the PostService:
save(post: PostInput) {
  return this.socketClient.send('/topic/posts/create', post);
}
This will send a message of type PostInput to the socket service after which the backend will save the object inside a database.
To test this out, I’m going to create a new page component called the CreatePostPageComponent:
@Component({
  selector: 'app-create-post-page',
  templateUrl: './create-post-page.component.html'
})
export class CreatePostPageComponent {
  newPost: PostInput = {title: '', content: ''};

  constructor(private postService: PostService, private router: Router) { }

  createPost(input: PostInput): void {
    this.postService.save({...input, authorId: 1});
    this.router.navigate(['/posts']);
  }
}
We’re providing a dummy PostInput object, and we have a function that will call the service, and then navigate back to the post overview. For this demo, I’m not using security, so I’ve hardcoded the author ID to 1 here.
The next component I’m going to create is a component called PostFormComponent. This will allow me to re-use the same form for creating and editing posts:
@Component({
  selector: 'app-post-form',
  templateUrl: './post-form.component.html'
})
export class PostFormComponent implements OnChanges {
  form: FormGroup = this.fb.group({
    title: ['', Validators.required],
    content: ['', Validators.required]
  });

  @Input()
  post: PostInput;
  @Output()
  onPost: EventEmitter = new EventEmitter();

  constructor(private fb: FormBuilder) { }

  ngOnChanges(): void {
    this.form.controls.title.setValue(this.post.title);
    this.form.controls.content.setValue(this.post.content);
  }

  onSubmit(): void {
    this.onPost.emit({title: this.form.controls.title.value, content: this.form.controls.content.value});
  }

}
<div class="inner-container">
  <article>
    <form [formGroup]="form" (submit)="onSubmit()">
      <label>Title</label>
      <input type="text" formControlName="title" />

      <label>Content</label>
      <textarea rows="10" formControlName="content"></textarea>

      <button [disabled]="form.invalid">Create post</button>
    </form>
  </article>
</div>
Within this component we’re using reactive forms to provide some validations, and when we save the post, we call the onPost even emitter, which we’ll now bind to the createPost() function within the CreatePostPageComponent template:
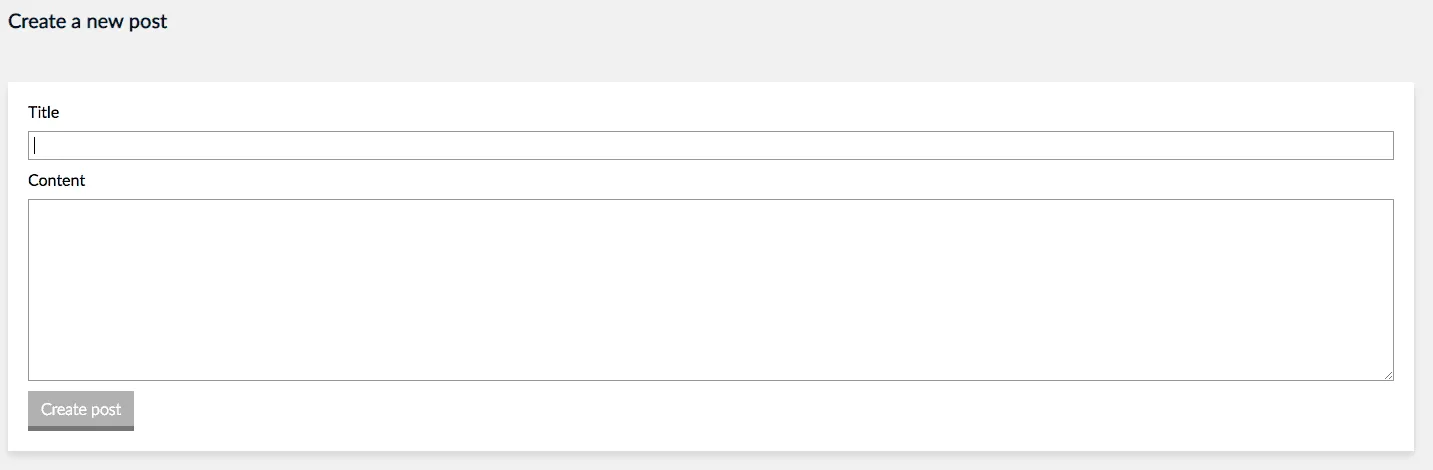
<h1>Create a new post</h1>
<app-post-form [post]="newPost" (onPost)="createPost($event)"></app-post-form>
After this, we can now successfully create new posts using WebSockets.
Unlocking the full power of WebSockets
What’s great about WebSockets though is that the server can let us know when something changed. For example, people could subscribe to a topic that gets a message whenever a new post is being created, so that they could add the post to the post list overview. Within the backend, we already implemented this, when a post is created through the /topic/posts/create topic, the saved result is sent back to the /topic/posts/created topic. Basically we could listen to that, and make it work.
First of all, we need to create a new method within PostService:
onPost(): Observable {
  return this.socketClient.onMessage('/topic/posts/created').pipe(map(post => PostService.getPostListing(post)));
}
Just like before, we’re using the map() function to properly convert the date into a Date object. What’s different though is that we’re not using the first() operator. This makes sense, since we want to listen for all changes, and not just the first one. That does mean we need to manually clean up the observable afterwards though. We’ll do this later in this article!
However, back to the PostListComponent, we can subscribe to those changes within the ngOnInit() lifecycle hook:
ngOnInit(): void {
  this.service
    .findAll()
    .pipe(map(posts => posts.sort(PostListingPageComponent.descendingByPostedAt)))
    .subscribe(posts => this.posts = posts);
  this.service
    .onPost()
    .subscribe(post => {
      this.posts.push(post);
      this.posts.sort(PostListingPageComponent.descendingByPostedAt);
    });
}
So, what happens here is that we push the new post to the array, and sort the posts again. We could actually use the unshift() operator, but I prefer it this way so that if two posts get posted at the same time, they are correctly sorted by their date, rather than by the time we obtain a message from them.
But that’s basically it, if you create a new post now, and you open the post overview in a second tab, you’ll see that the post overview will be updated there as well.
Unsubscribing
Now, one issue we have right now is that if we switch pages, our subscriptions aren’t released and we’re basically having a memory leak. To solve that, we can unsubscribe. To make this happen, you can either store the subscriptions as fields, or you can create a separate subject within the PostListingPageComponent, for example:
private unsubscribeSubject: Subject = new Subject();
After that, you can modify the ngOnInit() method to use the takeUntil() operator:
ngOnInit(): void {
  this.service
    .findAll()
    .pipe(map(posts => posts.sort(PostListingPageComponent.descendingByPostedAt)), takeUntil(this.unsubscribeSubject))
    .subscribe(posts => this.posts = posts);
  this.service
    .onPost()
    .pipe(takeUntil(this.unsubscribeSubject))
    .subscribe(post => {
      this.posts.push(post);
      this.posts.sort(PostListingPageComponent.descendingByPostedAt);
    });
}
And now we can implement the OnDestroy interface like this:
ngOnDestroy(): void {
  this.unsubscribeSubject.next();
  this.unsubscribeSubject.complete();
}
If you go back to your application now, and you would switch pages, you’ll see that it properly cleans up subscriptions within the console.
Handling errors
Handling errors is just the same thing over again. Within the backend, we wrote the code so that if certain exceptions occur, they are sent to a topic called /user/topic/error. Only the user who caused the exception will get these messages, so we don’t have to worry that other people will see your errors.
So basically, all we have to do is the same thing we have already done. First let’s create a new service:
@Injectable({
  providedIn: 'root'
})
export class ErrorService {

  constructor(private socketClient: SocketClientService) { }

  onError(): Observable {
    return this.socketClient.onPlainMessage('/user/topic/error');
  }
}
And then let’s create a component that will listen to these messages:
@Component({
  selector: 'app-error-handler',
  templateUrl: './error-handler.component.html'
})
export class ErrorHandlerComponent implements OnInit, OnDestroy {
  message: string;
  private unsubscribeSubject: Subject = new Subject();

  constructor(private errorService: ErrorService) { }

  ngOnInit(): void {
    this.errorService.onError().pipe(takeUntil(this.unsubscribeSubject)).subscribe(message => this.message = message);
  }

  ngOnDestroy(): void {
    this.unsubscribeSubject.next();
    this.unsubscribeSubject.complete();
  }

  clear(event: Event) {
    this.message = null;
    event.preventDefault();
  }
}
And the template:
<p *ngIf="message != null" class="error">
{{message}}
<a class="close" href="" (click)="clear($event)">×</a>
</p>
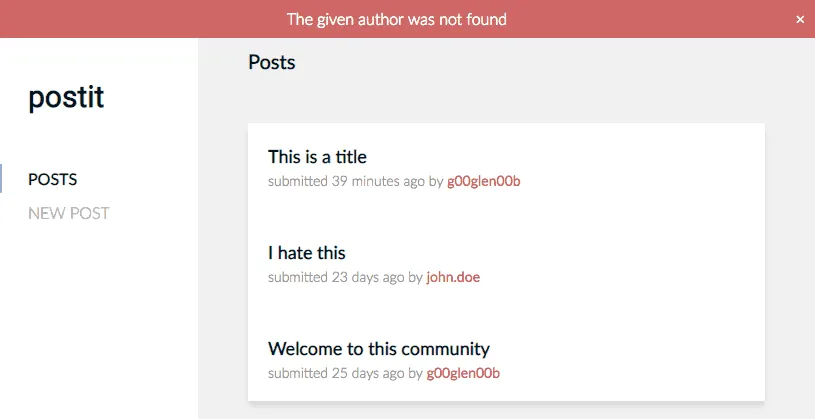
Now, that’s all you need. To test it out, you could change the author ID within the CreatePostPageComponent to a value that doesn’t exist (anything except 1 or 2). If you add the component to your application, and apply some CSS, it could look like this when you’re trying to add a new post:
And with this, I’m going to wrap up this tutorial. As usual, the full code can be found on GitHub.