
Recently, I’ve moved over my blog to Gatsby, with Wordpress as a headless CMS. In this tutorial, I’ll show how you can set up Gatsby in such way.

Setting up a new project
First things first, you’ll have to set up a new project with npm. The easiest way to get started is by using the Gatsby CLI. You can either install it globally with npm install -g gatsby-cli, or you can install it locally and use a tool like npx:
npm install gatsby-cli --save
npx gatsby new my-cool-project
Once installed, you can install the WordPress plugin for Gatsby, by installing the following dependency:
npm install gatsby-source-wordpress --save
After that’s done, you’re ready to go!
Exploring a Gatsby project
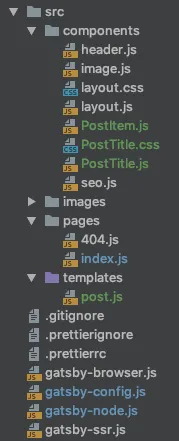
In your generated Gatsby project, you could find the following Gatsby configuration files:
- You can use the gatsby-config.js file is to configure Gatsby and its plugins.
- Additionally, you can also call a few hooks in Gatsby. You should put hooks called during server-side rendering should be put within the gatsby-ssr.js file.
- If you want things to happen at certain times within the browser (eg. when a page is loaded), you should put these within the gatsby-browser.js file.
- Any action that should happen during build time, such as creating new pages, should be put within the gatsby-node.js file.
Next to these configuration files, there is also the src/ folder containing all our components. Within the src/pages folder, we can put any page component that should result in a static page. For example, index.js will contain the homepage and 404.js will contain the 404 page. Additionally, you can define custom page components such as about.js which will be served as http://localhost:8000/about/.
Within a page, you can use smaller-scoped React components, which you should put within the src/components folder.
Last but not least, there is the src/templates folder. You can use this folder for dynamic page components. For example, you can use it for a detail page that has different data depending on the context.
Exploring the index page
If we check the src/pages/index.js page, we see that it contains some dummy content:
const IndexPage = () => (
  <Layout>
    <SEO title="Home" />
    <h1>Hi people</h1>
    <p>Welcome to your new Gatsby site.</p>
    <p>Now go build something great.</p>
    <div style={{ maxWidth: `300px`, marginBottom: `1.45rem` }}>
      <Image />
    </div>
    <Link to="/page-2/">Go to page 2</Link>
  </Layout>
)
Since we don’t need this dummy content, we can remove most of it, and keep the Layout and SEO components:
const IndexPage = () => (
  <Layout>
    <SEO title="Home" />
  </Layout>
)
The Layout component contains our site header and footer, so we’re going to keep those. The SEO component uses React Helmet, to properly add things that belong to the <head> of the document, such as the title, meta tags and so on.
Configuring the WordPress plugin
As I’ve mentioned before, Gatsby plugin configuration should be put within the gatsby-config.js file.
Within this file, we need to add a new object to the “plugins” array, like this one:
{
  resolve: `gatsby-source-wordpress`,
  options: {
    baseUrl: `my.wordpress.domain.org`,
    protocol: `https`,
    hostingWPCOM: false,
    useACF: false,
    perPage: 100,
    concurrentRequests: 10,
    includedRoutes: [
      `**/categories`,
      `**/posts`,
      `**/pages`,
      `**/media`,
      `**/tags`,
      `**/taxonomies`
    ],
    excludedRoutes: [],
  }
}
This plugin will use the WordPress API to fetch all data. By configuring this plugin, you can tell exactly which data should be fetched, and how it should be fetched. For example, you can configure the endpoints that you want to fetch, how many simultaneous requests you want to make and so on.
Additionally, you can tell it whether you use a self-hosted WordPress or not, and if you use the advanced custom fields plugin, which can be integrated with.
Testing it out
After adding the configuration, you can test it out by running the application by using npm start or by using gatsby develop. While building, it will fetch all information from your WordPress site, and provide it as a GraphQL API. Once done, you’ll see two URLs appear, one for your application, and the other one to test your GraphQL API.
If we open the GraphQL endpoint, usually found at http://localhost:8000/\_\_graphql, we can select the fields we want to retrieve on the left side, and execute it.
For example, let’s say I want to fetch the latest 5 posts, I could execute the following query:
{
  allWordpressPost(limit: 5, sort: {fields: date, order: DESC}) {
    edges {
      node {
        excerpt
        date(formatString: "MMMM Do, YYYY")
        slug
        tags {
          name
        }
        title
      }
    }
  }
}
The response should be a JSON array containing the excerpt, the date, slug, the tag names, and the title.
Building a page
Now that we know that our WordPress data is imported properly, we can build an index page by using the GraphQL API. To do this, we can use the new useStaticQuery react hook provided by Gatsby:
const {allWordpressPost} = useStaticQuery(graphql`
  {
    allWordpressPost(limit: 5, sort: {fields: date, order: DESC}) {
      edges {
        node {
          excerpt
          slug
          tags {
            name
          }
          title
          date(formatString: "MMMM Do, YYYY")
        }
      }
    }
  }
`);
Now we can use allWordpressPost in our React components. For example, I could create a PostTitle component:
export const PostTitle = ({title, date, tags, slug}) => (
  <h1 className="post-title">
    <Link to={`/${slug}`}>{title}</Link>
    <small>
      {date}
      {` | `}
      {tags != null && tags.map(({name}) => <span>{name}</span>)}
    </small>
  </h1>
);
Additionally, I can create a PostItem component:
export const PostItem = ({node}) => (
  <article>
    <PostTitle
      title={node.title}
      tags={node.tags}
      date={node.date}
      slug={node.slug}/>
    <p>{node.excerpt}</p>
  </article>
);
And finally, we can iterate over the allwordpressPost.edges within the index page to use the PostItem component:
return (
  <Layout>
    <SEO title="Home" />
    {allWordpressPost.edges.map(({node}) => <PostItem node={node}/>)}
  </Layout>
);
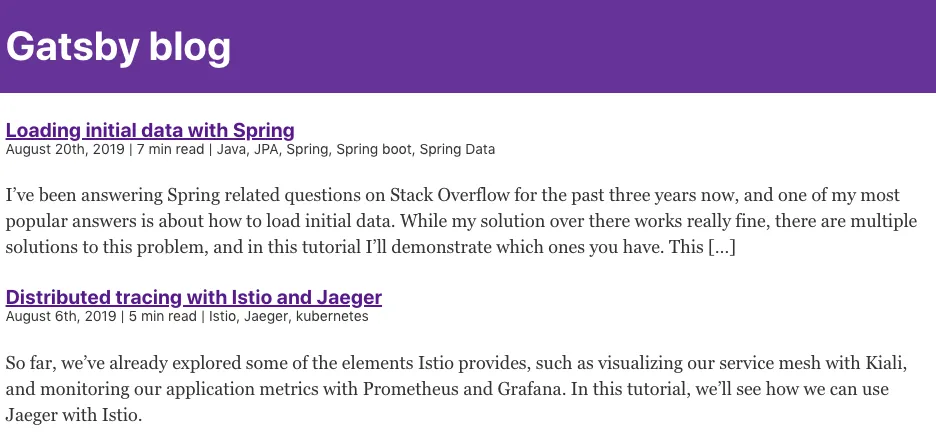
Once you run this application, the result should be something like this:
And there you have it, you properly integrated WordPress with Gatsby. Next time, we’ll implement a proper detail page, and add some extra features. If you’re interested in the code, you can check out the source code of my blog on GitHub.