
Unit testing your Spring boot applications
Contents
- What is unit testing
- Getting started
- Writing a test
- Creating parameterized tests
- Testing exceptions
- Mocking dependencies
- Interacting with the mock
- Capturing arguments
- Advanced answering with mocks
- Assertions for collections
- Useful builtin mocks
- What should I test
- Conclusion
What is unit testing
There are various ways of testing your application. First of all we have to differentiate between manual and automated testing. With manual testing, a user goes through certain flows of the application to verify if the most common functionality is working.
However, this doesn’t scale, so in addition to manual testing, we usually write automated tests as well. With automated tests, we run various tests automatically during the build phase.
One of these automated tests are unit tests. With unit tests, we try to test a specific isolated part of the code, also called a unit. For example, if you have a method for creating a new user in your application, you could write a unit test for the creation/validation process. Beware, during these unit tests we don’t test the integration with other parts of the application, such as other methods, database interactions and so on.
Getting started
To be able to write unit tests, we need a few things. First of all, we need a testing library which allows us to write and run tests. The default testing framework for Spring boot is JUnit.
The second part is that we need an assertion library to write down what our expectations are within the unit test. While JUnit comes with its own assertion library, it’s a bit limited in functionality. That’s why we often use AssertJ.
The final part is that since we want to write isolated unit tests, we have to add a mocking framework to mock all interactions with other systems and classes. A common library to do this is Mockito.
Luckily, Spring already has a starter that includes all three libraries. So all you have to do is open our pom.xml and add:
<dependency>
    <groupId>org.springframework.boot</groupId>
    <artifactId>spring-boot-starter-test</artifactId>
    <scope>test</scope>
</dependency>
If you’re using Spring boot’s Bill of Materials or BOM (spring-boot-dependencies or spring-boot-starter-parent), you do not need to define a version number.
If you generated your project with Spring Initializr, the testing library will automatically be added to your project.
Writing a test
Let’s assume the following class:
class MedicationAvailabilityEntity {
    private BigDecimal quantity;
    private BigDecimal initialQuantity;

    // TODO: Implement constructor + getters + setters

    public void setQuantity(BigDecimal newQuantity) {
        if (newQuantity.compareTo(BigDecimal.ZERO) < 0) {
            throw new InvalidMedicationAvailabilityException("The quantity cannot be less than zero");
        } else if (newQuantity.compareTo(this.initialQuantity) > 0) {
            throw new InvalidMedicationAvailabilityException("The quantity cannot be more than the initial quantity");
        } else {
            this.quantity = newQuantity;
        }
    }
}
This class has a custom setQuantity method to make sure that a given quantity cannot be less than zero and neither can it exceed the initialQuantity field.
To write a test, we create a class called MedicationAvailabilityEntityTest within the same package as the entity, but within the src/test/java directory.
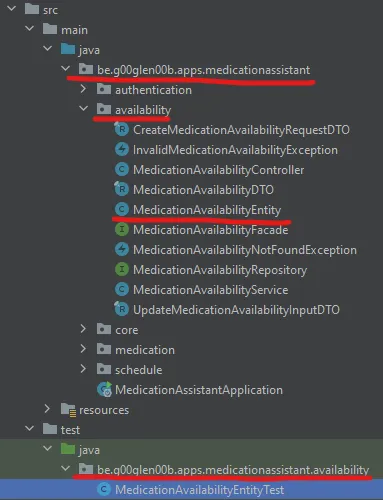
Within IntelliJ, you can generate these classes by using the Ctrl + Shift + T shortcut on Windows or Command + Shift + T on macOS.
After that, we can write a first test to verify that the quantity is updated if it matches all validations.
To do so, we write a test method:
class MedicationAvailabilityEntityTest {
    @Test
    void setQuantity_updatesQuantityIfAtLeastZeroAndLessThanInitialQuantity() {
        // TODO: Implement
    }
}
Within IntelliJ, you can generate a test method by using the Alt + Insert shortcut on Windows or Command + N on macOS.
Be aware: Between JUnit 4 and JUnit 5, the annotations were changed. Many tutorials still refer to the old annotations. To use JUnit 5, make sure that all imports come from org.junit.jupiter.api.
Now we can initialize an object to use within our test:
@Test
void setQuantity_updatesQuantityIfAtLeastZeroAndLessThanInitialQuantity() {
    var entity = new MedicationAvailabilityEntity();
    entity.setInitialQuantity(new BigDecimal("100"));
    // TODO: Implement
}
As you can see, I created an entity and already configured the initial quantity to be 100. This means that the quantity I set should be between (and including) 0 and 100.
To test this, we set the quantity to a value between those limits (eg. 90) and test whether getQuantity() returns 90.
@Test
void setQuantity_updatesQuantityIfAtLeastZeroAndLessThanInitialQuantity() {
    var entity = new MedicationAvailabilityEntity();
    entity.setInitialQuantity(new BigDecimal("100"));

    entity.setQuantity(new BigDecimal("90"));
    assertThat(entity.getQuantity()).isEqualByComparingTo("90");
}
What’s special here is that we use the assertThat() method from AssertJ, which is a static method we can import:
import static org.assertj.core.api.Assertions.assertThat;
The nice thing about AssertJ is that it comes with an easy comparison check.
This is important because BigDecimal’s equals() method only returns true if both the value and the precision are exactly the same.
This means that 100.000 and 100.0 are not considered equal.
In this example, the precision doesn’t change, but from an API perspective, it doesn’t matter to me either if it did change. That’s why equality by comparison is good enough for this example.
To run the test, we can either build our project or run it from our IDE. Within IntelliJ this can be done by clicking the green arrow next to the test method or test class.

Creating parameterized tests
Good unit tests not only test the happy path, but also edge cases. In this example, testing with a quantity of 0 and 100 would be good tests as well. To do so, we could copy our test, change the values and run them all.
However, if you have the same test with only different input/output parameters, you could in stead use a parameterized test.
To do so, change the annotation from @Test to @ParameterizedTest and add a @CsvSource annotation.
For example:
@CsvSource
@ParameterizedTest
void setQuantity_updatesQuantityIfAtLeastZeroAndLessThanInitialQuantity() {
    // ...
}
The next step is to add an array of strings to the @CsvSource annotation, where each string contains a comma separated list of parameters.
In our case, we want to use three parameters, a parameter for the initial quantity, a parameter for the new quantity and a parameter for the expected result.
In addition to defining the @CsvSource, we also need to add the parameters to our test, for example:
@CsvSource({
    "100,90,90",
    "100,0,0",
    "100,100,100"
})
@ParameterizedTest
void setQuantity_updatesQuantityIfAtLeastZeroAndLessThanInitialQuantity(String initialQuantity, String newQuantity, String expectedResult) {
    // ...
}
After that, you can change the test to use the parameters:
@CsvSource({
    "100,90,90",
    "100,0,0",
    "100,100,100"
})
@ParameterizedTest
void setQuantity_updatesQuantityIfAtLeastZeroAndLessThanInitialQuantity(String initialQuantity, String newQuantity, String expectedResult) {
    var entity = new MedicationAvailabilityEntity();
    entity.setInitialQuantity(new BigDecimal(initialQuantity));

    entity.setQuantity(new BigDecimal(newQuantity));
    assertThat(entity.getQuantity()).isEqualByComparingTo(expectedResult);
}
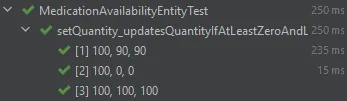
If you run the test now, you’ll see that it runs all examples:
Testing exceptions
Now that we’ve tested the happy path, it’s time to test the exceptions as well. Since our assertion would be different than before, it’s a bad idea to add it as parameters. The best solution would be to create a new test.
After that, we can already define the first part of our test:
@Test
void setQuantity_doesNotUpdateQuantityIfLessThanZero() {
    var entity = new MedicationAvailabilityEntity();
    entity.setInitialQuantity(new BigDecimal("100"));

    entity.setQuantity(new BigDecimal("-1"));
    // TODO: Implement
}
If we run this test now, it would fail because exceptions thrown within the test causes it to fail.
To solve this, we can use AssertJ’s assertThatExceptionOfType() assertion:
@Test
void setQuantity_doesNotUpdateQuantityIfLessThanZero() {
    var entity = new MedicationAvailabilityEntity();
    entity.setInitialQuantity(new BigDecimal("100"));

    assertThatExceptionOfType(InvalidMedicationAvailabilityException.class)
        .isThrownBy(() -> entity.setQuantity(new BigDecimal("-1")))
        .withMessage("The quantity cannot be less than zero");
}
This fluent API allows us to test the type of the exception and the message. However, while this test makes sure that an exception is thrown, we didn’t check whether the quantity remains the original value.
To do so, we can first set the quantity to a valid value, and then write an assertion that the quantity is still the same valid value after trying to set it to a negative value.
@Test
void setQuantity_doesNotUpdateQuantityIfLessThanZero(){
    var entity = new MedicationAvailabilityEntity();
    entity.setInitialQuantity(new BigDecimal("100"));

    entity.setQuantity(new BigDecimal("90"));
    assertThatExceptionOfType(InvalidMedicationAvailabilityException.class)
        .isThrownBy(()->entity.setQuantity(new BigDecimal("-1")))
        .withMessage("The quantity cannot be less than zero");
    assertThat(entity.getQuantity()).isEqualByComparingTo("90");
}
Now we can do the same for a quantity higher than the initial quantity. We can either implement this by refactoring this test to a parameterized test, or by implementing a new test. Personally, I prefer writing separate tests for exceptional cases.
Mocking dependencies
The class we tested so far was quite isolated since it had no dependencies. However, in most of the cases your classes will depend on other classes and so on.
For example, let’s say we have the following code:
@Service
class UserService {
    private final UserRepository repository;

    // TODO: Create constructor

    @Override
    public Optional<UserInfoDTO> findById(UUID id) {
        return repository
            .findById(id)
            .map(this::mapToDTO);
    }

    private UserInfoDTO mapToDTO(User savedUser) {
        return new UserInfoDTO(savedUser.getId(), savedUser.getEmail(), savedUser.getName());
    }
}
To test a method like the findById(), we would have to pass the UserRepository somehow.
One possibility is to pass the real implementation of it. However, if UserRepository depends on other dependencies, you have to create those as well and so on.
To avoid this, we use a mocking library. With the mocking library, we create a dummy implementation of the classes we depend on, such as UserRepository.
This gives us two advantages:
- We don’t need to instantiate dependencies of dependencies of … .
- We have full control over the behaviour of the mock and can make it return stuff the way we want.
The drawback of this approach is that we don’t know if the real implementations would interact properly. This is why you should also write other tests such as integration tests.
To mock a dependency, we use Mockito. For example, we could write a test like this:
class UserServiceTest {
    @Test
    void findById_returnsDTO() {
        var repository = Mockito.mock(UserRepository.class);
        var service = new UserService(repository);
        // TODO: Implement test
    }
}
An important thing to notice is that the prefered way of injecting dependencies is through constructor injection. This allows you to easily inject dependencies without relying on relfection.
A downside of this approach is that we would have to repeat these two lines for each test.
To make our tests less polluted, we can move it to a @BeforEach method, which will be invoked before each test.
For example:
class UserServiceTest {
    private UserService service;
    private UserRepository repository;

    @BeforeEach
    void setUp() {
        repository = Mockito.mock(UserRepository.class);
        service = new UserService(repository);
    }

    // TODO: Implement tests
}
Since this is a common scenario for testing, Mockito made it even easier by allowing you to use the @Mock and @InjectMocks annotations.
To be able to use them, you do have to add the Mockito JUnit extension to your tests though:
@ExtendWith(MockitoExtension.class) // Add this
class UserServiceTest {
    @InjectMocks // Add this
    private UserService service;
    @Mock // Add this
    private UserRepository repository;

    // TODO: Implement tests
}
The @InjectMocks annotation will use constructor injection when possible.
If not available, it will either try injecting through setters or field injection.
Interacting with the mock
If we want to use the mock now, we can use the Mockito.when() method to make it return something.
For example:
@Test
void findById_returnsDTO() {
    var id = UUID.randomUUID();
    var entity = new UserEntity(id, "me@example.org", "Martine Olamilekan", "hash");
    when(repository.findById(id)).thenReturn(Optional.of(entity));

    Optional<UserInfoDTO> result = service.findById(id);
    assertThat(result).contains(new UserInfoDTO(id, "me@example.org", "Martine Olamilekan"));
}
As you can see here, when the findById() method is called with the given ID, it will return the entity we constructed.
Based on that entity, we know what the result of the service.findById() call will be.
In this example, we knew exactly what the parameters of the repository call would be.
Sometimes, you don’t know that. In that case, you can use ArgumentMatchers.any() during the Mockito.when() call.
For example:
@Test
void findById_returnsDTO() {
    var id = UUID.randomUUID();
    var entity = new UserEntity(id, "me@example.org", "Martine Olamilekan", "hash");
    when(repository.findById(any())).thenReturn(Optional.of(entity)); // Using any()

    Optional<UserInfoDTO> result = service.findById(id);
    assertThat(result).contains(new UserInfoDTO(id, "me@example.org", "Martine Olamilekan"));
}
Personally, I prefer using these any() calls during Mockito.when().
To make sure that the repository method was called with the proper arguments, I use Mockito.verify():
@Test
void findById_returnsDTO() {
    var id = UUID.randomUUID();
    var entity = new UserEntity(id, "me@example.org", "Martine Olamilekan", "hash");
    when(repository.findById(any())).thenReturn(Optional.of(entity)); // Using any()

    Optional<UserInfoDTO> result = service.findById(id);
    assertThat(result).contains(new UserInfoDTO(id, "me@example.org", "Martine Olamilekan"));
    verify(repository).findById(id);
}
The reason why I use this approeach in stead of passing id to Mockito.when() is because this provides clear error messages when you call the repository with different arguments.
With the original code, the mock would return Optional.empty() if you pass a different ID to it (or null if you don’t use optionals).
This makes sense, because the IDs don’t match. This causes your test to fail with a NullPointerException or an assertion that doesn’t match.
That means that you would have to find out why the assertion failed.
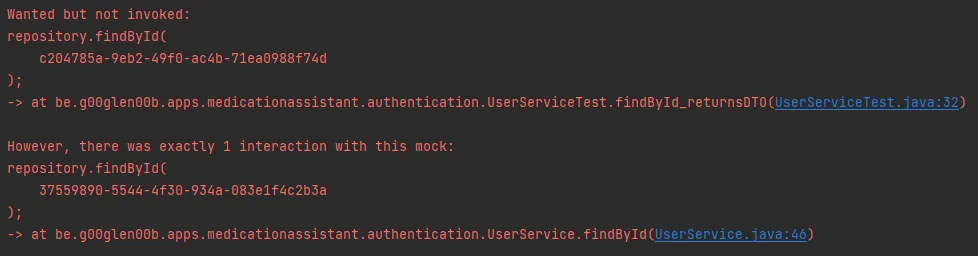
On the other hand, if you use the verify() call, Mockito will provide a clear error message if the mock was called with different arguments.
Be aware: If you have a method with multiple arguments, either all arguments should be argumentcaptors or concrete arguments. The following will not work:
when(repository.findByEmailAndName(any(), "Martine Olamilekan")).thenReturn(Optional.of(entity));To solve this, you can use
any()for both parameters or useArgumentMatchers.eq():when(repository.findByEmailAndName(any(), eq("Martine Olamilekan"))).thenReturn(Optional.of(entity));
Capturing arguments
As we’ve seen now, using Mockito.verify() with the argument matchers can be used to verify interactions with the mock.
However, in some scenario’s you might need more information about the arguments that were passed to the mock.
For example:
@Transactional
public UserInfoDTO createUser(String email, String name, String password) {
    String hash = passwordEncoder.encode(password);
    UserEntity user = UserEntity.create(email, name, password);
    UserEntity savedUser = repository.save(user);
    return mapToDTO(savedUser);
}
In this example, we pass a UserEntity object to the mock within the repository.save() method.
If we want to make sure that certain fields match our expectations, we can use an ArgumentCaptor.
An ArgumentCaptor can be constructed with the ArgumentCaptor.forClass() method, but this provides no support for generics.
Another approach is to use the @Captor annotation within our test. For example:
@Captor
private ArgumentCaptor<UserEntity> anyUserEntity;
Now we can write a test like this:
@Test
void create_savesEntityBasedOnInput() {
    var id = UUID.randomUUID();
    var entity = new UserEntity(id, "me@example.org", "Martine Olamilekan", "hash");
    when(repository.save(any())).thenReturn(entity);
    when(passwordEncoder.encode(any())).thenReturn("hash");

    service.createUser("me@example.org", "Martine Olamilekan", "password");
    verify(repository).save(anyUserEntity.capture()); // Use capture()
    assertThat(anyUserEntity.getValue().getEmail()).isEqualTo("me@example.org");
    assertThat(anyUserEntity.getValue().getName()).isEqualTo("Martine Olamilekan");
    assertThat(anyUserEntity.getValue().getPassword()).isEqualTo("hash");
}
By using anyUserEntity.capture() in stead of any(), we can then use anyUserEntity.getValue() to obtain the object that was passed to the mock.
This allows us to write assertions for that object.
Advanced answering with mocks
So far our tests contained exactly one interaction with a given method of our mocks. However, let’s say that we have a method to create multiple users at once, such as:
@Transactional
public List<UserInfoDTO> createUsers(List<CreateUserInput> inputs) {
    return inputs
        .stream()
        .map(input -> createUser(input.email(), input.name(), input.password()))
        .toList();
}
If we use the same mocks as before, the result would contain the same object three times, because we return a fixed result regardless of the input.
One way we could solve that is by chaining the results:
when(repository.save(any()))
    .thenReturn(entity1)
    .thenReturn(entity2)
    .thenReturn(entity3);
This allows us to pass a different entity for each time the method is invoked. However, that means that our test would grow rapidly, as we also need to construct three different objects.
One solution to this problem is to return the entity that was passed to the mock back as a result.
This can be done with the thenAnswer() method combined with AdditionalAnswers.returnsFirstArg().
For example:
when(repository.save(any())).thenAnswer(returnsFirstArg());
We can also do the same with the passwordEncoder.encode() call:
when(passwordEncoder.encode(any())).thenAnswer(returnsFirstArg());
We have to be very careful when using this approach. If we return the first argument, that means that the original password and the hashed password are exactly the same. That means that we can no longer write an assertion to make sure that the hashed password is passed to the repository (since they’re the same).
To solve that, we can write our own Answer:
when(passwordEncoder.encode(any())).thenAnswer(invocation -> "hash" + invocation.<String>getArgument(0));
In this example, we’re appending the word “hash” to each password, so a password “123456” would become “123456hash”. This allows us to write assertions to make sure that “123456hash” is passed to the entity.
Assertions for collections
So far we’ve already seen how powerful the AssertJ library is. To illustrate this even more, I’m going to write a test for the following method:
@Override
public Page<MedicationDTO> findAllByPartialName(String partialName, Pageable pageable) {
    return repository
        .findAllByPartialName(partialName, pageable)
        .map(this::mapToDTO);
}
Within this method, a list of medication entities is returned, and then mapped to MedicationDTO objects.
The first step to test this is to make our mock work properly:
@Test
void findAllByPartialName_returnsDTOs() {
    MedicationEntity aspirin = MedicationEntity.create("Aspirin");
    MedicationEntity omeprazole = MedicationEntity.create("Omeprazole");
    when(repository.findAllByPartialName(any(), any())).thenReturn(new PageImpl<>(List.of(aspirin, omeprazole)));

    // TODO: Implement
}
Now, if we want to write some assertions, we may encounter a problem.
This is because the MedicationEntity.create() method generates an entity with a random UUID.
One possibility is to pass the ID from the entity (eg. aspirin.getId()) to the DTO we use for asserting if the results match our expectations.
However, in this example we’re more interested whether the names match the names of the entities we created.
To do so, we can use the extracting() method of AssertJ:
@Test
void findAllByPartialName_returnsDTOs() {
    MedicationEntity aspirin = MedicationEntity.create("Aspirin");
    MedicationEntity omeprazole = MedicationEntity.create("Omeprazole");
    when(repository.findAllByPartialName(any(), any())).thenReturn(new PageImpl<>(List.of(aspirin, omeprazole)));

    Page<MedicationDTO> result = service.findAllByPartialName("", PageRequest.of(0, 10));
    assertThat(result.getContent())
        .extracting(MedicationDTO::name)
        .containsOnly("Aspirin", "Omeprazole");
}
Useful builtin mocks
So far we’ve developed several unit tests using Mockito as our mocking framework.
Spring also provides some mock implementations such as MockClientHttpRequest, MockClientHttpResponse, MockPropertySource, MockFilterChain, MockHttpServletRequest and MockHttpServletResponse.
This allows you to write unit tests for filters, interceptors for RestTemplate and so on without having to rely on Mockito.
For example, let’s say we have the following code:
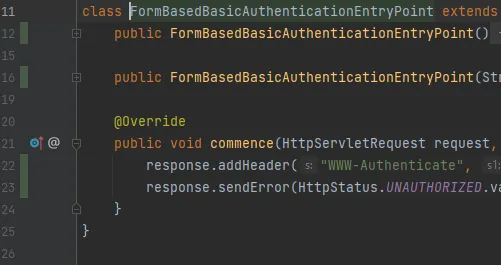
class FormBasedBasicAuthenticationEntryPoint extends BasicAuthenticationEntryPoint {
    public FormBasedBasicAuthenticationEntryPoint() {
        this("Realm");
    }

    public FormBasedBasicAuthenticationEntryPoint(String realmName) {
        setRealmName(realmName);
    }

    @Override
    public void commence(HttpServletRequest request, HttpServletResponse response, AuthenticationException authException) throws IOException {
        response.addHeader("WWW-Authenticate", "FormBased");
        response.sendError(HttpStatus.UNAUTHORIZED.value(), HttpStatus.UNAUTHORIZED.getReasonPhrase());
    }
}
To test whether the response contains the proper status, headers and response message, we can write the following test:
@Test
void commence_setsHeaderAndStatus() throws IOException {
    MockHttpServletRequest request = new MockHttpServletRequest();
    MockHttpServletResponse response = new MockHttpServletResponse();

    entryPoint.commence(request, response, new BadCredentialsException("Credentials are invalid"));
    assertThat(response.getHeader("WWW-Authenticate")).isEqualTo("FormBased");
    assertThat(response.getErrorMessage()).isEqualTo("Unauthorized");
    assertThat(response.getStatus()).isEqualTo(401);
}
This approach allows you to focus on behaviour rather than on implementation details.
For example, the status of a response can be set in several ways.
If you use Mockito to test this, you would use verify() to check if a specific method was called.
Rather than focusing on the way we implement this, the goal should be to check whether the status has been set to 401.
What should I test
Before I round up things, I want to cover one topic that is commonly asked. What should I test? The answer is: it depends.
Ideally, you should write your tests before you start implementing it. This is what we call Test Driven Development or TDD. This means that all business logic should be tested. However, in practice we rarely see projects with 100% coverage. The best thing to do is to discuss a testing goal with your team.
If you’re using IntelliJ, you can view your testing coverage by clicking the green arrow next to your test and choosing the third option called “Run … with Coverage”.
After that, you get a report of the testing percentage of each package and class. In addition, if you browse your code now, lines that are tested will be marked green and lines that aren’t tested will be marked in red.
Keep in mind that your tests should focus on behaviour and not on implementation details. Writing unit tests for configuration classes isn’t a good idea. There are other types of testing that are more suitable for this such as integration tests and end to end tests. Configuration classes will be tested implicitly by these other types of tests.
How many unit, integration and end to end tests you write also depends on your team. Unit tests main advantage is that they’re fast to develop and run. However, the drawback to their isolated nature is that these tests don’t test how these units work together.
You also should focus on testing business logic.
Writing unit tests for your getters and setters is not something you should do unless they contain specific logic such as the setQuantity() method I demonstrated earlier.
Normally these getters and setters will implicitly be tested if you use those getters and setters within your business logic.
If not, it means you’re not using those getters and setters and you should likely remove them.
Conclusion
Unit testing is an essential part of development. With Spring boot, there are already quite some frameworks and tools builtin to make the life of the developers easier. Stay tuned for the next tutorials covering other parts of testing your Spring boot applications.
Most code and test examples come from this repository on GitHub.