
What is CSRF
If you’re developing a REST API with Spring and Spring Security, you probably encountered the CSRF configuration section. Cross Site Request Forgery or CSRF is a technique where the user is tricked into sending a request to an application they’re logged in to.
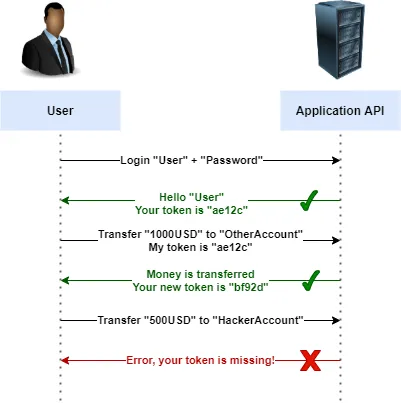
For example, let’s say I’m a customer with bank XYZ and I’m currently logged in to their web application. Their web application has a REST API to transfer money to other people:
http://bank-xyz.com/api/transfer?amount=1000&target=OtherAccount
In this example, this API call would transfer 1000 dollars to OtherAccount. If I personally execute this request, there’s no problem.
However, what if someone with bad intentions sends me this link hidden in an e-mail, and I accidentally click on it? In that case, I would unwillingly send 1000 dollars to this person, which isn’t really good.
You might think that this is a bad API in general, because it uses the GET keyword.
While that’s true, changing the HTTP method doesn’t matter.
The hacker could create their own webpage with a hidden form to the bank API. For example:
<form
  name="transfer"
  action="http://bank-xyz.com/api/transfer"
  method="post"
  style="display: none">
  <input type="hidden" name="amount" value="1000" />
  <input type="hidden" name="target" value="OtherAccount" />
  <button>Submit</button>
</form>
And then, they could make it automatically submit through some JavaScript:
document.transfer.submit()
So even when you use a proper HTTP method, the user can still be tricked into executing certain requests.
A solution to CSRF
Now, how do we solve this? One solution is to make the REST API generate a unique token and send it as a part of the response. The client then has to pass this token back to the REST API for the following call, after which the REST API will respond with a new token and so on.
This prevents malicious requests to the REST API, since they don’t know what the token will be.
Spring Security has this mechanism built in, and it can be enabled by using the .csrf() configuration.
For example:
@Override
protected void configure(HttpSecurity http) throws Exception {
    http
        .csrf()
        .csrfTokenRepository(CookieCsrfTokenRepository.withHttpOnlyFalse());
}
By using this configuration, the response will contain a cookie called XSRF-TOKEN, and Spring will expect a X-XSRF-TOKEN header with each request.
Using CSRF with Springfox and Swagger UI
As you’ve seen now, adding CSRF protection means that you have to customize the client to send this header back. This customization also applies to the Swagger UI client generated with Springfox.
Springfox already comes with CSRF support, as can be seen in their documentation. This can be enabled through the following configuration:
@Bean
SecurityConfiguration security() {
    return SecurityConfigurationBuilder.builder()
        .enableCsrfSupport(true)
        .build();
}
Sadly, this configuration doesn’t work properly yet. The reason that it doesn’t work is because the CSRF token is only fetched once during page load. You can see this behaviour within springfox.js.
Due to this limitation, only the first request will work. After that, you need to refresh the Swagger UI page to try any subsequent request.
Providing your own Swagger UI
Luckily, Swagger UI comes with its own mechanism to alter the request before it’s sent.
This can be done through the requestInterceptor configuration, as can be seen within the Swagger UI documentation.
However, Springfox offers no way to customize the requestInterceptor.
This means that the only solution is to provide your own Swagger UI.
The first step is to add the Swagger UI WebJar to your project. If you’re using Maven, you can do this by adding the following dependency:
<dependency>
    <groupId>org.webjars</groupId>
    <artifactId>swagger-ui</artifactId>
    <version>3.51.2</version>
</dependency>
After that, we can add a file called index.html within src/main/resources/static/swagger-ui/:
<!DOCTYPE html>
<html lang="en">
<head>
  <meta charset="UTF-8">
  <title>Swagger UI</title>
  <link rel="stylesheet" type="text/css" href="/webjars/swagger-ui/3.51.2/swagger-ui.css" />
  <link rel="icon" type="image/png" href="/webjars/swagger-ui/3.51.2/favicon-32x32.png" sizes="32x32" />
  <link rel="icon" type="image/png" href="/webjars/swagger-ui/3.51.2/favicon-16x16.png" sizes="16x16" />
  <link rel="stylesheet" type="text/css" href="./index.css" />
</head>

<body>
<div id="swagger-ui"></div>

<script src="/webjars/swagger-ui/3.51.2/swagger-ui-bundle.js" charset="UTF-8"> </script>
<script src="/webjars/swagger-ui/3.51.2/swagger-ui-standalone-preset.js" charset="UTF-8"> </script>
<script src="./index.js" charset="UTF-8"></script>
</body>
</html>
This HTML file is loosely based upon the original HTML file provided by Swagger UI. The main difference is that I changed the paths to refer to the WebJar, and that I removed the inline styling and inline scripts. In stead, I’ll create a file called index.js and index.css within the same folder as the freshly created index.html.
Within index.css I pasted the same styling as from the original HTML template:
html {
  box-sizing: border-box;
  overflow: -moz-scrollbars-vertical;
  overflow-y: scroll;
}

*, *:before, *:after {
  box-sizing: inherit;
}

body {
  margin:0;
  background: #fafafa;
}
With our own setup complete, we can safely disable the Swagger UI generated by Springfox. To disable this, add the following property to application.properties:
springfox.documentation.swagger-ui.enabled=false
If we run our application now, we should be able to see a white page at http://localhost:8080/swagger-ui/index.html.
Configuring SwaggerUIBundle
The next step is to properly configure Swagger UI so we no longer get an empty page. As I mentioned before, Swagger UI has many configurable options. Luckily, we don’t have to configure all of those by ourselves, since Springfox already provides an API with most values configured:
The /swagger-resources API contains the configuration for Swagger UI to refer to the proper Swagger JSON specification. This JSON specification contains information about which endpoints your API contains.
Next is the /swagger-resources/configuration/ui API. This API contains the configuration about what the user interface should look like.
For example, this configuration tells us what information should be collapsed within the user interface and what shouldn’t.
Most of these options can be configured by providing a UiConfiguration bean.
And finally, there’s the /swagger-resources/configuration/security API. This API contains the configuration necessary to set up OAuth2 and other security related options.
Now, to load the configuration with Swagger UI, I’m going to add the following function to index.js:
async function fetchJsonConfig(url) {
  const credentials = 'same-origin';
  const headers = {
    'Accept': 'application/json',
    'Content-Type': 'application/json'
  };
  const response = await fetch(url, {headers, credentials});
  return await response.json();
}
Once that’s done, we can create the following function within index.js:
window.onload = async function() {
  const uiConfig = await fetchJsonConfig('/swagger-resources/configuration/ui');
  const securityConfig = await fetchJsonConfig('/swagger-resources/configuration/security');
  const resources = await fetchJsonConfig('/swagger-resources');
  window.ui = SwaggerUIBundle({
    url: '',
    dom_id: '#swagger-ui',
    urls: resources,
    ...securityConfig,
    ...uiConfig,
    presets: [
      SwaggerUIBundle.presets.apis,
      SwaggerUIStandalonePreset
    ],
    plugins: [
      SwaggerUIBundle.plugins.DownloadUrl
    ],
    oauth2RedirectUrl: '/webjars/swagger-ui/3.51.2/oauth2-redirect.html',
    showMutatedRequest: true,
    modelPropertyMacro: null,
    parameterMacro: null,
    layout: 'StandaloneLayout'
  });
};
Beware, I’m using async/await and the spread operator. This syntax is not supported in Internet Explorer nor early versions of Edge.
If you refresh the blank Swagger UI page now, you should be able to see the Swagger UI in all of its glory.

Configuring the requestInterceptor
Even though we can properly see our operations now, CSRF support is still not enabled. To enable this, we have to read the XSRF-TOKEN cookie and pass it as a header.
To read this cookie, we can either parse document.cookie by ourselves, or rely on a library like universal-cookie.
To use universal-cookie, I’m going to add the following script to index.html:
<script crossorigin src="https://unpkg.com/universal-cookie@4/umd/universalCookie.min.js"></script>
Make sure to add this before loading the index.js script.
After that, I changed the window.onload function to load the universal-cookie library:
window.onload = async function() {
  const uiConfig = await fetchJsonConfig('/swagger-resources/configuration/ui');
  const securityConfig = await fetchJsonConfig('/swagger-resources/configuration/security');
  const resources = await fetchJsonConfig('/swagger-resources');
  // Add this
  const cookies = new UniversalCookie();
  // ...
};
And then I configured the SwaggerUIBundle to read the cookie and pass it as a header:
window.ui = SwaggerUIBundle({
    url: '',
    dom_id: '#swagger-ui',
    urls: resources,
    ...securityConfig,
    ...uiConfig,
    // ...
    // Add this
    requestInterceptor: request => {
      request.headers['X-XSRF-TOKEN'] = cookies.get('XSRF-TOKEN');
      return request;
    },
    // ...
  });
If you refresh Swagger UI now, you should be able to send requests!
Even subsequent calls should still work!
Bonus: Redirecting to index.html
With our current setup, we pretty much mimicked the behaviour that’s provided by Springfox. The major difference is that this setup fully supports CSRF protection as well.
One small difference is that Springfox also provides a proper redirect from the /swagger-ui/ folder to /swagger-ui/index.html.
If we want to add this, then we have to create our own Spring web configuration class and add some view controllers:
@Configuration
public class WebConfig implements WebMvcConfigurer {
    @Override
    public void addViewControllers(ViewControllerRegistry registry) {
        registry.addViewController("/swagger-ui").setViewName("redirect:/swagger-ui/");
        registry.addViewController("/swagger-ui/").setViewName("forward:/swagger-ui/index.html");
    }
}
If we run our application now, we can either visit /swagger-ui, /swagger-ui/ or /swagger-ui/index.html and you’ll end up with the Swagger UI.
Conclusion
Cross Site Request Forgery or CSRF is one of the most common attack vectors. In fact, it used to be part of the OWASP top 10 until 2017. One of the reasons why it’s no longer on that list is because of the builtin support by frameworks like Spring Security.
Even though there are other countermeasures against CSRF (samesite cookies, …), it’s still a good idea to enable CSRF protection. And while Springfox doesn’t properly support CSRF protection yet, it’s not very difficult to add it by yourself by configuring a custom Swagger UI page.
A complete example can be found in a project I’m working on.