
JPA made easy with Spring data's repositories
- January 12th, 2016
- 8 minute read
- JPA Spring Spring boot Spring Data Web
In my previous tutorial I made a simple application to show some superheroes and supervillains. While the application did what it should do it was pretty statically because I used some mock data.
With Spring Data it’s very easy to create a simple CRUD application without the hassle of creating your own DAO’s. Spring Boot makes it even easier for you so you don’t even have to create an EntityManager by yourself, this was usually the stuff that made my head spin when I just started Java development, but no more!

Project setup
Like every Spring boot project we start at start.spring.io. Enter the group ID and artifact ID you like and as dependencies I’m going to select the following:
- JPA: Dependency to use Spring Data JPA
- MySQL: MySQL JDBC driver for connecting to a database (you could choose another driver as well if you know what you’re doing!)
- Web: Dependency for creating web applications
- Thymeleaf: Template engine
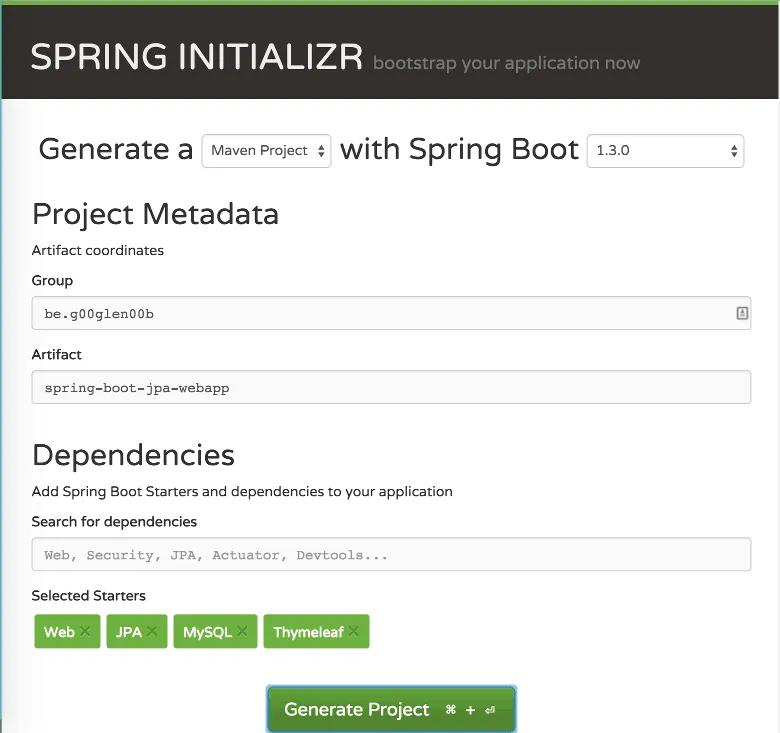
Press the big Generate project button, unzip the archive and open the project in your favourite IDE. You’re now set to create some cool projects with Spring Boot!
Database
In this example I will be using a local MySQL database. In case you don’t have one, you’ll have to install it by yourself. What you also have to do is to create a MySQL database, if you’re on the MySQL CLI, you could use the following command:
CREATE DATABASE test;
To select the created database you use the following command:
USE test
Now the next step is that we’re going to create a table called superhero:
CREATE TABLE IF NOT EXISTS `superhero` (
  `id` INT(11) NOT NULL AUTO_INCREMENT,
  `name` VARCHAR(32) NOT NULL,
  `first_name` VARCHAR(32),
  `last_name` VARCHAR(32),
  `good` bit(1),
  PRIMARY KEY (`id`)
) ENGINE=InnoDB  DEFAULT CHARSET=latin1;
And finally we’re going to insert some records:
INSERT INTO `superhero` (`name`, `first_name`, `last_name`, `good`) VALUES
  ('Superman', 'Clark', 'Kent', 1),
  ('Silver Banshee', 'Siobhan', 'McDougal', 0);
With the database up and running it’s time to write some code!
Spring boot allows you to easily setup your tables and insert data on startup using the schema.sql and data.sql SQL files. No worries, I’ll cover that in another tutorial, soon!
Entity
If you import the generated project into your IDE, you can immediately start adding classes and stuff, without having to do a lot of setup first.
The first thing I’m going to do is to create an entity that resembles the table I just created:
@Entity
@Table(name = "superhero")
public class Superhero {
    @Id
    @GeneratedValue(strategy = GenerationType.AUTO)
    @Column(name = "id")
    private Long id;
    @Column(name = "first_name")
    private String firstName;
    @Column(name = "last_name")
    private String lastName;
    @Column(name = "name")
    private String name;
    @Column(name = "good")
    private boolean good;

    public Long getId() {
        return id;
    }

    public String getFirstName() {
        return firstName;
    }
    public void setFirstName(String firstName) {
        this.firstName = firstName;
    }

    public String getLastName() {
        return lastName;
    }
    public void setLastName(String lastName) {
        this.lastName = lastName;
    }

    public String getName() {
        return name;
    }
    public void setName(String name) {
        this.name = name;
    }

    public boolean isGood() {
        return good;
    }
    public void setGood(boolean good) {
        this.good = good;
    }
}
At first sight this class is a simple POJO with some fields and getters/setters for every field except for the ID. We don’t want people to allow updating the ID, so if you leave out the setter, there is no way you can edit the field. Obviously for instantiation you’ll have to find another mechanism, being either a builder or a constructor with the possibility to add the ID. Or in this case we have an auto-generated ID, so in theory you don’t need any way to set the field, though for testing you still might want to keep a constructor or a builder.
Anyways, next to the fields themselves there are also some JPA annotations. Above the class we can find two of them, called @Entity and @Table. With the first annotation we tell JPA that this class is an entity, while with the second one you tell which table it resembles. If the table name is the same as the class name, you could leave this one away.
Now, for each field we have the @Column annotation to tell what column the field resembles. For the ID we also have the @Id annotation and the @GeneratedValue annotation which tells JPA how the ID is created.
Repository
In the early days you now had to create a DAO class which has methods for creating, updating, deleting and reading data from the table. With Spring Data on the other hand all you need is an interface that extends another interface. For example:
public interface SuperheroRepository extends JpaRepository<Superhero, Long> {
}
So in this case we created an interface called SuperheroRepository, extending Spring’s JpaRepository, providing some generics for the entity and the type of the ID, being Superhero and Long. The reason we have these generics is so the return type and parameter types of the methods can be determined. For example, the findOne() method should accept a parameter of type Long and should return an entity of type Superhero.
Controller
Now the final piece of code is to write a controller that retrieves all entities and returns a ModelAndView to render those superheroes (and villains):
@Controller
@RequestMapping("/superhero")
public class SuperheroController {
    @Autowired
    private SuperheroRepository repository;

    @RequestMapping
    public ModelAndView getSuperheroes() {
        return new ModelAndView("superheroes", "superheroes", repository.findAll());
    }
}
All we have to do when we want to use the repository is to autowire it. By extending from JpaRepository we already have some predefined methods. One of them being findAll(). Now we can simply use that in our controller.
The view
If you followed my last tutorial you know that, if we use ModelAndView in the way we did, the first argument is the name of the view ("superheroes"), the second argument is the name of the model ("superheroes" as well), and the third one is the model.
To create a view called superheroes, we have to go to the src/main/resources/templates folder and create a file called superheroes.html. Inside the file you can provide any HTML template you want, enriched with Thymeleaf syntax.
For our application I’m going to be using the following template:
<!DOCTYPE html>
<html lang="en">
<head>
  <link rel="stylesheet" href="https://maxcdn.bootstrapcdn.com/bootstrap/3.3.5/css/bootstrap.min.css" />
</head>
<body>
<div class="container">
  <table class="table">
    <thead>
    <tr>
      <th>#</th>
      <th>Hero name</th>
      <th>Real name</th>
      <th>Good</th>
    </tr>
    </thead>
    <tbody>
    <tr th:each="hero, status : ${superheroes}">
      <td th:text="${status.count}">1</td>
      <td th:text="${hero.name}">Hero name</td>
      <td th:text="${hero.firstName + ' ' + hero.lastName}">Real name</td>
      <td>
        <span class="glyphicon glyphicon-ok" th:if="${hero.good}"></span>
        <span class="glyphicon glyphicon-remove" th:unless="${hero.good}"></span>
      </td>
    </tr>
    </tbody>
  </table>
</div>
</body>
</html>
If you look at it, you would htink this is a normal HTML file. But if you look closely, you’ll see some special attributes starting with th:. These attributes are part of Thymeleaf and allow you to provide an HTML template.
In this case we have the attribute th:each to loop over all superheroes in the ${superheroes} model. Every time we loop over it we use the hero model to contain the specific superhero and status to contain metadata about the loop itself.
Now, for each table row, we show four cells. The first one contains a number that increases on each loop cycle. We can use the ${status.count} property for that.
For the other properties we will be using the ${hero.name} to retrieve the data of the name property of the Superhero object, and for the other column we will be using the full name of the superhero, being ${hero.firstName + ' ' + hero.lastName}, concatenating both the firstName and lastName properties.
For the final column we’re using the th:if and th:unless attributes to show (or hide )data depending on a boolean condition. In this case we use the good property of the Superhero object to show a tick or a cross if the hero is actually good or evil (villain).
To show the tick or cross symbol we use the Glyphicons set, which is included in Bootstrap by default.
Setting some properties
Before we run our application we have to configure our application to be using the given database, and provide the credentials to connect to it. To do that you can open the application.properties filed inside the src/main/resources folder, or if you prefer using YAML, you can delete the properties file and create a file called application.yml in stead.
I prefer YAML because it shows how the properties are linked together hierarchically:
spring:
  datasource:
    url: jdbc:mysql://localhost:3306/demo
    username: root
    password: 123456
  jpa:
    database-platform: org.hibernate.dialect.MySQLDialect
Using properties it would be:
spring.datasource.url=jdbc:mysql://localhost:3306/demo
spring.datasource.username=root
spring.datasource.password=123456
spring.jpa.database-platform=org.hibernate.dialect.MySQLDialect
Make sure you replace the properties to the correct details.
Testing it out
If you run the application now, and you visit http://localhost:8080/superhero, you should see the application in its full glory.
The entries we stored inside the database are displayed like they should be:

With that we made a simple application that connects to a database and shows you the data in a simple table.
Achievement: Wrote an application with Spring boot, using Spring Data JPA repositories.
If you’re seeing this, then it means you successfully managed to make it through this article. If you’re interested in the full code example, you can find it on GitHub.