
Previous week I went to Devoxx and Pratik Patel gave a great talk about React.js. This was enough for me to start playing with the library. React.js is a JavaScript library for building user interfaces by writing components. It’s a view-oriented library which allows you to write isomorphic components which can be used both in the back-end (to prerender the markup) and in the front-end (to make the user interface adapt to new changes). Since it’s a view-oriented library, it can be used within other libraries/frameworks, for example AngularJS.
The library is not as popular as AngularJS, but is quite popular and used often as well. It’s used (and written by) the folks of Facebook/Instagram.
Setup
Like I said before, React.js allows you to write components that work both in the browser and the back-end (Node.js). Because of that, it’s usually used together with Browserify, a library that allows you to use require() calls and compile it so it works on the front-end. So… when I say compiling, I also say build system! In this example I’m going to use Gulp.js, but if you’re a fan of Grunt, I’m quite sure the same can be done as well. Make sure to read my tutorial about Gulp.js (and even Grunt) if you haven’t read it yet.
So, my initial project structure is the following:
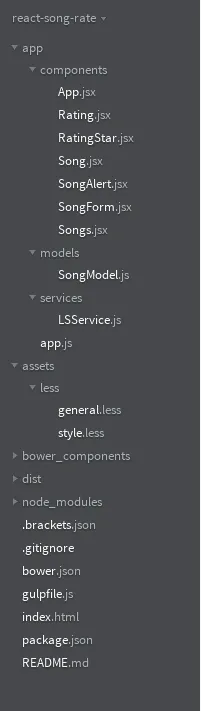
I made two main folders called app and assets. The **assets **folder is the easiest, as it only contains a folder called less and inside are two Less stylesheets called general.less and style.less. The **app **folder on the other hand is a bit more complex, as it represents the core of our application. It contains three folders called components, models and services. The application I’m going to build is a song rate application, where a user can enter a song (by artist and title) and vote/delete them later on.
[
There are several user interface components recognizable in this application:
- Song.jsx: This component represents a single song, containing the title, delete button and the rating.
- Rating.jsx: Each song has a rating component containing stars and their behavior (clicking adjusts the score of the song).
- RatingStar.jsx: The rating component can be divided even further, so that we have a component for each individual star.
- Songs.jsx: The complete list of song components will reside in this component.
- SongForm.jsx: Below the list of songs there’s a form to enter new songs. The form and its behavior reside in this component.
- SongAlert.jsx: When there are no songs in the list, we want to give the user some feedback, just to tell them that the list is empty. This information will reside in this component.
- App.jsx: The complete puzzle can be made with this component, as it contains all other components and represents our entire application. It can be seen as the “root” component in our application.
Notice that the extension of these files is .jsx and not plain JavaScript. With React.js you can use a special templating language called JSX. So, to make them easily recognizable, we use the seperate extension.
Inside the **app **folder there are some other folders/files as well, like app/models/SongModel.js which will represent our model (the data) and app/services/LSService.js, which will be our service to store the songs. The songs will be persisted inside the HTML5 LocalStorage as a JSON serialized string. The main application file, called app.js will be the control center of our application, it will fire everything we need to make our application run.
Building with Gulp
I’m not going to spend a lot of time to this, but with Gulp I’m going to build my application. Before we start with writing our gulpfile.js, we have to define the packages we need to load using package.json. The packages I’m going to use are the following:
{
  "name": "react-song-rate",
  "version": "1.0.2",
  "devDependencies": {
    "gulp": "3.8.10",
    "gulp-run": "1.6.5",
    "gulp-less": "2.0.1",
    "gulp-concat": "2.4.3",
    "gulp-uglify": "1.0.2",
    "gulp-minify-css": "0.3.11",
    "gulp-jshint": "1.9.0",
    "browser-sync": "1.8.2",
    "browserify": "3.44.2",
    "vinyl-source-stream": "1.0.0",
    "vinyl-buffer": "1.0.0",
    "reactify": "0.17.1",
    "del": "1.1.1"
  },
  "paths": {
    "less": "assets/less/*.less",
    "js": "./app/**/*.js",
    "jsx": "./app/**/*.jsx",
    "app": "./app/app.js",
    "html": "*.html"
  },
  "dest": {
    "style": "style.css",
    "app": "app.js",
    "dist": "dist"
  }
}
There are several Node.js packages listed here, so let’s walk through them:
- gulp is the main package used for building applications with gulp.js, it contains a set of APIs to run it all.
- gulp-run will be used to execute shell commands (or commands). In this case I’m going to use it to execute the command
bower installto manage our front-end dependencies. - gulp-less will be used to compile our Less code into simple CSS files.
- gulp-concat will be used to merge multiple files into one. In this case I’m going to use it to merge all compiled CSS files into a single file to reduce network requests.
- gulp-uglify: When you want to minimize your JavaScript code, you will usually look for an uglify tool. In this case I’m using the gulp-uglify plugin to minify all my JavaScript code to reduce the overall size of the application.
- gulp-minify-css: This plugin is to CSS what gulp-uglify is to JavaScript. The gulp-minify-css plugin will be used for minifying the merged and compiled CSS files.
- gulp-jshint: To check the validity of our JavaScript code, we will run it against a set of validation rules using JSHint.
- browser-sync: To make development even easier, we’re going to run a webserver containing the application when the code is built, which will automatically refresh as soon as the code is rebuilt. The browser-sync package makes it possible to do this.
- browserify: Browserify allows you to use CommonJS (/Node.js styled) imports in your front-end code and compile that to a single JavaScript file. This is a similar approach to using AMD build tools, but with Node.js styled imports.
- vinyl-source-streams: Bridge that can convert normal text streams to vinyl/gulp streams. Browserify returns a normal text stream, so we use this module to convert it into a vinyl stream
- vinyl-buffer: Most gulp tasks however require a buffered stream. So, if you want to process your vinyl source stream later on, you will have to convert it to a buffered stream. We do this when we need to uglify the compiled code
- reactify: Reactify converts JSX code into regular JavaScript code.
- del: Before or after building your code, it can be useful to clean the previously built code. To do that, we’re going to use the del package to delete all our built sources.
I also created some extra properties to configure some of the paths that will be used in the Gulp configuration. I could create a variable inside gulpfile.js, but I like adding these parameters to package.json.
Like I said before, I’m not going to spend a lot of time on the Gulp configuration, because most of it is explained in my other tutorial about Gulp (this configuration file is a modified copy of that file). The entire gulpfile.js configuration for this project is:
var gulp = require('gulp'),
    del = require('del'),
    run = require('gulp-run'),
    less = require('gulp-less'),
    cssmin = require('gulp-minify-css'),
    browserify = require('browserify'),
    uglify = require('gulp-uglify'),
    concat = require('gulp-concat'),
    jshint = require('gulp-jshint'),
    browserSync = require('browser-sync'),
    source = require('vinyl-source-stream'),
    buffer = require('vinyl-buffer'),
    reactify = require('reactify'),
    package = require('./package.json'),
    reload = browserSync.reload;

/**
 * Running Bower
 */
gulp.task('bower', function() {
  run('bower install').exec();
})

/**
 * Cleaning dist/ folder
 */
.task('clean', function(cb) {
  del(['dist/**'], cb);
})

/**
 * Running livereload server
 */
.task('server', function() {
  browserSync({
    server: {
     baseDir: './'
    }
  });
})

/**
 * Less compilation
 */
.task('less', function() {
  return gulp.src(package.paths.less)
  .pipe(less())
  .pipe(concat(package.dest.style))
  .pipe(gulp.dest(package.dest.dist));
})
.task('less:min', function() {
  return gulp.src(package.paths.less)
  .pipe(less())
  .pipe(concat(package.dest.style))
  .pipe(cssmin())
  .pipe(gulp.dest(package.dest.dist));
})

/**
 * JSLint/JSHint validation
 */
.task('lint', function() {
  return gulp.src(package.paths.js)
  .pipe(jshint())
  .pipe(jshint.reporter('default'));
})

/** JavaScript compilation */
.task('js', function() {
  return browserify(package.paths.app)
  .transform(reactify)
  .bundle()
  .pipe(source(package.dest.app))
  .pipe(gulp.dest(package.dest.dist));
})
.task('js:min', function() {
  return browserify(package.paths.app)
  .transform(reactify)
  .bundle()
  .pipe(source(package.dest.app))
  .pipe(buffer())
  .pipe(uglify())
  .pipe(gulp.dest(package.dest.dist));
})

/**
 * Compiling resources and serving application
 */
.task('serve', ['bower', 'clean', 'lint', 'less', 'js', 'server'], function() {
  return gulp.watch([
    package.paths.js, package.paths.jsx, package.paths.html, package.paths.less
  ], [
   'lint', 'less', 'js', browserSync.reload
  ]);
})
.task('serve:minified', ['bower', 'clean', 'lint', 'less:min', 'js:min', 'server'], function() {
  return gulp.watch([
    package.paths.js, package.paths.jsx, package.paths.html, package.paths.less
  ], [
   'lint', 'less:min', 'js:min', browserSync.reload
  ]);
});
The only thing that is new in this case is that the JavaScript compilation tasks are a bit different from the previous tutorial. In stead of concatenating all files, we start with our heart of our application called app.js. This file will fire up everything, and will be the root of our entire application. It depends on our model and the App.jsx component, which in turn depend on the other components/JavaScript files. So, if we use Browserify to compile app.js, it will chain through and compile everything.
We don’t have to look at all JavaScript files and we don’t have to concatenate them either, simply use the browserify() to pipe our app.js file and it’s done. However, Browserify will work fine with normal JavaScript files, but with JSX files it will throw errors because it doesn’t recognize it. To solve that, we use the reactify module to transform the code first.
The gulp-browserify module is deprecated and blacklisted in favor of the normal browserify module. However, this module returns simple text streams and these are not compatible with the gulp streams. To overcome this problem we use the vinyl-source-streams module, which acts as a bridge between these two streaming formats. We can then simply write the file to the filesystem without any problem.
The js:min task is also a bit different from the js task. The reason is that after compiling all code using browserify, we still need to uglify it. However, most gulp tasks, like gulp-uglify require buffered streams. To convert the vinyl source stream to a buffered stream, we have to add an additional step to it, using the vinyl-buffer module.
Another change I made are the file locations. In stead of having a lot of duplicate strings of references to the JavaScript files, Less files, …, I added some extra properties to package.json and included package.json into the Gulp configuration file.
Also make sure that you watch both the .js and .jsx files, so that changes are detected in both files.
Manage front-end dependencies using Bower
Our application will use several libraries, including react.js:
- Twitter Bootstrap: To make our life easier and not having to write hundreds of lines of CSS code before we can create a good looking application, we will simply use Twitter Bootstrap.
- Lo-Dash: Who doesn’t love it, utility belt libraries like Lo-Dash and Underscore.js make our life much easier, so yes, I’m going to use it as well in our application.
- Underscore.string: An extension on Underscore.js which can be used on Lo-Dash as well (they’re forks with the same syntax) that allows us to have another set of utilities for manipulating Strings, great! So that’s why I’m using this library.
- Font Awesome: Font Awesome is a font glyph based iconset (like the glyphicons set included with Bootstrap), the only difference is that it’s bigger, and with a lot of varieties, so obviously we need that as well.
Wait before you start downloading them. I like making it easy, so should you. That’s why I’m using Bower to manage my front-end dependencies. Simply make a bower.json file, add the following configuration and you’re done.
{
    "name": "react-song-rate",
    "dependencies": {
        "react": "latest",
        "bootstrap": "latest",
        "lodash": "latest",
        "underscore.string": "latest",
        "font-awesome": "latest"
    }
}
Testing it out
After writing all these files, you only have to add an index.html file on the root of your project and you can start testing it out (add a simple hello world or so). Before executing our Gulp configuration, we have to install the necessary command line tools. Both Bower and gulp.js require you to install a CLI tool, but no worries, that tool is installable through npm as well, by executing the following command:
npm install -g gulp bower
Once you did that, you can execute gulp, go to your project root and execute the following command:
gulp serve
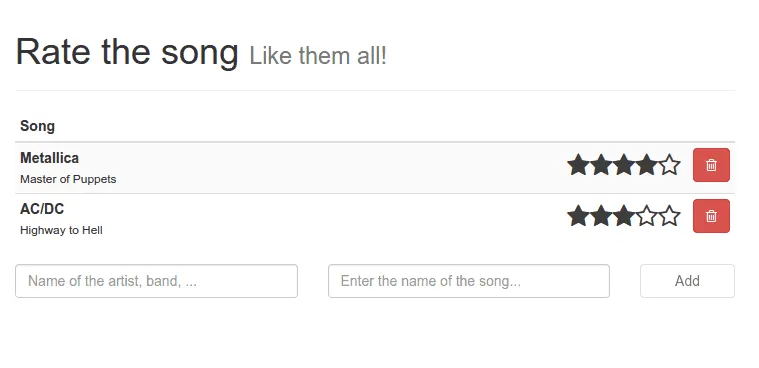
If you followed every step properly, your webapplication should pop-up in your favourite browser, for example:

It certainly looks ugly as hell, but hey, we can now a lot faster. For example, if you change your HTML structure and look back at your browser, it should instantly change.

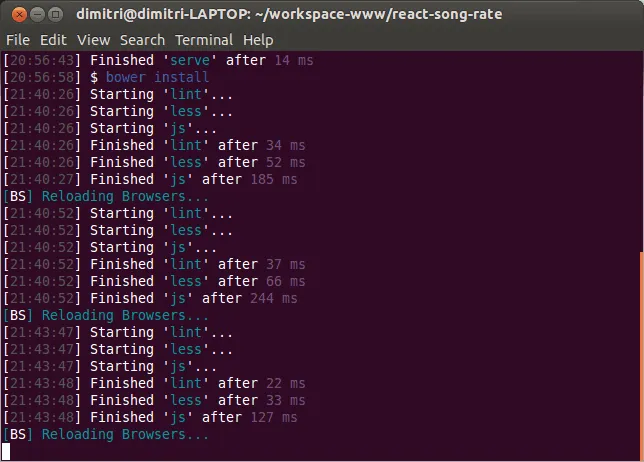
If you don’t believe me, you can always look back at your terminal/console, which should look a bit similar to this:
You’ve set up your entire application structure and build environment, so let’s start coding! Read my next tutorial to read everything you need to know to write your own React.js application.