
Be aware, this article was written for Meteor 0.7. Recently Meteor released their 0.9 version, and things doesn’t seem to work as expected anymore. I will try to look at this as soon as possible, but be patient.
In this tutorial I’m going to show you how easy you can write really cool apps just by using the Meteor platform. In this example I’m going to write an application using the Twitter streaming API, giving you a live feed of what’s going on on Twitter. In stead of just requesting the newest tweets over and over again, you can also choose to stream the latest tweets so you always get the latest tweets automatically.
With Meteor streams you can then stream them to the client which can then show you a small feed.
Project setup
First we need to set up our project. If you installed Meteor and Meteorite this is quite easy, just execute the following commands:
mrt create meteor-twitter-streams cd meteor-twitter-streams mrt remove autopublish mrt add semantic-ui mrt add npm mrt add streams mrt add momentjs mrt
What this does is quite simple. It creates a project called meteor-twitter-streams, it then moves up to make it the current working directory and then it removes/adds some Meteor smart packages. In this case:
- autopublish: The autopublish package is being removed because it automatically publishes each collection. This is great for small testing purposes but in actual apps you want to filter the collections to the client (so that the client only sees what he’s allowed to see).
- semantic-ui: Semantic UI is a UI library, it looks pretty good and the class names are actually quite easy to remember (compared to Twitter Bootstrap for example). It also has a great feed component which I’m going to use in this example.
- npm: Meteor is a platform built upon Node.js. You can easily use packages that are available inside Node.js. However, if you want to use custom Node.js modules from the npm repository, then you need to install the npm module. In this case we’re going to use it for the twitter package.
- streams: Meteor has a great architecture based upon collections. However, if you just want to stream data without persisting, then you need to look for an alternative. Meteor streams is a smart package that helps you with that.
- momentjs: Moment.js is probably the best date/time library for JavaScript. To use it in Meteor you can easily install the momentjs smart package.
Now when we go and look at our project structure, you should be able to find the files meteor-twitter-streams.html, meteor-twitter-streams.css and meteor-twitter-streams.js. This is a great thing when you’re developing small applications, but if you need more complex applications you want to split up your HTML code into views and your JavaScript code into controllers and a part for the serverside code.
So in this example I’m going to use the following directory structure:
- client: This folder will contain our client code.
- server: This folder will contain the code that may only run on the server environment.
- public: This folder will contain extra resources/assets that we need for the web application. In this case I’m going to use it for the Semantic UI fonts and images.
- private: This folder may contain resources/assets that are necessary for the server side code. This is useful for configuration files.
- model: This folder will contain our models. In Meteor you usually talk about collections.
The client code is the most complex one (containing views, controllers and Handlebars helpers), this is why we chose to even add some extra folders here:
- client/app: This folder contains all our application logic (HTML views + JavaScript logic).
- client/app/controllers: This folder contains all view/template related code.
- client/app/views: This folder contains all views. In Meteor you talk about Handlebars templates when you talk about views.
- client/assets: This folder contains all our automatically loaded assets (like stylesheets). In this case I also made a folder called css inside of it.
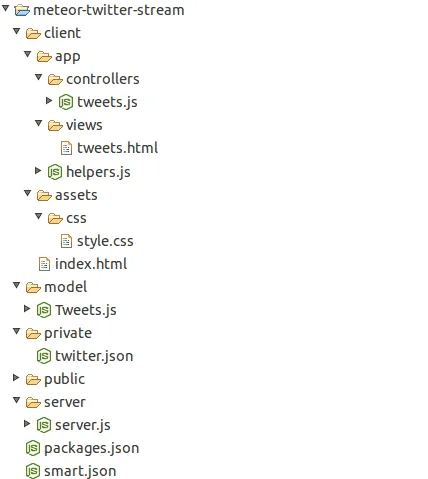
So, make sure you have the same structure as in the screenshot above. Prepare by already creating the necessary files as well. For the public folder you need to download Semantic UI and copy the fonts and images folder inside it. There is currently a bug in the Semantic UI smart package that doesn’t allow it to find its resources (fonts/images). When deploying them seperately in the public folder the issue is resolved.
We also need to include the Twitter Node.js module that I already told you about, to do that, we’re going to need a file called packages.json and add the dependencies you need, for example:
{
    "twitter": "0.2.9"
}
Heads up! The file packages.json should NOT be confused with package.json that you use with Node.js and npm. They have the same purpose (allowing you to load Node.js packages), however, their structure is entirely different!
Twitter streaming
Now we entirely set up our application, so it’s time for making the application stream. The server-side code (server.js) is pretty easy. But before we start with writing it, we’re going to configure our application (twitter.json). When using the Twitter APIs, you need to register an application and allow your user to use the application. If you did that, you should be able to retrieve the following details from the Twitter developer dashboard:
- Consumer key
- Consumer secret
- Access token key
- Access token secret
The consumer key and secret are application dependant, while the access token key and secret are unique for each user (+ application).
So now we put these inside our twitter.json configuration file, together with the hashtag we’re going to look for (in this case #JavaScript).
{
    "consumer": {
        "key": "xxxxxxxxxxxxxxxxxxx",
        "secret": "xxxxxxxxxxxxxxxxxxxxxxxxxxxxxxxxxxxxxxxx"
    },
    "access_token": {
        "key": "xxxxxxxx-xxxxxxxxxxxxxxxxxxxxxxxxxxxxxxxxxxxxxxxxx",
        "secret": "xxxxxxxxxxxxxxxxxxxxxxxxxxxxxxxxxxxxxxxxxx"
    },
    "hashtag": "#javascript"
}
So now we can finally start developing our application. The first step (server.js) is that we’re going to initialize the Twitter streaming module:
var Twitter = Meteor.require("twitter");
var TweetStream = new Meteor.Stream('tweets');
var conf = JSON.parse(Assets.getText('twitter.json'));
var twit = new Twitter({
    consumer_key: conf.consumer.key,
    consumer_secret: conf.consumer.secret,
    access_token_key: conf.access_token.key,
    access_token_secret: conf.access_token.secret
});
So what happens here is that we first include the Twitter Node.js module (Twitter). We then initialize the stream we’re going to use to stream our data to the client (TweetStream). We’re also going to read the configuration file we created just now and parse the JSON contents (conf) and finally we’re going to initialize the Twitter client by providing it the keys we configured earlier (twit).
The most important things to know here are that you can include Node.js modules quite easy by using Meteor.require(). You can also read file contents from the private folder quite easy as well by using Assets.getText(). The only thing you need to do then is convert the plain text to an object by using JSON.parse().
So the next step is to initialize the Twitter stream and when we retrieve new tweets from the stream, we use our own Meteor stream to stream that data to the client. The code for this is easy as well:
twit.stream('statuses/filter', {
    'track': conf.hashtag
}, function(stream) {
    stream.on('data', function(data) {
        TweetStream.emit('tweet', data);
    });
});
So as you can see we first set up the stream by usng twit.stream(). We then read the data from the stream (stream.on()) and send it to our Meteor stream (TweetStream.emit()).
Setting up the client
Before we’re actually going to write templates and JavaScript code for our templates, I’m going to set up the client. First I’m going to write a small stylesheet (style.css). Semantic UI does not provide styling for links, so I’m going to write that myself:
a {
    color: #009FDA;
    text-decoration: none;
}
a:hover {
    color: #00BAFF;
}
Then the next thing I’m going to do is write my main application HTML code (index.html). This is going to pretty easy, because the only thing I’m going to do is load my tweets template/view:
<head>
  <title>Tweets for #JavaScript</title>
</head>

<body>
  {{> tweets}}
</body>
As you can see this file is pretty empty. Meteor automatically loads all files you need. So if you put extra JavaScript code, stylesheets or HTML files inside your client folder, then they’re automatically picked up and added to your application. No more <script> tag hell for us!
Handlebars
Handlebars.js is the templating engine behind Meteor. It’s actually one of the most popular templating engines, also being used in Ember.js and Backbone.js. In this example I’m going to extend the functionality of Handlebars by defining extra helpers. These helpers can be used to render content in a different way.
The first helper (helpers.js) that I’m going to write will format the timestamp of the tweet, I’m going to use the HH:mm:ss format here:
Handlebars.registerHelper('moments', function(date) {
    return moment(date).format('HH:mm:ss');
});
As you can see it’s quite easy. I use the moment.js module to format a specific date and return the desired output.
A more comple helper is the helper to format the tweet text. As you may know from the Twitter API, the text that is returned does not provide links (like mentions, hashtags or URLs). So in this case I’m going to do that myself by using the following helper:
Handlebars.registerHelper('linkify', function(tweet) {
    var out = tweet.text;
    out = out.replace(/[A-Za-z]+:\/\/[A-Za-z0-9-_]+\.[A-Za-z0-9-_:%&~\?\/.=]+/g, function(url) {
        var tweetText = url;
        if (tweet.entities.urls !== undefined && tweet.entities.urls.length > 0) {
            var myUrl = _.find(tweet.entities.urls, function(urlObj) {
                return urlObj.url === url;
            });
            if (myUrl !== undefined && myUrl !== null) {
                tweetText = myUrl.display_url;
            }
        }
        return tweetText.link(url);
    });
    out = out.replace(/[#]+[A-Za-z0-9-_]+/g, function(hash) {
        txt = hash.replace("#", "");
        return hash.link("http://twitter.com/search/%23" + txt);
    });
    out = out.replace(/[@]+[A-Za-z0-9-_]+/g, function(u) {
        var username = u.replace("@","")
        return u.link("http://twitter.com/" + username);
    });
    return out;
});
This is probably the most complex helper I’ve ever written, but don’t worry, it’s also the hardest piece of code in this entire tutorial. What I’m going here is actually three things. First I’m going to use a regular expression to find all URLs inside the tweet. Then I’m going to convert those to links and eventually also look inside the entities of the tweet object to get the original URL.
If you’re familiar with Twitter, then you know that each URL you add, is being converted to a shortlink using the t.co shortener. However, this is not being displayed in your tweets and in stead of that the original URL is displayed. To do this kind of stuff, we need to check if the URL we’re currently parsing has a match inside of the entities object. We can do that by using underscore.js:
var myUrl = _.find(tweet.entities.urls, function(urlObj) {
    return urlObj.url === url;
});
if (myUrl !== undefined && myUrl !== null) {
    tweetText = myUrl.display_url;
}
With _.find() I can find the entity that matches the current URL. If it exists, then I’m going to use that URL to put it inside tweetText which is going to be used as the visible text of the link.
The “linkify” part for mentions and hashtags is a bit easier. First I’m going to look for all hashtags by using a regular expression (/[#]+[A-Za-z0-9-_]+/g) and then I’m going to replace each hashtag by a link:
hash.link("http://twitter.com/search/%23" + txt);
Model, View, Controller
Even without explicitely talking about these concepts, Meteor allows you to easily divide your code into models, views and controllers. The easiest is the model (model/Tweets.js) which just contains our collection:
Tweets = new Meteor.Collection(null);
The null means that it’s not going to be persisted to the MongoDB database. So in stead of that this is just a plain in memory collection that we can use on the client.
The next part is the view (tweets.html), it looks quite spectacular, but it’s really not that hard:
<template name="tweets">
    <div class="ui piled feed segment">
        <h2 class="ui header">
            Recent Activity
            <div class="sub header">#JavaScript</div>
        </h2>
        {{#each tweets}}
            <div class="event">
                <div class="label">
                    {{#if retweeted_status}}
                        <i class="circular retweet icon"></i>
                    {{else}}
                        <a href="http://twitter.com/{{user.screen_name}}" title="{{user.name}}">
                            <img src="{{user.profile_image_url}}">
                        </a>
                    {{/if}}
                </div>
                <div class="content">
                    <div class="date">{{moments created_at}}</div>
                    <div class="summary">
                        {{#if retweeted_status}}
                            <a href="http://twitter.com/{{user.screen_name}}">{{user.name}}</a> retweeted
                        {{else}}
                            {{{linkify this}}}
                        {{/if}}
                    </div>
                    {{#if retweeted_status}}
                        <div class="extra text">
                            {{{linkify retweeted_status}}}
                        </div>
                    {{else}}
                        {{#if entities.media}}
                            <div class="extra images">
                                {{#each entities.media}}
                                    {{#if isPhoto}}
                                        <a href="{{expanded_url}}"><img src="{{media_url}}" /></a>
                                    {{/if}}
                                {{/each}}
                            </div>
                        {{/if}}
                    {{/if}}
                </div>
            </div>
        {{/each}}
    </div>
</template>
So what happens here is that I’m going to write a template first, for example:
<template name="tweets">
    <div class="ui piled feed segment">
        <h2 class="ui header">
            Recent Activity
            <div class="sub header">#JavaScript</div>
        </h2>
    </div>
</template>
Then I’m going to loop through each tweet in the Tweet collection:
{{#each tweets}}
    <div class="event">
        <div class="label">

        </div>
        <div class="content">

        </div>
    </div>
{{/each}}
The next part is the image. For each tweet I’m going to show the profile image. However, if it’s a retweet, then I’m going to show you the retweet symbol in stead, for example:
<div class="label">
    {{#if retweeted_status}}
        <i class="circular retweet icon"></i>
    {{else}}
        <a href="http://twitter.com/{{user.screen_name}}" title="{{user.name}}">
            <img src="{{user.profile_image_url}}">
        </a>
    {{/if}}
</div>
So as you can see we wrote a simple if/else structure based upon the retweeted_status field. If this field is defined, then it means it’s a retweet.
The next part is the tweet itself. In this part I’m going to show you the magic of Handlebars helpers:
<div class="date">{{moments created_at}}</div>
<div class="summary">
    {{#if retweeted_status}}
        <a href="http://twitter.com/{{user.screen_name}}">{{user.name}}</a> retweeted
    {{else}}
        {{{linkify this}}}
    {{/if}}
</div>
The first thing I’m going to do is format my date using the moments helper which I wrote earlier. Then I’m going to show the tweet contents (using the linkify helper) unless it’s a retweet. If it’s a retweet then I’m going to show you who retweeted.
Obviously, when we have a retweet we also want to show you the retweeted contents. We can do that by using the retweeted_status field and use the linkify helper to format it.
{{#if retweeted_status}}
    <div class="extra text">
        {{{linkify retweeted_status}}}
    </div>
{{else}}

{{/if}}
Finally I also want to show you the images that are inside the tweet if there is any. The entities object of a tweet allows us to retrieve various meta information about the tweet like the URLs, mentions, hashtags and also the media that’s used inside the tweet. In this case I’m going to loop through the media and if it’s a photo I’m going to show it to the user:
{#if entities.media}}
    <div class="extra images">
        {{#each entities.media}}
            {{#if isPhoto}}
                <a href="{{expanded_url}}"><img src="{{media_url}}" /></a>
            {{/if}}
        {{/each}}
    </div>
{{/if}}
And with this piece we actually wrote the entire view, now it’s time for the controller (app/controllers/tweets.js. The controller is quite easy. The first thing it does is listen to the Meteor stream and add each tweet to a local collection (model):
TweetStream = new Meteor.Stream('tweets');

TweetStream.on('tweet', function(tweet) {
    tweet.created_at = moment(tweet.created_at).toDate();
    console.log(tweet);
    Tweets.insert(tweet);
});
As you can see I’m also converting the created_at field to a date. This makes it much easier to sort. In our template we are using the {{#each tweets}} to loop through all tweets. Obviously we first have to specify what’s inside tweets by using the following code:
Template.tweets.tweets = function() {
    return Tweets.find({}, {
        sort: {
            'created_at': -1
        }
    });
};
What this does is that it uses the Tweets collection and sorts all entries/tweets based upon the creation date. The code Template.tweets.tweets means that we’re filling a property called tweets (2) inside the tweets template (1).
Another thing we did in our template is checking if the media is a photo by using {{#if isPhoto}}. We have to write that piece of code as well:
Template.tweets.isPhoto = function() {
    return this.type === "photo";
};
Automatically the current media is sent with it, because we’re using it inside a {{#each}} loop. So the only thing we have to check is if the type field equals to photo.
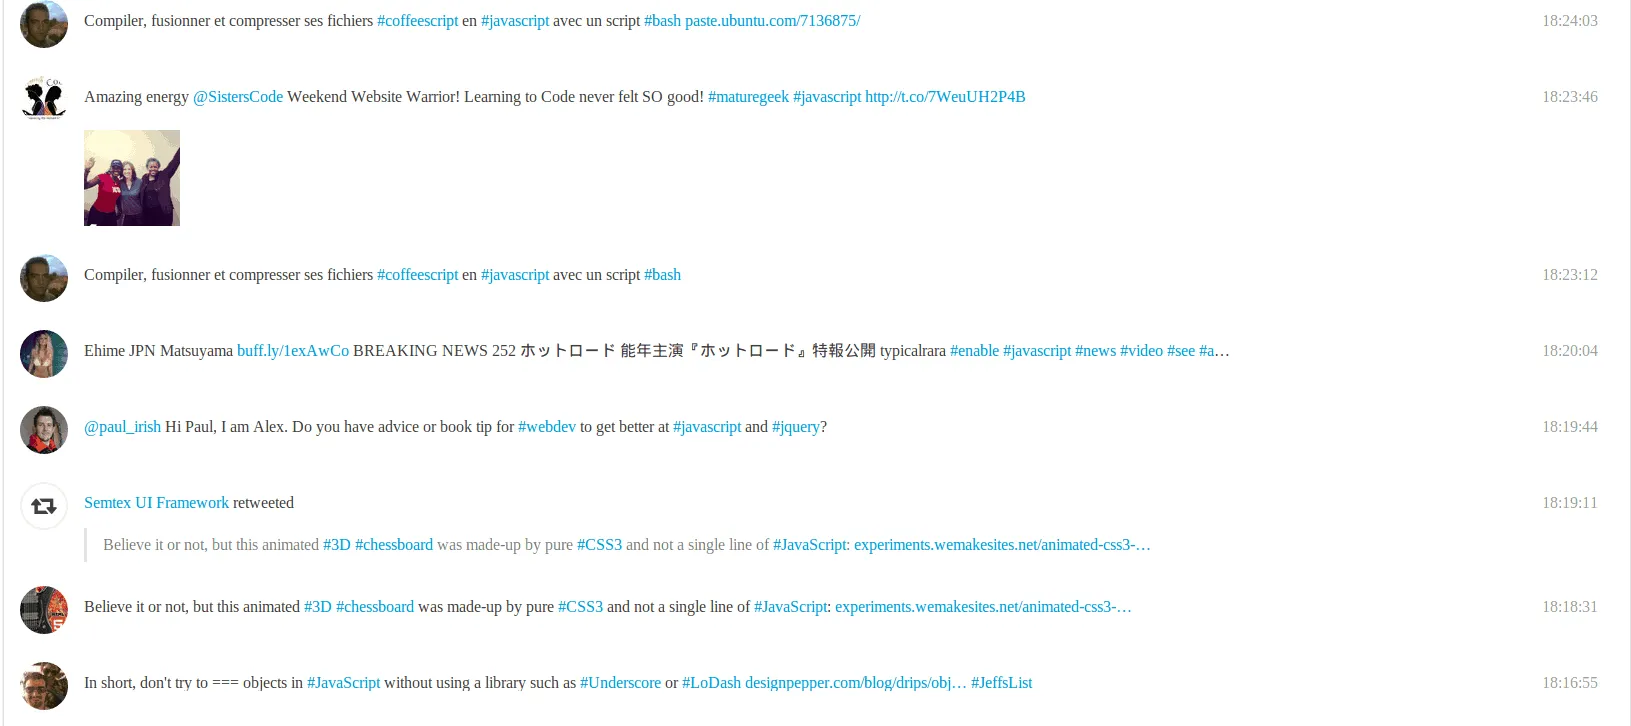
Demo
So now we made an awesome application in just 50 lines of HTML code and 70 lines of JavaScript code. It’s well structured, with a sweet user interface.
If you open your browser now and go to http://localhost:3000 you will see our application in its full glory.
You can also find the demo online on meteor.com. Deployment to a subdomain of meteor.com is free and can be really great to collaborate and test how cool Meteor actually is.
Achievement: Tutorial finished
This ends our tutorial about using the Twitter streaming API in Meteor. If you’re interested in the full code example, you can find it on GitHub. If you want to try out the code yourself, you can download an archive from Github.