
Vue.js gained quite some popularity over the past few years. As a JavaScript framework, it positions itself next to React, Angular and a few other libraries to provide a component-based application structure. In this example, I’ll create a Q&A application… with Vue!

What is Vue
Vue is a framework designed to provide structure to a JavaScript application by introducing components. It’s similar to Angular as you’ll use template-based bindings (in contrary to React, which uses JSX), and many features will come out of the box, such as routing, state management, … . Vue is progressive, since it allows you to use it in certain parts of your application, without having to adopt Vue into your entire application. Additionally to being progressive, it’s also reactive, which means that it’ll change the rendered HTML as soon as the data changes, to do this, Vue uses a virtual DOM to see what impact certain changes have, which makes it more performant than immediately updating the rendered DOM.
Getting started
The easiest way to get started with Vue is by using the Vue CLI. To install the CLI, you just need to use npm:
npm install -g @vue/cli
This will install v3.x of the CLI, which is currently in beta. Also note that you need to have at least v8.x installed of Node.js in order to work with the new CLI. Alternatively you could install v2.x of the CLI, but in the newest version, things were simplified.
Now, to set up a project, all you need to do is to use the following command:
vue create my-project-name
The CLI will ask you which settings to apply, which could be either the default (using Babel + ESLint + Webpack) or a custom choice.
I’ll also install AT UI, a UI kit for Vue.js applications:
npm install -s at-ui at-ui-style
The next step is to load the components by importing it and using Vue.use(). This can be done by pasting the following code in src/main.js:
import AtUI from 'at-ui';
import 'at-ui-style';

Vue.use(AtUI);
Make sure to do this before bootstrapping your Vue application.
To see if it worked, you can add a simple button to App.vue:
<template>
  <div id="app">
    <div class="container">
      <at-button type="primary">Test</at-button>
    </div>
  </div>
</template>
If you run the application now, you should see a blue button appear. This can be done by running the following command:
npm run serve
Creating your own components
In this tutorial, we’re going to set up a few components so we can use them in the future. First of all, let’s create a header for our application. I’m going to call this component src/components/core/SiteHeader.vue:
<template>
  <at-menu mode="horizontal" active-name="questions">
    <at-menu-item name="questions"><i class="icon icon-home"></i> Questions</at-menu-item>
    <at-menu-item name="users"><i class="icon icon-users"></i> Users</at-menu-item>
  </at-menu>
</template>

<script>
  export default {

  }
</script>

<style scoped>

</style>
A Vue component contains three parts, a template (which is the HTML that should be rendered), a script, containing the logic for each component and the style for each component. You can use CSS in here, but also a CSS preprocessor like Sass. If you would like to use Sass, you do have to install two other node modules though (being sass-loader and node-sass). You also have to add the lang="scss" attribute to the <style> element.
In this case, I’m going to keep the component quite simple, routing will be for another time, so the component will only have a template… for now.
Using components within other components
Now that we have our site header component, it’s time to include it within the App component. The first step to do this is to import the component:
import SiteHeader from '@/components/core/SiteHeader';
The next thing is to register it within the App component itself, to do this you have to use the components section:
export default {
  components: {SiteHeader}
}
Now that we did this, we can add the header into the template by using the <SiteHeader> tag:
<template>
  <div id="app">
    <div class="container">
      <SiteHeader></SiteHeader>
      <div class="inner-container">
        <h1 class="page-title">Questions</h1>
      </div>
    </div>
  </div>
</template>
I also added a bit CSS to the app component to add some spacing:
.inner-container {
  padding: 1em 0;
}

.page-title {
  font-weight: 300;
  font-size: 2em;
}
Working with data
When we’ll start with routing (probably in the next tutorial), it’s important to keep each page on a separate component. In my example, the most important page will be a page containing all questions, so I’ll name it src/components/questions/QuestionsPage.vue.
This component will mostly contain references to other components and propagate the data to them. So first, let’s create a dummy src/components/questions/QuestionList.vue component and include it into the QuestionsPage component as we’ve seen before using the components section.
After that, we can create some dummy data by using the data section:
import QuestionList from './QuestionList';

export default {
  components: {QuestionList},
  data () {
    return {
      questions:  [{
        "_id": "5aeb5c6d9be6ec471bcdff30",
        "title": "How do I create a question?",
        "firstPost": {
          "_id": "5aeb5c6d9be6ec471bcdff31",
          "voteCount": 0,
          "createdAt": "Thu Apr 20 2018 21:01:01 GMT+0200 (CEST)"
        }
      }, {
        "_id": "5aebefb06287f50673c1a308",
        "title": "How do we create answers?",
        "firstPost": {
          "_id": "5aebefb06287f50673c1a309",
          "voteCount": 0,
          "createdAt": "Fri May 04 2018 07:29:20 GMT+0200 (CEST)"
        }
      }]
    };
  }
}
This data will eventually come from the GraphQL API I wrote before. But for now, we’ll just use a dummy result.
Passing properties to other components
Now, we just created a QuestionList component, but our data is within the QuestionsPage component… so how do we pass it? To pass properties, you can use the props section, and define each property and configure the type and tell if its required or not:
export default {
  props: {
    questions: {
      required: true,
      type: Array
    }
  }
}
The next step is to loop over the questions and to show the details of it. To do this, I’m going to create a new component called src/components/questions/QuestionListItem.vue. This component will also require a property, but in this case it will be a single question:
export default {
  props: {
    question: {
      required: true,
      type: Object
    }
  }
}
Within the QuestionsPage component, we can now pass the questions by using the following template:
<template>
  <QuestionList :questions="questions"></QuestionList>
</template>
Buy using the :questions=questions property, we assign the data within this component, to the questions property of the QuestionList component.
Working with computed properties
Within the QuestionListItem component, I want to be able to show a “new question” tag if the question has been posted less than a week ago.
To do this, I want to create a property called isNew that will be automatically calculated based on the question.firstPost.createdAt property.
To make this work, I’m going to use a library called Moment.js, so I’ll have to install it first:
npm install --save moment
After that, I can import it and use it:
import moment from 'moment';

export default {
  computed: {
    isNew () {
      return moment(this.question.firstPost.createdAt).isAfter(moment().subtract(1, 'week'));
    }
  },
  props: {
    question: {
      required: true,
      type: Object
    }
  }
}
Now that we have our question and the isNew property, we can write our template:
<template>
  <div class="card-wrapper">
    <at-card>
      <div class="row">
        <div class="col-2">
          {{question.firstPost.voteCount}}
        </div>
        <div class="col-10">
          {{question.title}}<br />
          <at-tag v-if="isNew" color="primary">New question</at-tag>
        </div>
      </div>
    </at-card>
  </div>
</template>
Working with arrays
Back in our QuestionList component, we still have to use QuestionListItem somehow. To do this, we can use the v-for directive to create a QuestionListItem component for each question in the array:
<template>
  <div>
    <QuestionListItem :question="question" v-for="question in questions" :key="question._id"></QuestionListItem>
  </div>
</template>
What happens here is that with the v-for directive, the component is repeated for each question, which we can then pass to the right property by using :question="question", similar like what we did within the QuestionsPage component.
Testing it out
If we add the QuestionsPage component to the App component properly like we did before, you should be able to see the result. The application should look like this:
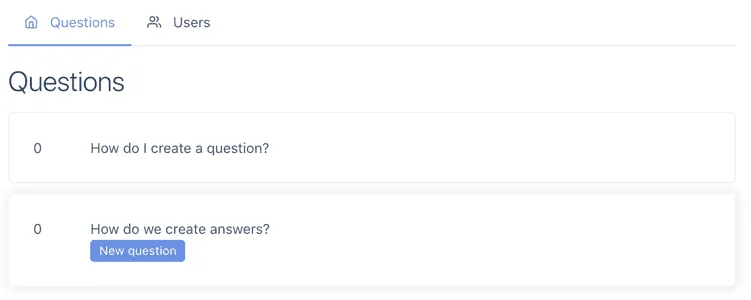
Depending on the createdAt date, you’ll see a “New question” tag next to the question or not. The code can, as usual be found on GitHub.