
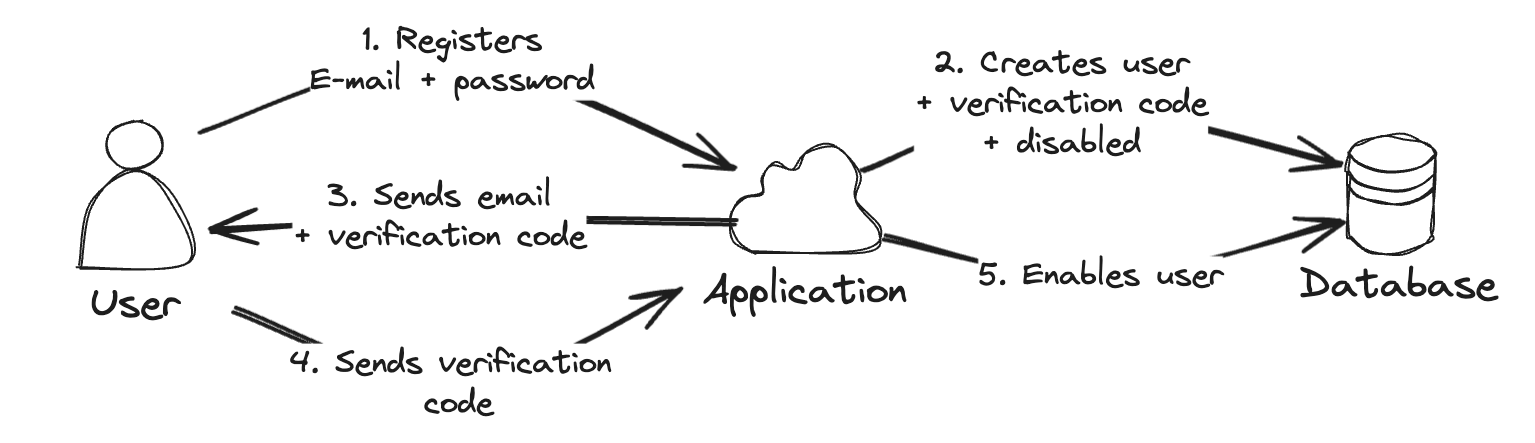
When registering a new user with an e-mail address, you usually want to verify that the e-mail address of the user is legitimate. The easiest way to do so, is by sending them a mail with a unique link that they have to click in order to fully register.
Project setup
In order to implement this feature, we need a few dependencies:
- spring-boot-starter-web: Required for developing a web application.
- spring-boot-starter-security: Used for applying authentication.
- spring-boot-starter-data-jpa: Used for persisting user information.
- spring-boot-starter-thymeleaf: Used for generating the e-mail content based on a template.
- spring-boot-starter-mail: Used for sending an e-mail.
- commons-lang3: Used for generating a random verification code.
If you’re using Maven, you can add the following dependencies:
<dependency>
    <groupId>org.springframework.boot</groupId>
    <artifactId>spring-boot-starter-security</artifactId>
</dependency>
<dependency>
    <groupId>org.springframework.boot</groupId>
    <artifactId>spring-boot-starter-web</artifactId>
</dependency>
<dependency>
    <groupId>org.springframework.boot</groupId>
    <artifactId>spring-boot-starter-data-jpa</artifactId>
</dependency>
<dependency>
    <groupId>org.springframework.boot</groupId>
    <artifactId>spring-boot-starter-thymeleaf</artifactId>
</dependency>
<dependency>
    <groupId>org.springframework.boot</groupId>
    <artifactId>spring-boot-starter-mail</artifactId>
</dependency>
<dependency>
    <groupId>org.apache.commons</groupId>
    <artifactId>commons-lang3</artifactId>
</dependency>
Setting up Spring Security
Before we can implement the registration part, we first need to configure Spring Security.
One way to implement this is by using a login mechanism like basic authentication or a form login in addition to a PasswordEncoder.
For example:
@Bean
public PasswordEncoder passwordEncoder() {
    return new BCryptPasswordEncoder();
}

@Bean
public SecurityFilterChain securityFilterChain(HttpSecurity http) throws Exception {
    return http
        .authorizeHttpRequests(customizer -> customizer
            .requestMatchers(HttpMethod.POST, "/api/user").anonymous()
            .requestMatchers(HttpMethod.POST, "/api/user/verify").anonymous()
            .anyRequest().authenticated())
        .httpBasic(withDefaults())
        .sessionManagement(withDefaults())
        .build();
}
With this configuration, we’re requiring authentication for all endpoints except two:
- POST /api/user: This will be the endpoint to create a new user from.
- POST /api/user/verify: This endpoint will be used to verify a user their e-mail address.
The final part to configure Spring Security is to create a UserDetailsService:
@Service
@RequiredArgsConstructor
class SecurityUserDetailsService implements UserDetailsService {
    private final UserEntityRepository repository;

    @Override
    public UserDetails loadUserByUsername(String email) throws UsernameNotFoundException {
        return repository
            .findByEmail(email)
            .map(entity -> User
                .builder()
                .username(entity.getEmail())
                .password(entity.getPassword())
                .enabled(entity.isEnabled())
                .build())
            .orElseThrow(() -> new UsernameNotFoundException("No user found for the given e-mail address"));
    }
}
Within this UserDetailsService we have to implement a single method called loadUserByUsername().
This method expects us to return an object of type UserDetails, which has several fields, including:
- The username,
- The hashed password,
- An indication of whether the account is enabled,
- An indication of whether the account is expired,
- An indication of whether the account is locked,
- An indication of whether the credentials of the account are expired.
The way Spring Security will invoke this is by doing the following:
- First it will hash the password that was used during login.
- Then it will retrieve the
UserDetailsfrom theUserDetailsServiceusing the given username. - After that, it will match the given hashed password with the one within the
UserDetails. - Finally, it will also check whether the
UserDetailsis enabled, non-expired, non-locked etc.

In our example, we will use three of those fields, being the username (which will be our e-mail address), the password and the enabled flag, which we’ll toggle as soon as the user verifies their e-mail address.
Since UserDetails is an interface, we need to create our own class, or use Spring’s User class.
The registration process
Now that the authentication process is ready, we can move to the registration part. The first part is to store the user their information inside the database:
@RestController
@RequestMapping("/api/user")
@RequiredArgConstructor
class UserController {
    private final PasswordEncoder passwordEncoder;

    @PostMapping
    @Transactional
    public void register(RegisterRequestDTO request) {
        UserEntity entity = repository.save(UserEntity.builder()
            .email(request.email())
            .password(passwordEncoder.encode(request.password()))
            .build());
    }
}
Normally we do this by saving the e-mail together with the hashed password inside a database.
Important is that the password should be hashed with the same PasswordEncoder that’s being used with Spring Security.
To enable the e-mail verification, we will add two things:
- We will add an
enabledflag to our user entity and initially disable the user. - We will add a
verificationCodefield to our entity and generate a random string with Apache Commons.
The result would be something like this:
UserEntity entity = repository.save(UserEntity.builder()
    .email(request.email())
    .password(passwordEncoder.encode(request.password()))
    .enabled(false) // Add this
    .verificationCode(RandomStringUtils.randomAlphanumeric(32)) // Add this
    .build());
Sending the e-mail
The next part of our registration process is to send the e-mail to the user. To do this, we first need to configure our SMTP server. This configuration depends on your SMTP provider, but in my case I will be using MailHog Docker container for development purposes:
spring.mail.host=localhost
spring.mail.port=1025
In addition, I will also set up a Thymeleaf template for our e-mail inside src/main/resources/templates/user-verify.html:
<!DOCTYPE html>
<html xmlns:th="http://www.thymeleaf.org" lang="en">
<body>
<p>Welcome to MyApp XYZ!</p>
<p>Before you can use the application, you first need to verify your account by clicking the following link:</p>
<p><a th:href="${applicationUrl}" th:text="${applicationUrl}"></a></p>
</body>
</html>
This template is rather simple, and contains a single applicationUrl variable.
To generate the e-mail, we will create a new class and autowire JavaMailSender and SpringTemplateEngine into it:
@Service
@RequiredArgConstructor
class UserMailService {
    private final JavaMailSender mailSender;
    private final SpringTemplateEngine templateEngine;
}
The JavaMailSender is automatically created as soon as we provide the right properties, and is a wrapper around the Jakarta Mail specification.
SpringTemplateEngine on the other hand is Thymeleaf’s templating engine with certain Spring features enabled.
Within this class, we first need to write a method to render the HTML with Thymeleaf:
private String getVerificationMailContent(UserEntity entity) {
    Context context = new Context();
    String verificationUrl = String.format("http://localhost:8080/verify?code=%s", entity.getVerificationCode());
    context.setVariable("applicationUrl", verificationUrl);
    return templateEngine.process("user-verify", context);
}
In this method, I’m using String.format() to add the generated verification code to a URL.
For this demo I’m using a hardcoded URL, but in reality you probably want to put this in a separate property.
After that, I’m passing the URL as the applicationUrl variable so that the template can be rendered.
Another method we’ll need is to create the e-mail itself.
I will use a MimeMessage here:
private MimeMessage createMessage(UserEntity entity, String content) throws MessagingException {
    MimeMessage mimeMessage = mailSender.createMimeMessage();
    MimeMessageHelper message = new MimeMessageHelper(mimeMessage);
    message.setText(content, true);
    message.setSubject("Welcome to MyApp XYZ");
    message.setFrom("noreply@myapp.xyz");
    message.setTo(entity.getEmail());
    return mimeMessage;
}
And then finally, we’ll create a method to put it all together and send the e-mail:
public void sendVerificationMail(UserEntity entity) {
    String content = getVerificationMailContent(entity);
    try {
        mailSender.send(createMessage(entity, content));
    } catch (MessagingException ex) {
        throw new UserMailFailedException("Could not send e-mail to verify user with e-mail '" + entity.getEmail() + "'", ex);
    }
}
Now we have to change our controller so that it calls the sendVerificationMail() method we just wrote:
@PostMapping
@Transactional
public void register(RegisterRequestDTO request) {
    UserEntity entity = repository.save(UserEntity.builder()
        .email(request.email())
        .password(passwordEncoder.encode(request.password()))
        .enabled(false)
        .verificationCode(RandomStringUtils.randomAlphanumeric(32))
        .build());
    userMailService.sendVerificationMail(entity); // Add this
}
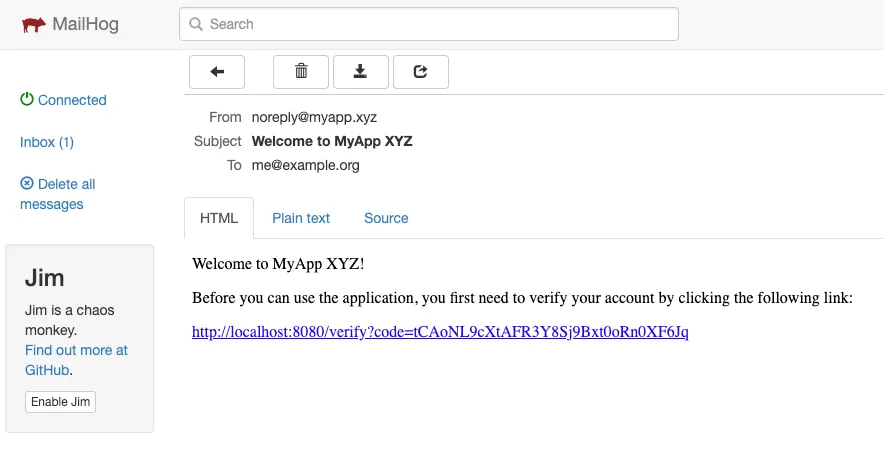
If we now register a new user, we’ll get an e-mail that looks like this:
Verifying the user
The final step we have to take is to write an endpoint to verify the user. To do this, I added the following controller method:
@PostMapping("/verify")
@Transactional
public void verify(@RequestParam String code) {
    // TODO: implement
}
To implement this, we first need to retrieve the user by their verification code, and then enable the user:
UserEntity entity = repository.findByVerificationCode(code).orElseThrow();
entity.setEnabled(true);
entity.setVerificationCode(null);
And that’s basically it. Now you can write a verification landing page within your application to call this endpoint.