
Handling authentication and authorization with Angular
- March 27th, 2018
- 6 minute read
- Angular Angular CLI ngrx
When writing an application, eventually you may have to secure it. In this article I’ll go over the various things you can do with Angular to handle the authentication of your application.
ngrx
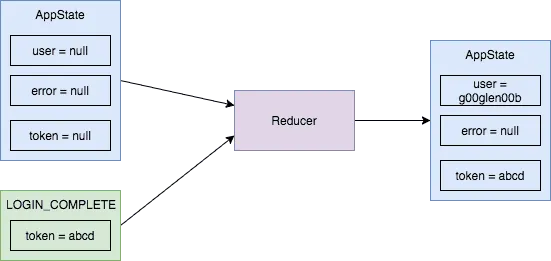
As mentioned in my last article, the authentication state is application-wide, and is easier to manage when you use a library as @ngrx/store. This allows you to publish your state to all subscribers. Be sure to read this article before starting with this one.
Showing/hiding elements
If you want to show elements depending on a user being logged in or not, you can create your own directive to hide the element. First of all, you need to create a directive:
ng g directive auth/is-authenticated
After that, you’ll have to inject the following dependencies:
- A reference to the template, which is
TemplateRef - A reference to the container holding the element, such as
ViewContainerRef - The ngrx
Store, to subscribe to changes happening to the authentication
constructor(private templateRef: TemplateRef<an>>, private viewContainer: ViewContainerRef, private _store: Store<AppState>) {
}
The next step is to create a function that will either create an element if the user is logged in, or clear the elements within the container if the user is logged out:
renderElementOnAuthenticated(auth: Authentication) {
  if (auth.token != null) {
    this.viewContainer.createEmbeddedView(this.templateRef);
  } else {
    this.viewContainer.clear();
  }
}
In my case, a auth.token will only be available when the user is logged in, so that’s why I check upon that.
After that, you have to use the OnInit hook to subscribe to the store and to link it to the function we just wrote:
ngOnInit(): void {
  this.subscription = this._store
    .select(state => state.auth)
    .subscribe(auth => this.renderElementOnAuthenticated(auth));
  }
Also, note that I’m storing the subscription in a separate field called this.subscription. This is necessary to prevent memory leaks from happening due to subscriptions staying open, even after a component or a directive has been destroyed. The final step is to actually unsubscribe when you’re destroying the directive, by implementing OnDestroy and adding the following lifecycle hook:
ngOnDestroy(): void {
  this.subscription.unsubscribe();
}
Now you can use the directive everywhere, such as:
<clr-dropdown clrMenuPosition="bottom-right" *appIsAuthenticated="">
  <button class="nav-icon" clrDropdownToggle>
    <clr-icon shape="user"></clr-icon>
    <clr-icon shape="caret down"></clr-icon>
  </button>
  <div class="dropdown-menu">
    <span class="dropdown-item disabled">Welcome {{profile?.username}}</span>
    <div class="dropdown-divider"></div>
    <a href="" clrDropdownItem [routerLink]="['/profile/edit']" [routerLinkActive]="['active']">Edit profile</a>
    <a href="" clrDropdownItem (click)="logout($event)">Log out</a>
  </div>
</clr-dropdown>
The code example above uses the *appIsAuthenticated directive to hide the entire dropdown if the user is not logged in. The * clarifies that the directive is a structural directive and alters the DOM.
Guarding routes
Another thing you can do is to make routes unavailable if a user shouldn’t have access to them. This can be useful to shield routes that should be inaccessible when the user is not logged in, or when he doesn’t have enough permissions, such as an admin page.
A guard isn’t that difficult, the first thing you need to do is to implement CanActivate:
@Injectable()
export class AuthenticatedGuard implements CanActivate {

}
After that, you need to implement the canActivate() function:
canActivate(): boolean {
  return this.authenticated;
}
In my case, I used a field called authenticated that will be either true or false depending on if the token is present in the authenticatio object, just like we did in the directive before:
authenticated: boolean = false;

constructor(private _store: Store<AppState>) {
  this._store
    .select(state => state.auth)
    .subscribe(authentication => this.authenticated = authentication.token != null);
}
That’s all you need to implement a route guard. Now that we’ve written the guard, you can add it to your route configuration:
const routes: Routes = [
  {path: 'articles', component: ArticlesComponent},
  {path: 'articles/new', component: NewArticleComponent, canActivate: [AuthenticatedGuard]},
  {path: 'articles/:slug/edit', component: EditArticleComponent, canActivate: [AuthenticatedGuard]},
  {path: 'articles/:slug', component: ArticleDetailComponent}
];
As you can see in the example above, the ArticlesComponent and the ArticleDetailComponent are accessible to everyone, but creating a new article or editing an article depends on the user being authenticated, so we used the canActivate property of the route to add our guard.
Intercepting HTTP calls
We’ve been using the token a lot now to check if a user is authenticated. But we actually need to send the token with each request as well. Otherwise the REST API would complain that the user is authenticated. Obviously you could add the token to every HTTP call you make. But most of the time it’s easier to automagically add the correct headers to the request. This is where writing a HTTP interceptor becomes interesting. Be aware, we’re using the new HttpClient API here, so this example only works for Angular 4 and beyond.
First of all, we need a new class, for example:
ng g class auth/auth-http-interceptor
The next step is to make your new class to implement the HttpInterceptor interface:
@Injectable()
export class AuthHttpInterceptor implements HttpInterceptor {

}
By implementing this method, you also need to implement the intercept function:
intercept(req: HttpRequest<any>, next: HttpHandler): Observable<HttpEvent<any>> {
  const authReq = req.clone({ headers: req.headers.set('X-Token', this.token) });
  return next.handle(authReq);
}
This function pass two parameters, the first one being the original HttpRequest and the second one being the HttpHandler, which basically is used to chain interceptors.
The implementation clones the request, and adds a new header, in my case being X-Token passing the actual token. But this could be anything. If your application uses basic authentication, you probably want to add something like this in stead:
const authReq = req.clone({ headers: req.headers.set('Authorization', `Basic ${btoa('${this.username}:${this.password}')}`) });
Next to this, we also have to set either the this.token field or the this.username and this.password fields. To do that, we rely on ngrx once more. (Did I already mention that you should really check out my article about ngrx?)
token: String;

constructor(private _store: Store<AppState>) {
  this._store
    .select(state => state.auth)
    .subscribe(authentication => this.token = authentication.token);
}
Now that we defined the interceptor, it’s time to actually add it to the providers. To do this, you can open the AppModule and add the following to the providers array in the @NgModule decorator:
providers: [{ provide: HTTP_INTERCEPTORS, useClass: AuthHttpInterceptor, multi: true}]
Make sure to import HTTP_INTERCEPTORS from @angular/common/http:
import {HTTP_INTERCEPTORS} from '@angular/common/http';
Conclusion
There are many things that can be done when using Angular. In this article I checked the route guards, directives and the HTTP interceptors. If there’s anything else you might come up with, make sure to mention it in the comments!
Achievement: Next level Angular applications
If you’re seeing this, then it means you successfully managed to make it through this tutorial.